Introduction
The CURSOR-CRM architecture gives rise to various security-relevant aspects:
-
Transaction data is protected on a database server and can generally only be accessed via the application server. Only a database administrator (with the relevant database passwords) would be able to access the data via an SQL editor.
-
The same applies for the application documents integrated in the application (e.g. single letter documents), which means that here too, the document files cannot be accessed via network activations. Instead, they can only be accessed in he context of the application and therefore in line with the implemented rights concept.
-
Client access to the central application server can be configured restrictively via a firewall. The port that must be enabled for the application server are agreed within the scope of standard installation tasks.
-
Data transfer within an internal network is encrypted using SSL certificates. SSL certificates are not just available for mails or macros, but specifically also for application servers and web servers, which allows an encryption of the data transfer within the CRM application environment.
-
For an external access (e.g. via a terminal server) an option exists via e.g. VPN to tunnel the data transfer online to protect it against non-authenticated users.
-
Authentication in the system is required to work with the CRM application. Passwords defined within the application are accepted only in line with configurable guidelines and are furthermore encrypted and stored in the database.
-
CURSOR-CRM has its own user administration with the option of assigning various system rights for individual user groups.
The access to datasets, fields and individual functions (e.g. creation, deletion, assignment of datasets) is governed by permissions in CURSOR-CRM. A user must have relevant assigned rights to read or edit datasets. With some exceptions (e.g. access to employee information, administrative functions), each user has generally universal permissions. You can limit these rights according to your specific requirements.
The permission with stronger limitation supersedes where dataset and field rights collide. Where a user is e.g. has no read permission for a particular field, he will not be shown its content even if he has read permission for the dataset in which the field is contained. Conversely, where the user has a "read only" permission for the dataset, he would only be permitted to read the filed content, even if he had an "edit" permission for this field.
Action rights allow the activation/deactivation of the buttons Create and Delete, as well as the link in the tree structure.
The following illustrations demonstrate how dataset and field access rights impact each other.

|
Dataset 1: |
Although the user has write permission for the dataset, this right is limited by the fields B and C. |
|---|---|
|
Dataset 2: |
The field permission limits the dataset right for Field C. The field right cannot expand the dataset right for field A, which means the user only has read access to field A. |
|
Dataset 3: |
The user will not see the dataset. |
Permissions are used not only for datasets and functions, but an be applied to searches and reports as well. Permissions are mapped by user groups and rights templates.
-
Employees are bundled in user groups
-
Groups are bundled in rights templates
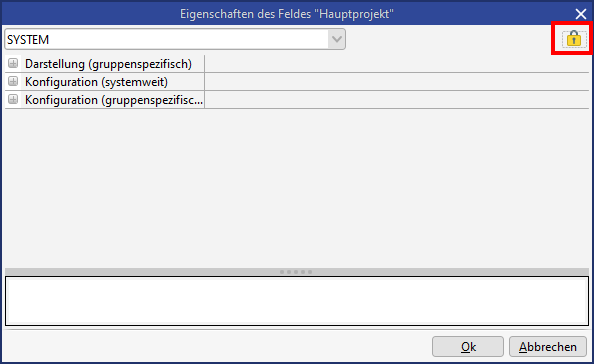
The SYS system right is a type that cannot be used by the customer. It is internal to the system and is used for the Additive Standard Rights feature.
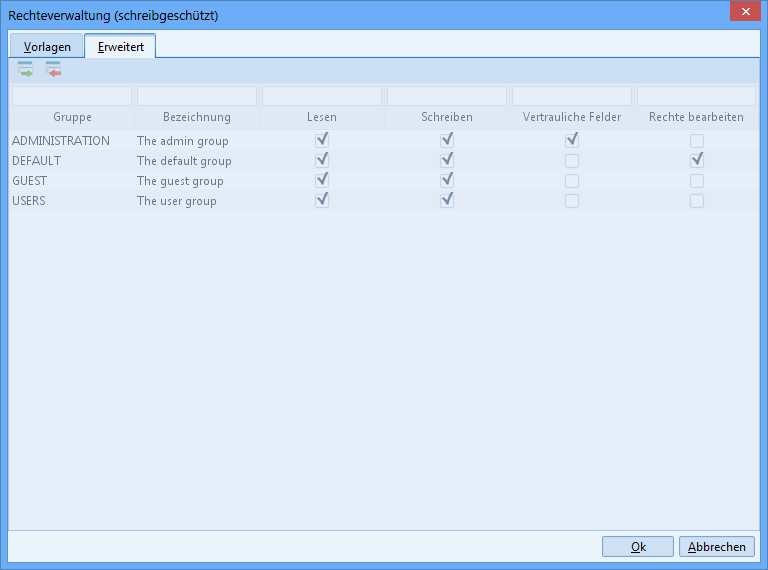
User groups
Permissions are assigned via user groups. Each user must therefore be assigned to at least one user group. You can create new user groups here: Administration / Group. Here you can also delete user groups or view the employees (in the tree structure) allocated to the individual user groups.
The following permission groups are provided as default groups in the standard delivery version of CURSOR-CRM/EVI:
|
Group name |
Rights |
Remark |
|---|---|---|
|
GUEST |
Read permission only for newly created datasets within entities affected by rights |
|
|
DEFAULT |
Like GUEST + right permissions |
|
|
USERS |
Rights are configured on a customer-specific basis |
|
|
ADMINISTRATION |
|
Has permissions for all tasks affected by rights in the delivery version |
There are 130 fields per right in the Bitright table, which means a total of 10080 possible rights groups. Valid values for the field Bitright.Groups are 0 to 10079.
Configuration groups
The behavior of system elements is controlled via configuration groups. They influence the layout of individual system elements for various user groups. Configuration groups are used in the administrative entities Mask configuration, Field Attributes, Masks and Searches. Each employee dataset is assigned to a configuration group at the time of creation, which is checked during app start-up and results in the loading of the stored configuration. The mask configuration is configured in such a way that specific entities, menu items or tabs in the sub pane are unavailable for a defined user group. A clear benefit of these options is that the overview of the relevant field of activity of each user group within the CRM system is improved.
The user groups are encapsulated in configuration groups.
Employee
A user group is allocated for each employee in the main mask "Employee" (tab 'Configuration'). It represents the main user group. Other user groups can be allocated to an employee via the tree structure.
When the employee creates a new dataset affected by rights, then this dataset is automatically assigned access rights. Unless stated otherwise in the field "Rights Template", the DefaultTemplate will be implemented. Add the desired template to the field "Rights Template" if you do not wish to apply the DefaultTemplate.
Make sure to assign rights templates to the employees that allow them to edit newly created datasets. Otherwise the employee will no longer be able to access a new dataset, once it was saved.
Rights
The following rights can be assigned to groups:
|
Edit rights |
Permits the assignment or withdrawal of rights. You cannot withdraw this right for your own user group. |
|---|---|
|
Write |
Permits the writing and editing of datasets. |
|
Read |
Grants read-only access. Is set automatically for 'Edit rights' and 'Write'. You cannot withdraw this right for your own user group. |
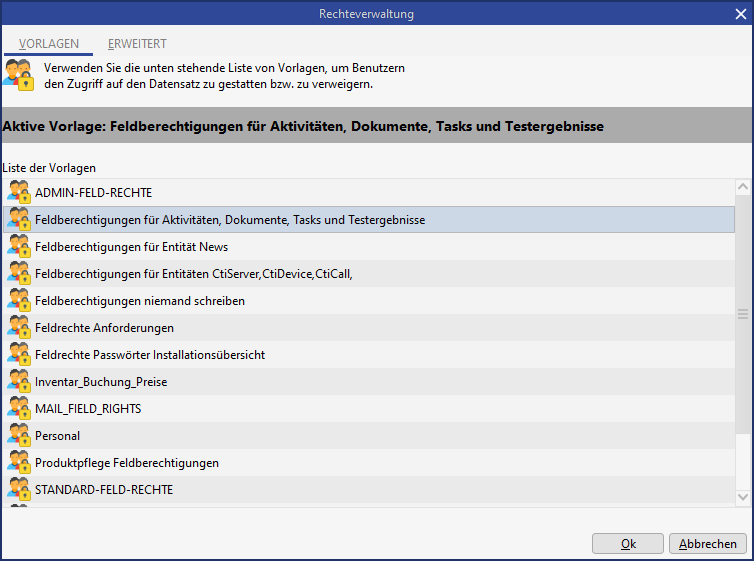
Rights templates
For easier handling, you should create rights templates in which the rights for the individual user groups are defined. Then you or the user won't have to change the configuration for each user group individually if you want to modify the access rights for a dataset or field. You will just have to select the right template. If none of the existing templates fit a specific purpose, then you can choose one that is closest to your requirements and adjust it accordingly. The use of rights templates simplifies the handling of entities affected by rights and improves the performance of the application.
Another advantage of the rights templates is the easier management in case of structural changes. Where rights templates were used consistently, the modification of permissions in the template will directly influence the rights of the relevant data.
You can only select templates for which you have the permission to Edit rights.
Hint
You should create a template for specific rights combinations that are needed frequently.
You can modify or add to the DefaultTemplate, but you must NOT delete it. The DefaultTemplate is used no other rights template (main mask "Employee") is specified for an employee to create datasets.

Creating a rights template:
-
In the main menu, select Administration / Rights templates
-
Click

New |
|---|
-
Enter a self-explanatory name for the template, which will later be displayed in the button menu and on the Templates page in the Rights manager entity. The Description can contain e.g. information about the assigned rights.
-
Decide, whether the right should be a Field Right (check mark) or a Dataset Right (no check mark).
-
Save the new dataset.
-
Click (button bar in the main mask).
|
|
|---|
-
Define the rights for each individual user group in the Rights manager.
Rights manager
In the Rights manager for a dataset or field you can read, which permissions are set for the selected template and what the settings are for the other rights templates. You can select another rights template or change the settings for a template of the dataset or field.
Example:
Set the rights in activities and documents on dataset level via the icon.
|
|
|---|

Field rights are configured via the field attributes.
The rights templates are listed in the tab 'Templates' and the template can be assigned to the current dataset or field. The current template is highlighted. The associated settings are displayed on the tab 'Advanced'.
The rights settings are displayed for the highlighted group. With the buttons

|
|---|
and

|
|---|
you can add or remove user groups to/from the template. Confirm your settings with OK and exit the Rights manager.

Read and write permissions, as well as manage rights can be assigned to individual groups via the Rights manager dialog. Manage and write permissions automatically set the read right. The last remaining manage right cannot be rescinded. CURSOR Software AG can set up the create, delete and link rights for data in CURSOR-CRM/EVI. Write access is permitted for all groups by default, provided they have field rights. The dataset rights limit the field rights and vice versa (the lesser right prevails).
Manual rights assignment
The rights configuration in the standard version is done via the rights dialog provided. The groups and their associated permissions are displayed in a table. The table illustrates various bits of information at a glance and allows the use of standard sorting and limiting functions (via the column filter).
A system setting can be introduced to configure which tab is displayed when the dialog is opened. This setting can be one of the following:
-
By rights configuration: The first or second tab will be displayed depending on the current rights configuration (template or group-based).
-
Templates: The Templates tab is always displayed.
-
Advanced: The Advanced tab is always displayed upon opening.
In the delivery version, this system setting is set to 'Extended' by default.
Rights changes
You can remove highlighted rows in the table via the button Remove group.
|
|
|---|
This will have the effect of withdrawing read rights from this particular group for the dataset. You can specify a dedicated rights assignment per group (or DOE) by setting a check mark for the relevant columns.
Unchangeable rights
Permissions must be configured that no standard user can remove:
-
All read
-
Tech. admin write
-
Dept. admin evaluate confidential fields
A special rights template is provided in the delivery version for that specific purpose. Any permissions configured via this rights template will always be additionally saved when manual changes are made to the permissions. The rights configured in the rights template at the time of saving apply, i.e. later changes to the special rights template will not be applied in retrospect and will only become valid when the template is saved again.
Users can change the permissions in the rights dialog completely, and specifically he can also remove the group All read. When the permissions are saved, the rights defined in the "Master template" will also be added. This ensures that a user cannot remove the permission All read.
This mechanism applies only if the user edits permissions on group level (tab Advanced in the rights dialog). If the user changes permissions by selecting a rights template (1st tab in the rights dialog), then this automatism explicitly does not apply, because rights templates can only be edited by administrators and these will consequently be responsible to ensure a correct configuration.
Adding permissions
Additional groups (or in the case of HelVIS DOEs) can be given rights for the current dataset via the button.
|
|
|---|
The workflow for adding permissions is as follows:
-
Clicking the button "Add"
-
A search dialog opens, where the user can look for the groups to be added. This search dialog is identical in operation and structure to any other search dialogs. The search can be carried out both by DOE number and by individual employees (e.g. by last name).
After the search has been triggered, the groups corresponding to the search criteria are displayed as a list.
Note:
The search dialog for groups opens with the default search for the entity Groups. -
The Merger dialog will open when a group is selected from the results list by double-clicking. The assignment browser displays all previously assigned groups on the right (including the group you have just selected). The remaining groups from the search results list are displayed on the left, unless these had previously been assigned the permission.
This dialog is another default element and is also used when adding a contact person to a task. -
Once the dialog is confirmed, the changes will then be displayed in the rights dialog, i.e. newly added groups will be included in the table view, while groups that were removed no longer appear in the list.
-
The changes are applied when the rights dialog is exited.
Newly added groups are given default permissions (e.g. read only, but not write). The configuration of these default rights is done by the administrator on database level. Since changes to these default permissions will happen only very rarely, this will be considered sufficient.
Summarized:
-
The changeover to a table view of the groups and their rights increases transparency and simplifies operation.
-
A HelVIS user can implement searches via their DOE descriptions or specific employees (names) when adding groups.
-
Re-using familiar elements (search dialog, Merger dialog) will minimize the time needed for system familiarization.
-
The assignment of default rights for newly added groups minimizes the scope of work.
Editing rights in list view
You have the following invocation options for the rights dialog from within list views:
-
Button in the main mask
-
Button in the toolbar of the sub area (e.g. activities in connection with a business partner)
-
In a sub area context menu
Rights can be assigned simultaneously for multiple datasets in a single step. This applies to rights assignments in the following entities:
-
Field rights in the entity "Field attributes" of the administrator console
-
Action rights in the menu ‘Administration/Configure permission submitted actions’
-
Dataset rights in the list view of the main mask or a sub area
The first tab of the dialog in which the available rights templates are listed is displayed by default when the rights dialog is invoked from within a list view. In contrast to accessing a rights dialog from within an individual dataset, for which the view automatically changes to the first tab (rights template is active) or the second tab (manual rights), depending on the currently configured rights for this dataset, the current rights configuration will not be apparent if multiple datasets are being edited.
The behavior described here applies only if at least two datasets were selected in the list view. The behavior will be the same as if the rights dialog is opened from within the detail view if only exactly one dataset was selected, i.e. the current dataset configuration will be displayed.
Once the dialog is open, the user can configure rights as usual by selecting a rights template or by explicitly assigning rights to individual groups (tab Advanced). When the dialog is closed by clicking Ok then the rights configuration created by the user will be applied to all datasets selected in the list view.
The availability of the button for the invocation of the rights dialog is configurable via an action right Rights dialog in list view to prevent "accidental" changes to multiple datasets in list view. The action right allows the specification on group level as to which users will be able to access this functionality. The drop-down menu of the button for the direct selection of a rights template will then be unavailable for the same reason. This should ensure that a user will always have to go via the rights dialog in list views to prevent accidental changes. Generally, the button will only be available (in detail or list view, as well as in the sub area) if the rights verification is activated for the relevantly displayed entity.
This action right is activated by default in the delivery version, i.e. the button for opening the rights dialog is available in list views (main mask list and sub area). This configuration can be changed by the administrator as needed.
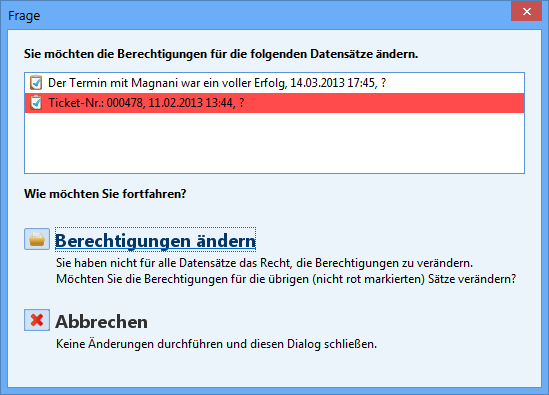
In case of a multiple selection in list view it may happen that the user does not have the necessary permissions for all selected datasets to change their rights. The user will be informed of that fact via a dialog. The dialog lists all datasets marked in the list view. The datasets for which the user has insufficient permissions will be highlighted in red. In that dialog, the user can select the option Change rights. The rights dialog will open and only those rights for those datasets, for which the user has the necessary manage rights will be changed (i.e. all datasets that are not highlighted in red). Selecting the option Cancel will close the dialog and no other action is taken.
Read-only view of the rights
Users must be able to display a read-only rights dialog to get an overview of currently assigned rights. The following changes to the default settings are required:
-
The button for opening the rights dialog must be always available if the rights verification for the relevant entity is enabled.
-
The rights dialog will open in read-only mode , i.e. the list detailing the currently assigned rights is read-only and the buttons for adding and removing rights groups is grayed out if the current user does not have permission to change the rights for the current dataset (Manage right).
A user with the relevant Manage right for the current dataset can make changes to the rights in the rights dialog as usual.
Field rights
Field rights can be configured via the context menu (right-click) for any field in any entity. The user must select the menu item Edit field attributes to do so. Via the button
|
Permissions |
|---|
the rights manager is opened. Alternatively, the setting can also be configured via the field attributes in the administrator console. Administrators are permitted to change field rights in the field attributes via the right Edit rights.
Field rights control the access to a field for user groups. Field rights can have a rights template assigned via the Rights manager (tab "Templates"). For these templates, the attribute "Field right" must be enabled. Alternatively, rights can be assigned directly to individual groups via the tab Advanced.
A field, for which the user does not have write permission will be grayed out, but the field content will be visible. A field, for which the user does not have read permission will be grayed out and the field will be displayed without content. In that case, no restriction can be done to the field via a search either.
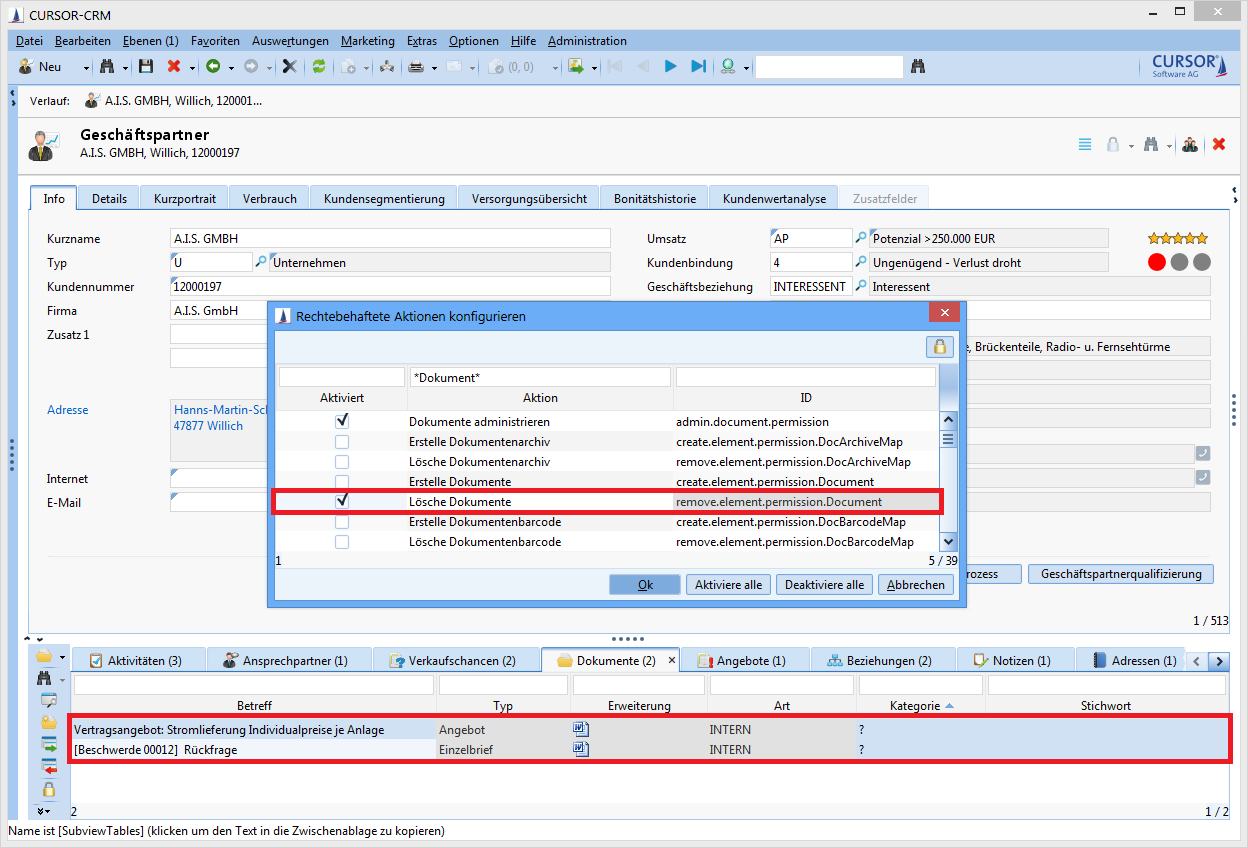
Action Rights
Action rights are another group of rights. They are verified exclusively on the client. Write permissions will be checked here.
|
Action |
ID |
Description |
|---|---|---|
|
Create <entity> |
create.element.permission.<entity> |
Controls the ability to create new elements. |
|
Delete <entity> |
remove.element.permission.<entity> |
Controls the ability to delete elements. |
|
Link <entity1> and <entity2> |
link.element.permission.<Name der Verknüpfung> |
Controls the ability to link elements. |
|
Edit selected table entries |
edit.selected.rows.permission |
Controls, whether the user can edit multiple datasets in the list via the menu item "Edit selected entries". |
|
Edit dataset rights |
manage.entry.rights |
Controls, whether the user can edit dataset rights. |
|
Edit dataset rights in list |
change.right.list.permission |
Controls, whether the rights of multiple datasets in the list can be changed. |
|
Display change history |
show.change.history.permission |
Controls, whether the user can display the field change history. |
|
Show active users |
show.active.users.permission |
Controls, whether the menu item "Active users" is displayed. |
|
Avoid creation of business partner with new person |
avoid.customer.creation.with.new.person.permission |
Controls, whether a business partner can be created with a new contact person. |
|
Administrate addition of deputies |
admin.adddeputy.permission |
Controls, whether the user can edit deputies for other users. |
|
Load all user searches |
admin.all.searches.permission |
Controls, whether the user can load all user searches in the search mask or search administration. |
|
Changing search result limit |
admin.search.topcountchange.permission |
Controls, whether the user can edit the number of results in the search mask. |
|
Maximum varying search result limit |
admin.search.topcount.permission |
Controls, which user is permitted to load more than 10,000 results if that is configured in the server (keyword: DEFAULT_MAX_ROW_NO) |
|
Administrate searches |
admin.search.permission |
Controls, whether the user is permitted to edit system searches. The visibility of the node "Search container management" is controlled via the administrator console. |
|
Administrate searches and reports (search mask) |
admin.search.report.permission |
Controls, whether the user is permitted to edit searches. |
|
Delete searches |
delete.search.permission |
Controls, whether the user is permitted to delete searches. |
|
Administrate SQL statement |
edit.dbfunction.permission |
Controls, whether the user is permitted to select the functions "SQL expression" and "SQL expression (Where-Part)" in searches. Existing searches with SQL expressions can always be executed. |
|
Start export of data |
data.export.permission |
Controls, whether the search results in the list can be exported to Excel. |
|
Start export of mass data |
massdata.export.permission |
Controls, whether the user is permitted to export mass data in the search mask. |
|
Administrate export of mass data |
admin.massdataExport.permission |
Controls the visibility of the item "Data exports" in the administration menu. |
|
XML import by directory monitoring |
client.xml.import.permission |
Controls, whether the XML import is permitted via directory monitoring in the Rich Client. (see configuration.bat -> XML_IMPORT_DIR) |
|
Configuring own desktop/interactive charts |
configure.own.desktop.permission |
Controls, whether the user is permitted to configure a user-specific desktop. |
|
Administrate desktop/interactive charts |
admin.desktop.permission |
Controls, whether the user is permitted to configure the system-wide desktop. |
|
Edit system configuration |
modify.system.configuration |
Controls, whether the user is permitted to change system configurations.
|
|
Doublet cleansing |
doublet.check.permission |
Controls, whether the menu item "Doublet cleansing" is displayed. |
|
Edit Merger dialog message texts |
rowmodelmerger.message.permission |
Controls, whether the user is permitted to edit message texts when linking elements. |
|
CURSOR-BPM |
bpmn.suite.persmission |
Controls, whether the user is permitted to open CURSOR-BPM. |
|
Open admin console |
open.admin.console.permission |
Controls, whether the user can open the administrator console. |
|
Administrate keys |
edit.keys.permission |
Controls, whether key maintenance will be displayed in the administrator console and whether keys and key ranges can be edited. |
|
Log in to all layers |
logonToEachLayer.permission |
Controls, which users are permitted to login to the CURSOR (C0) and partner layer (C1). |
|
Export/import customizing |
customizing.transport.permission |
Controls, whether the user is permitted to import/export customizing packages. |
|
Unlock customizing packages |
unlock.packages.permission |
Controls, which user group is permitted to unlock exported but not yet accepted customizing packages. |
|
Administrate modules |
admin.modules.persmission |
The visibility of the node "Module management" is controlled via the administrator console. |
|
Administrate configuration |
admin.configuration.permission |
Controls the visibility of the following entries in the administration menu:
The visibility of the following nodes is controlled via the administrator console:
|
|
Administrate customizing2 |
admin.customizing2.permission |
Controls the visibility of the following entities in the application:
The visibility of the following nodes is controlled via the administrator console:
|
|
Administrate scripts |
admin.script.permission |
Controls, whether the user is permitted to edit mask scripts. |
|
Delete old mask script history |
maskscript.history.remove.permission |
Controls, whether the administrator is permitted to delete obsolete entries in the mask script history. |
|
Administrate action box |
change.action.box.permission |
Controls, whether the user is permitted to configure the action box. |
|
Administrate invocation |
admin.invocation.permission |
Controls, whether the user is permitted to configure external invocations. |
|
Administrate mail configurations |
mail.configuration.permission |
Controls, whether the menu item "Mail configuration" is displayed. |
|
Administrate workflows |
admin.workflow.permission |
Controls, whether the user is permitted to edit workflows. |
|
Edit permission submitted actions |
update.rights.actions.permission |
Controls, whether the actions affected by rights can be displayed and changed. |
|
Administrate mask |
admin.mask.permission |
Controls the menu item "GUI Builder" in the administration menu The visibility of the following nodes is controlled via the administrator console:
|
|
Administrate documents |
admin.document.permission |
The visibility of the following nodes is controlled via the administrator console:
|
|
Administrate report |
admin.report.permission |
The visibility of the node "JasperReports" is controlled via the administrator console. |
|
Administrate migration |
admin.migration.permission |
This right is needed to upload patches. The visibility of the following nodes is controlled via the administrator console:
|
|
Administrate CTI |
csta.permission |
Controls, whether the menu item "CTI administration" is displayed. It controls the nodes "Telephony configuration" and "Telephony inbound dialog" in the administration console. |
|
Display dialog for SQL statements |
sql.statements.permission |
Controls, whether SQL statements for customizing packages can be edited. The visibility of the node "SQL statements" is controlled via the administrator console. |
|
Administrate web services |
web.services.permission |
Controls, whether web services can be displayed and edited in the administrator console. |
Practical example for illustration: Action right for data export
Administrative tasks can be managed via the menu item Administration / Configure permission submitted actions. This concept gives administrators a tool that allows them to equip other power users (e.g. department heads) with administrator rights, allowing them to manage these autonomously (within the scope of the assigned permissions). This allows the mapping of complex structures and permissions within the company.
There is e.g. a right for 'Data export' that controls, whether the user is permitted to transfer data to another application using the actions 'Entries to Excel' or ;Copy entries'. The actions are offered in the context menu of the list, in the menu of the search mask and in the toolbar of the sub data area. In the default version, every user has the right to copy data.

The right 'Data export' can be edited via Administration / Configure permission submitted actions. The menu items will not be displayed if the rights are rescinded for a user.

At the next login, these buttons will no longer be visible in the user's context menu.

Dataset rights
In order to configure the access rights for a dataset, it must be displayed in the main mask in form view or selected in the list view. To select a right template, expand the menu to the button
|
|
|---|
and select the desired template. Clicking the button will forward you to the Rights manager.
New creation of datasets
Only the main group of the logged in user will always have manager rights for the newly created dataset.
A selected rights template will have a check mark next to it in the button context menu. The page Templates is displayed when the Rights manager opens. None of the templates will be marked in the button context menu if the rights of that template were changed. You will be forwarded directly to the Advanced page when the Rights manager opens, where you can see the settings for the individual user groups.
Dataset rights activation
In the default delivery version of CURSOR-CRM, the entities Documents and Activities have active dataset rights. Where dataset rights are needed for other entities as well, these can be activated via the node Edit entity configuration in the administrator console.
The activation of rights for entities has far-reaching consequences for the existing rights concept. It may be that additional configuration of this functionality changes previous access rights and that not all fields (datasets) will be visible or editable for users. Where that is the case, you will need to consult with CURSOR Software AG.
Data export logging
Who has exported which results to Excel must be traceable. Access to this information must be available for specific user groups. The works council may, for example, want to know, who has exported what data to Excel. Once in Excel format, the relevant data could easily be used for other purposes.
Log function activation
The following steps are necessary to enable logging:
-
Activate the system parameter "Record table exports" in the "Integration" entity of the system settings.
-
Custom configuration of the log4j settings in the application server.
The identifier TableDataExport must be used as category. The associated appender can be rerouted into any file. This file can e.g. be saved in a directory, for which only th application server and selected user groups like the works council will have read or write access.
Server-side log method configuration
Where a JBoss application server is used, the custom configuration of the log4j settings will look as follows. On client side, the method logMessage(message, caller) to log information from a specific caller to a separate file in a separate folder can only be invoked via the UtilitiesController. The application server must be configured accordingly:
Example for JBoss 6.2
New entries in the JBoss file standalone-cursor.xml:
<!-- =============== -->
<!-- My log protocol -->
<!-- =============== -->
<size-rotating-file-handler name="EXCELEXPORT" autoflush="true">

    <encoding value="UTF-16"/>
    <formatter>
        <pattern-formatter pattern="%d %-5p [%c] %m%n"/>
    </formatter>
    <file relative-to="jboss.server.log.dir" path="/MyDir/Export.log"/>
    <rotate-size value="20m"/>
    <max-backup-index value="10"/>
    <append value="true"/>
</size-rotating-file-handler>

<!-- ================ -->
<!-- Specify category -->
<!-- ================ -->
<logger category="TableDataExport" use-parent-handlers="false">
    <level name="INFO"/>
    <handlers>
        <handler name="EXCELEXPORT"/>
    </handlers>
</logger>
In this example, everything logged by the caller TableDataExport would be written to the file Export.log in the JBoss folder log\MyDir.
Explanation of the log function
The following actions are always logged:
-
Excel export from within a table view of the application
-
The copying of data from a table view of the application to the clipboard
-
Execution of bidirectional Excel integration
-
Execution of the business travel report (Excel)
-
Creation of a control file as part of the serial letter creation
What is being logged?
-
Login token of the OS
-
Login token of the CRM application
-
Time of export
-
Number of exported datasets
-
Export source: (where was the export initiated? The purpose here is to identify the exported fields)
-
Exported fields
Sample extract from the log file:
2009-10-12 14:54:57,895 INFO
Angemeldet am Betriebssystem als mas
Angemeldet an INHOUSE als MAS
Zeitpunkt des Export: 12.10.2009 14:54:57
Anzahl der exportierten Datensätze: 3
Quelle des Exports: Hauptfenster Dokumente
Exportierte Felder: Betreff, Art, Dateiname, Typ, Kategorie, Erstellungsdatum
Special rights configurations
Authorization for a dataset is assigned when a new one is created.
Different rules apply, which are processed hierarchically.
-
As a first step, the configuration "Data rights via defined fields" is considered. Where the application of a rights template is configured here, then this template will be applied. If there are special rights configured, then this configuration will be considered and the process continues.
-
Then the configuration "Default rights from parent entity" will ne considered next. If the application of a rights template is configured here, then it will be used and any previous custom configuration will be discarded. Where special rights are configured, then that configuration will be considered, consolidated with the result of the previous configuration and the process will continue.
-
In the next step, the initial rights assignment will be executed (see "Special configuration of the initial rights assignment"). Where special rights were previously configured, these will be included in the configuration of the initial rights assignment.
Should an error be encountered in the configurations, then a relevant error code will be logged at runtime and the incorrect configuration will be ignored.
Dataset rights via defined fields
Dataset rights can also be configured via defined fields, when the dataset is saved. It should, however, be noted that this configuration slows down the storage process. It may also be possible that an error message will be displayed for the user if his or her own rights are being accidentally rescinded.
The configuration "Dataset rights via defined fields" not only applies for newly created datasets. Rights will be recalculated when one of the linked employee or group fields is changed. The decisive factor here is whether or not the flag "additive" is set. Only groups will be added if the flag is set to "true". The rights will be recalculated based on the configuration if it is set to "false".
Application of the rights template from a referenced lookup field
In this simple case, a lookup field is saved in an entity. The rights template will be applied to the current dataset if there is a change in the value of the lookup field.
In case of an employee entity, the setting useDefaultTemplateFromEmployee can additionally be used to differentiate, whether the rights template of the employee dataset should be used directly or whether the rights template saved for the employee field "Rights template" should be used.
The configuration is done via the administrator console in the entity "Advanced configurations (application parameters)":
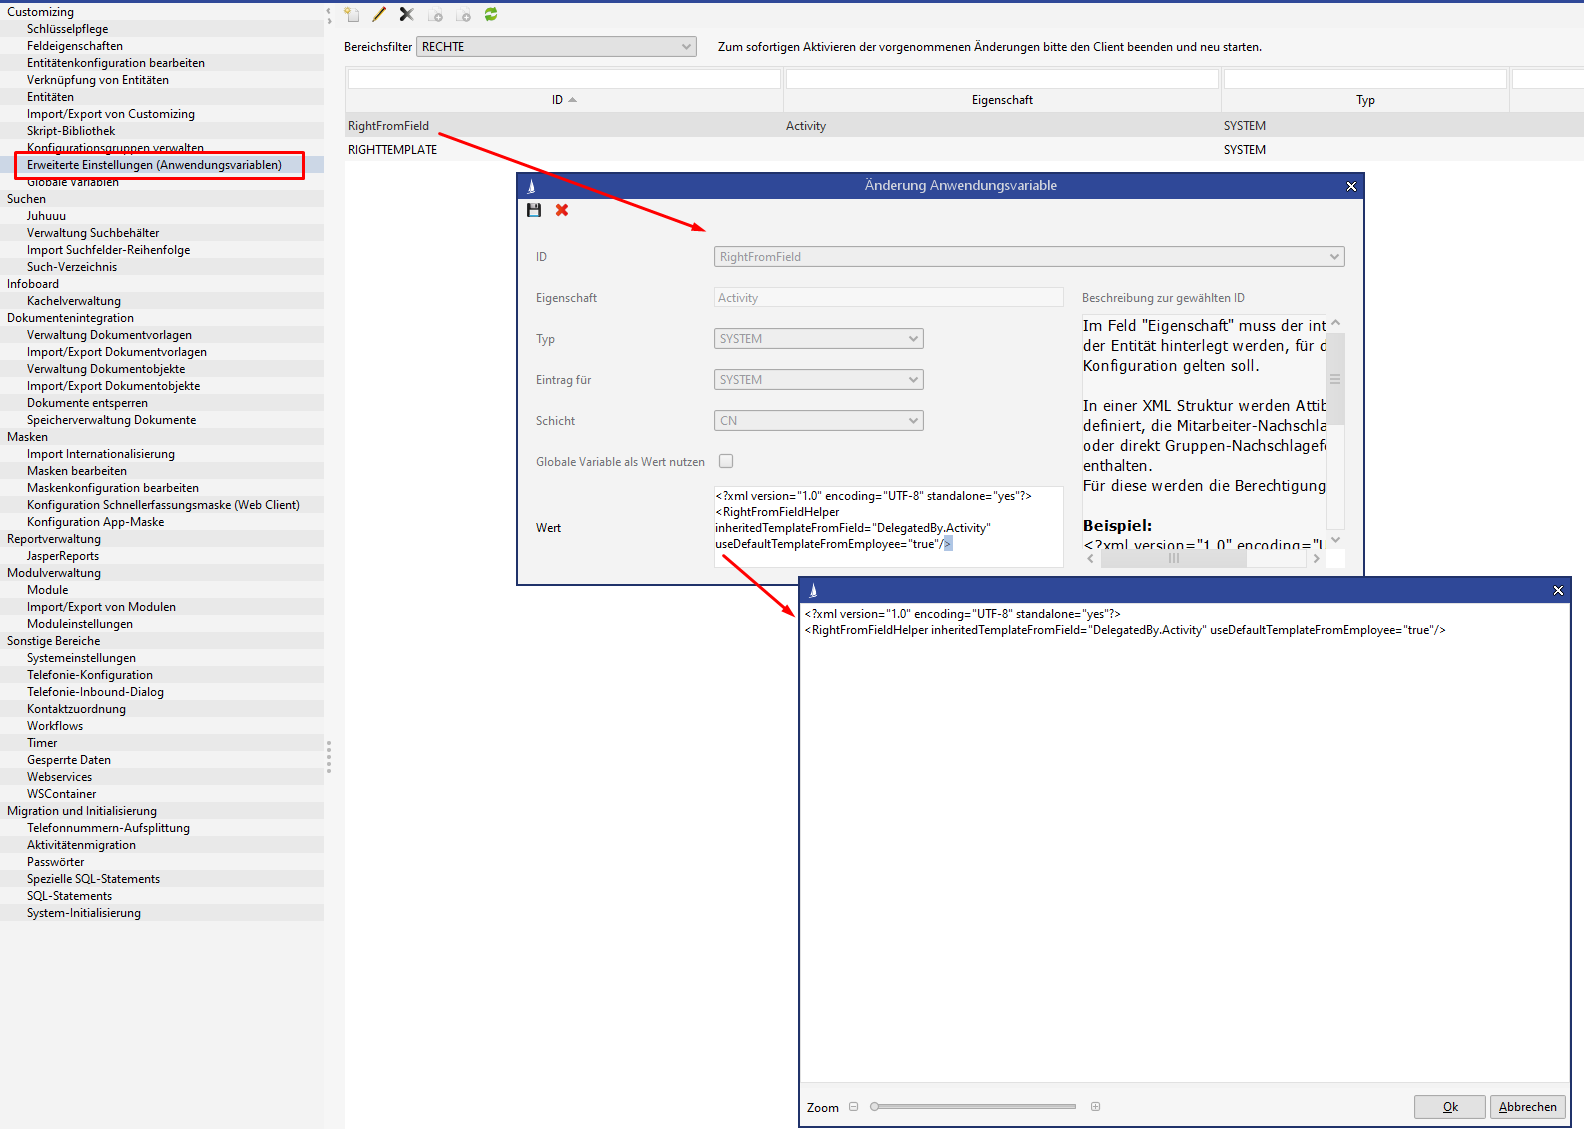
Fields configured this way should be set as required fields that do not allow an empty key, because an empty key is not permitted as rights template and will cause an exception.
Read the rights template via the field "Delegated by" and from there from the field "Right template of the linked employee"
<?xml version="1.0" encoding="UTF-8" standalone="yes"?>
<RightFromFieldHelper inheritedTemplateFromField="DelegatedBy.Activity" useDefaultTemplateFromEmployee="true"/>
Apply the rights template via the field "Activity with" directly from the contact person dataset
<?xml version="1.0" encoding="UTF-8" standalone="yes"?>
<RightFromFieldHelper inheritedTemplateFromField="DefaultContactPerson.Activity"/>
Generate a special rights template from linked employee or group fields and additional fixed groups
The configuration is also done via the administrator console in the "Advanced configurations (application parameters)" area:
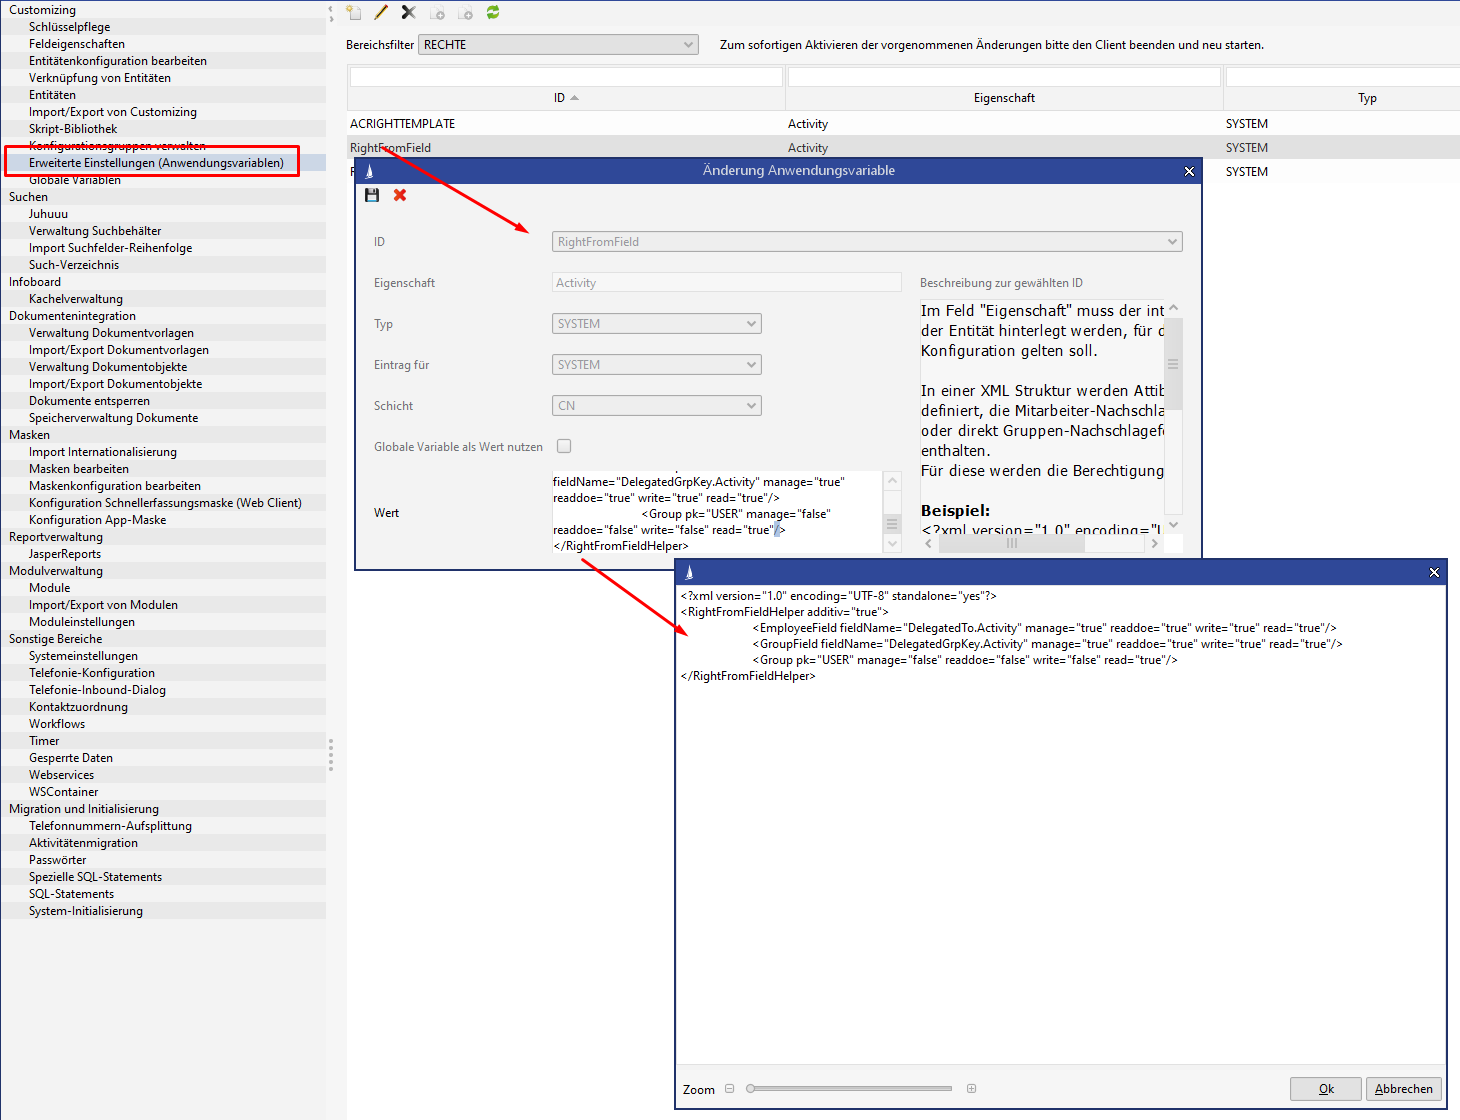
An XML structure is defined as a value that contains the employee lookup fields or the group lookup fields directly. The rights for the groups determined this way are saved directly in the element.
You can specify via the flag "additive", whether only groups should be added or whether the old right should be replaced.
The structure may also contain fixed group primary keys directly.
In the right template defined in the example, the field "Delegated to" reads the referenced employee and grants full access to his or her main group, which is defined in the employee in the field "User group".
The group in the field "Delegated to group" also gets full access.
The USER group always receives read permissions.
Saving a user-configured rights template
<?xml version="1.0" encoding="UTF-8" standalone="yes"?>
<RightFromFieldHelper additiv="true">
    <EmployeeField fieldName="DelegatedTo.Activity" manage="true" readdoe="true" write="true" read="true"/>
	<GroupField fieldName="DelegatedGrpKey.Activity" manage="true" readdoe="true" write="true" read="true"/>
	<Group pk="USER" manage="false" readdoe="false" write="false" read="true"/>
</RightFromFieldHelper>
Special configuration of the initial rights assignment
The rights template saved for the employee can be overloaded via the system entries of the PropertyMapper:
The configuration is done via the administrator console in the entity "Advanced configurations (application parameters)":

The following IDs can be used here:
-
One rights template per table can be saved. This entry will apply first if it is configured.
-
ID: ACRIGHTTEMPLATE
Property: [internal table name]
-
-
ACRIGHTTEMPLATE
A rights template can be saved for all business tables. -
REPRIGHTTEMP
When a report is saved, the rights template saved this way will be used. -
SEARCHRIGHTTEMPLATE
When saving a search in the C2 layer, the rights template saved this way will be used. -
RIGHTTEMPLATE
This entry will apply if no rights template was configured for the employee (the empty key is entered into the field "Rights template" in the employee main mask, which is not recommended).
For historical reasons, the value "NOTEMPLATE" can also be entered for the RIGHTTEMPLATE ID in the PropertyMapper. Should that be the case, then the rights pre-allocation occurs in a new dataset via the system entries of the PropertyMapper. This setting can only be done via SQL. This method is no longer recommended.
The pre-allocation of the rights templates is set with the same system entries of the PropertyMapper and could therefore be modified.
|
System entry IDs of the PropertyMapper |
set groups |
|---|---|
|
DEFAULT_RIGHT_GROUPS_READ |
ADMINISTRATION, DEFAULT and GUEST |
|
DEFAULT_RIGHT_GROUPS_WRITE |
ADMINISTRATION and DEFAULT |
|
DEFAULT_RIGHT_GROUPS_MANAGE |
ADMINISTRATION |
The PropertyMapper also offers another option
-
propertyMapper DEFAULTRIGHTTOADD true/false
Activates the template "Additive Standard Rights" (pk: DEFAULTRIGHTTOADD)
If the entry is activated, then the configuration "Additive default rights" will be added to every newly created rights dataset. This setting explicitly does not affect newly created templates.
It only takes effect for individual rights, even if they are created via the following configurations-
RightFromField (if no rights template is applied)
-
InheritedRight (if no rights template is applied)
-
-
DefaultRightAddGroup A list of rights can be stored here. These will be set for all groups that are to be assigned rights if they are added in the Rights manager (read right is a default right).
Inherit Rights from Relation
Prerequisite here is that the entity wanting to inherit the rights must be linked via a 1:n relation to an entity affected by rights, but must not be affected by rights itself.
The permissions of the superordinate entity will then be considered at runtime.
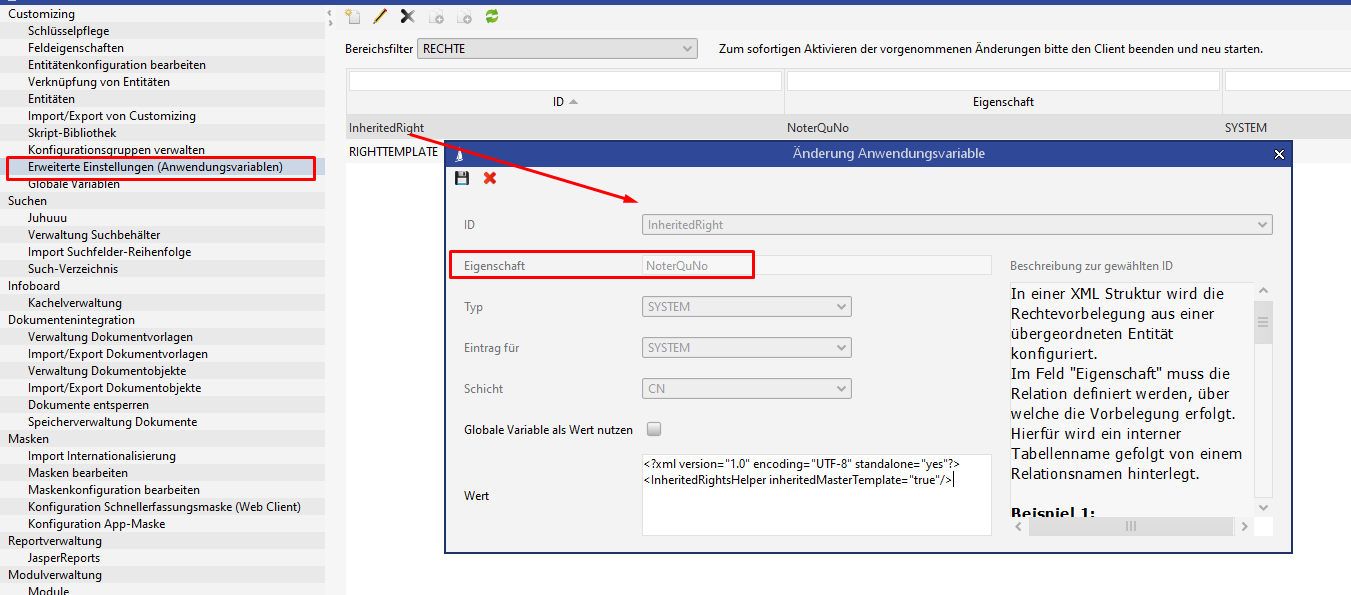
This configuration can be done in the administrator console via "Edit entity configuration".
Rights pre-allocation from superordinate entity
When an entity affected by rights is created as subordinate to an existing entity affected by rights and if the pre-allocation of rights is enabled for this relation, then the new dataset will derive its rights from the superordinate dataset.
Application of the rights template from the superordinate entity
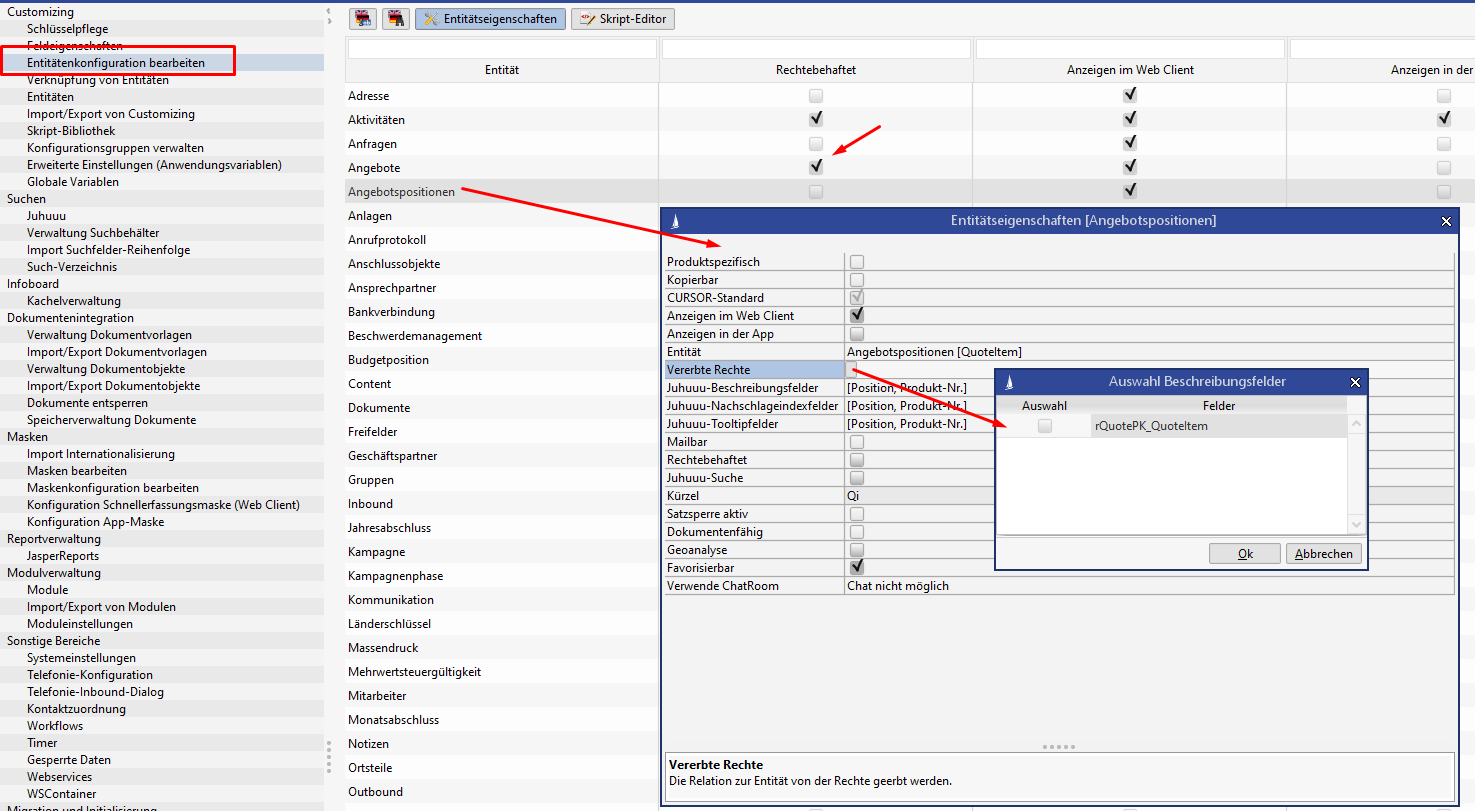
The configuration is done via the administrator console in the entity "Advanced configurations (application parameters)":
In the screenshot we see that the name of the entity requiring rights "Note" stored in the property via the relation rQuNo (n:m relation between offer and note). When a new subordinate note is created for the quote, the rights template used for the quote will now be applied to the note.
<?xml version="1.0" encoding="UTF-8" standalone="yes"?>
<InheritedRightsHelper inheritedMasterTemplate="true"/>
Generate a special rights template from the superordinate entity and additional fixed groups
The initial rights assignment can also receive its values from a superordinate entity with a mapping of the individual rights and the adding of fixed groups.
The configuration is done via the administrator console in the entity "Advanced configurations (application parameters)":
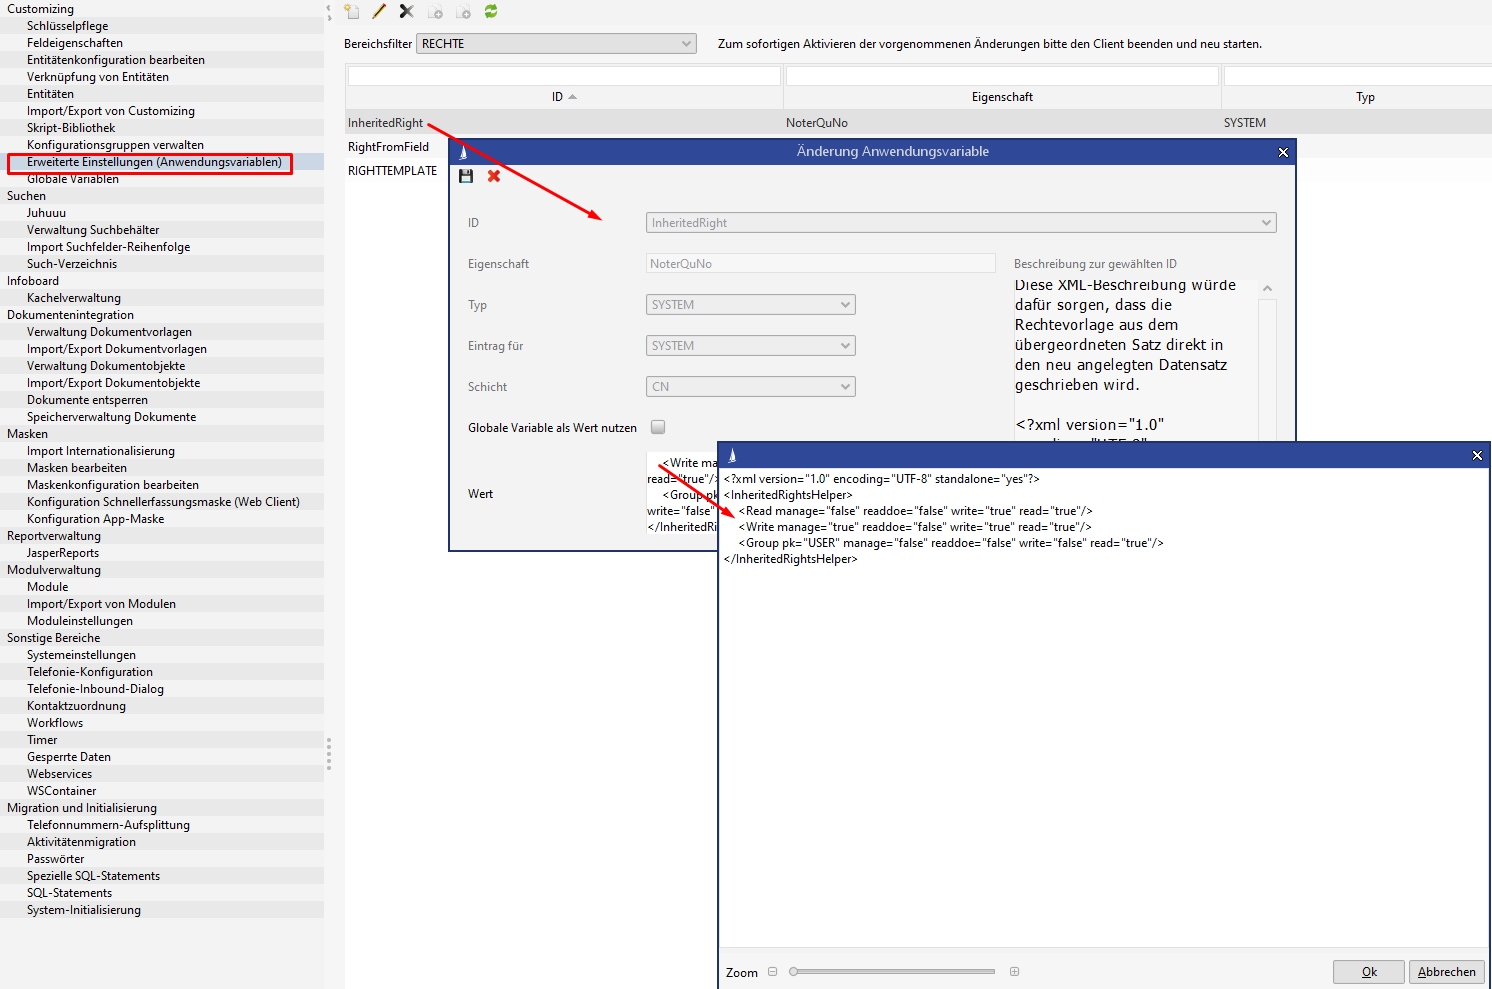
<?xml version="1.0" encoding="UTF-8" standalone="yes"?>
<InheritedRightsHelper>
     <Read manage="false" readdoe="false" write="true" read="true"/>
     <Write manage="true" readdoe="false" write="true" read="true"/>
     <Group pk="USER" manage="false" readdoe="false" write="false" read="true"/>
     <Group pk="ADMIN" manage="true" readdoe="false" write="false" read="true"/>
</InheritedRightsHelper>
The configuration in this example applies the rights from the superordinate dataset, whereby all users, who had
-
a read right for the original dataset will now have read and write rights for the new dataset.
-
a write right for the original dataset will now have read, write and manage rights for the new dataset.
-
members of the USER group will have read rights for the new dataset
-
members of the ADMIN group will have read and manage rights for the new dataset