Installation documentation
General information
The CURSOR Importer is an optional software program that requires separate licensing.
-
The latest version is always delivered
-
Imported is configured via the
configuration.batfile (You can change the language of thed interface here. Currently English and German are supported.) -
Imported is started via the
run.batfile
Therun.batrefers to a Java Runtime Environment in the folder of the importer. This should be in thejrefolder. If this is not included, a JRE is searched for underProgram Files (x86)\Java\<suitable jre version>\. If nothing is installed there either, the Importer will not start. In this case, download the JRE <suitable jre version> from the official site and create thejresubfolder for the importer. -
The run_cmd.bat file can be used to start the import of one or more already created XML import files. For this purpose, the corresponding settings must be set in the
configuration.bat.
Installation at the customer's site
-
The files to be delivered are located at f:\Install\Java\KopiervorlageFuerAuslieferung\CURSOR Importer\
<CRM Main Version>\<CRM Patch Version>. This includes the tool and the default settings. -
The sample data can also be copied from the folder f:\Inhaus\Text\900 Entwicklung\Importer\Beispieldaten\.
-
Installation at the customer's site is done by copying the contained files.
-
By default, there is a TrustStore "truststore_cursor.p12" in the main folder. This is to be replaced by the client's TrustStore, which is also in the RichClient. To do this, the TrustStore is copied and specified in configuration.bat. Otherwise, access via the WebService is not possible.
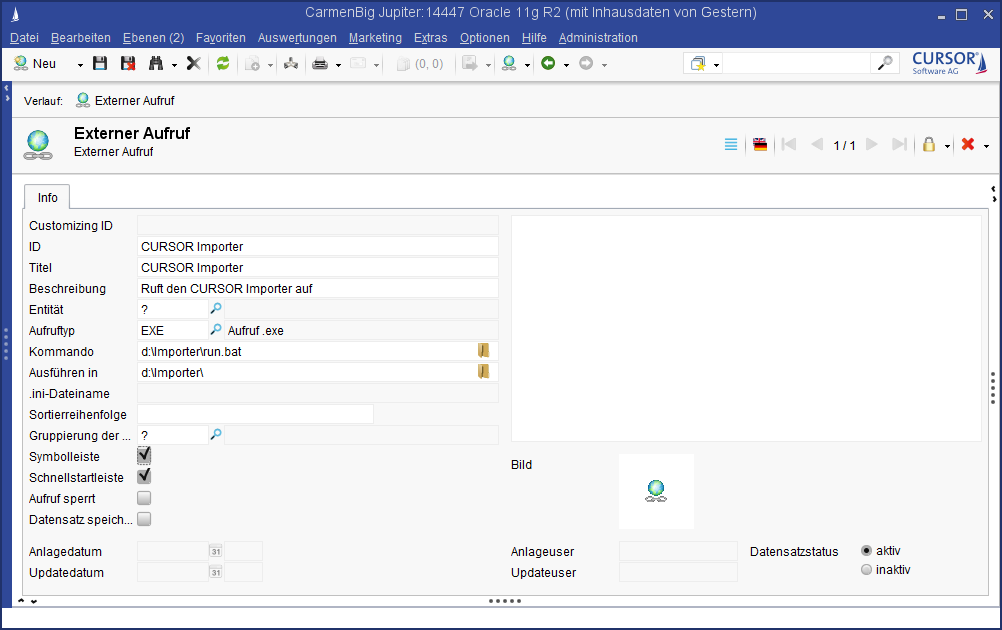
Call as external call
If desired, the tool can also be started by an external call (of EXE type), in which the command refers to the run.bat.
Using templates
Currently there are three templates for the import of activities, business partners and products. These templates are delivered with example files as a guide.
The structure is designed in such a way that there is one folder for each template, which contains example source data (*_Import.csv), a suitable configuration file (*_conf.xxic) and a template (*_template.xml).
Available templates:
-
ACT_template.xml
This template generates activities that are delegated to employees and populates the contained fields. Further relations such as contact persons are not populated. -
GP_template.xml
This template generates business partners with underlying person and default contact person, plus a street address and phone number. -
PRD_template.xml
This template generates products including a German product description.
In all cases, make sure that the source data contains valid keys from the target system. For example, Delegated to/from must be populated with a valid employee token. The same applies to the person type (PersontypeKey), where a valid key must be stored. If the keys in the sample data have been checked (usually the fields ending in Key), the import can be tested with the attached data.
Technical description
The CURSOR Importer is an optional software program that requires separate licensing.
The CURSOR Importer is an interface for importing data from CSV files or Excel tables (referred to as 'source data file' below). Using this interface, a user with the appropriate previous knowledge should be able to import data of a defined data structure independently. No in-depth knowledge of the data model or application is required.
XML templates are available to make it as easy as possible for the user to use, with each template guaranteeing the import of one defined data structure. The templates are provided by CURSOR Software AG and their functional scope is described.
The user receives a configuration file (*.xxic) and a template file (*.xml) that describes the structure of the source data file. Using this configuration, the customer can process multiple source data files of the same structure. The first step is to generate XML data for the XML import interface using CSV or Excel tables. In a second step, the CURSOR Importer enables direct import of data via the web service interface.
The Importer then configures which information from the source file is to be transferred to which information in the target file. This presupposes that the two structures fit together. If this is not the case, the templates must be adapted.
As a rule, further checks must be taken into account in an import scenario. This includes, for example, a check for duplicates or a consistency check of the data; this is not part of the Importer, but must be taken into account in the scenario with separate tools or procedures.
![CURSROR-Importer-Prinzip[1].jpg](/__attachments/a_46084d36be8a8338f004bcb4468645c802c300ca4a3460adc5881ceb1e580f67/CURSROR-Importer-Prinzip%5B1%5D.jpg?cb=13fa901b66ecf8322d95a42c698c76fd)
Features for users
When using the tool, it is recommended to split the procedure into two steps:
-
Initial setup with CURSOR Software AG (settings of import parameters)
-
Independent execution of the import
The settings of the import parameters remain as last-run settings in the lastrun.properties file. For further import processes, it is then only necessary to select the new source data file.
All steps necessary for using the tool are described below; since the settings are saved, this is only necessary for the initial configuration. Especially with the points described under 'Settings for the web service import', later changes are usually not necessary.
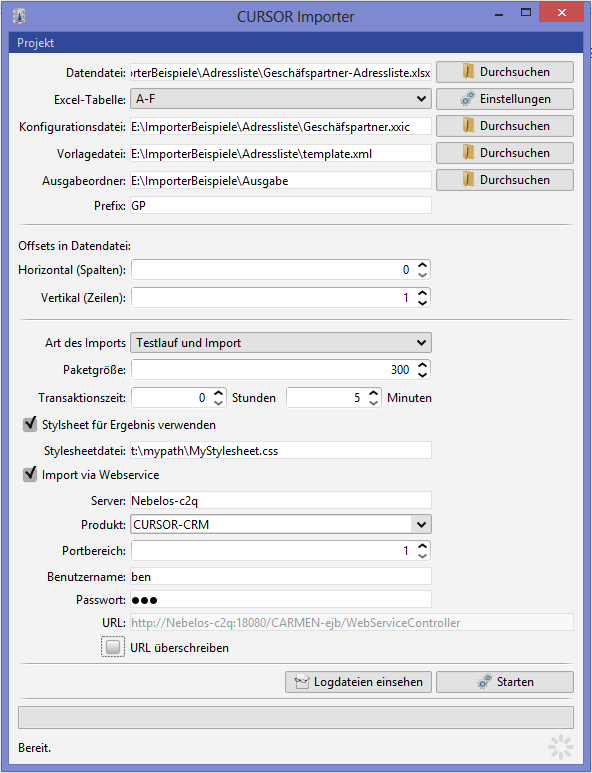
Setting up a project
Loading the source data file
-
Click the Browse button to open a search dialog.
![Datafile[1].png](/__attachments/a_a5540a95c2b0a26840c63f042ddf84e9e01f6a12db70c981f935855995c756ca/Datafile%5B1%5D.png?cb=fea7b4bdc1dbf7e6106e6b8d9fa47c11)
-
Select your file with the data to be imported in the search dialog.
![Datafile-locate[1].png](/__attachments/a_bfab48a2e2dc4d7139bdd28975b28237084e50864a7dd1a920f63010ca781edb/Datafile-locate%5B1%5D.png?cb=13bcbb83cecf6982f620fd825903c9d4)
Selecting the table (Excel files only)
If you have selected an Excel file, it is imported. In the Table selection box, select the table containing the data you want to import.
![Excel-select-sheet[1].png](/__attachments/a_fbe437c00b2671fd7da8d8e048fa254ebe3a001e251db1ab6c504cb65ce285f2/Excel-select-sheet%5B1%5D.png?cb=f8edec09558a15bd06b945a98ae40aa7)
Settings
If you have selected a CSV or Excel file, you can use the Settings button to select the separators and text separators used in the file, the escape character, the character set used (all CSV only) and a date format. If the dialog is not opened, the values are preset. Most of the time these settings are already correct. The Default button can be used to reload the default settings.
The settings must correspond exactly to the coding in the source data file! Only the date format is optional, since the two default formats of the XML import interface are also supported.
CSV
![Csv_choose_date_format[1].png](/__attachments/a_e291701c0c868bf9030c3de597d91da036a06ff23c6b3a5cdeec3964a6aca673/Csv_choose_date_format%5B1%5D.png?cb=921bcd486db80c5f1f5d8aae714e070a)
Excel
![Excel_choose_date_format[1].png](/__attachments/a_c5dd92261b4770ab000737ffc5ae8f6f8625b47a495325add5531f0fe941ba87/Excel_choose_date_format%5B1%5D.png?cb=b92f97b4cf6374e13d61c45d6c8a3474)
Loading the configuration file
You have received a configuration file (*.xxic) from CURSOR Software AG. This describes the structure of your source data file.
-
Click the Browse button to open a search dialog.
![Configfile[1].png](/__attachments/a_893c170a29f775a3291eac5ad88ac1addf0e4c004d84e4d5054e6f36180ac31c/Configfile%5B1%5D.png?cb=ad508e3f7e7c36a27ff7f2190763867f)
-
Select the configuration file in the dialog.
![Configfile-locate[1].png](/__attachments/a_b9e51c3b081517711f1fbb455638e6fa8d47f9156522860171e0269208a7184b/Configfile-locate%5B1%5D.png?cb=9245da4bf7fdce71502af3f80be4872a)
Loading the template file
You have received a template file (*.xml) from CURSOR Software AG that serves as a template for the import instructions to be generated.
-
Click the Browse button to open a search dialog.
![Templatefile[1].png](/__attachments/a_00c3ddd0d6dd4317991b4c0589ed241df8aff57b11b5799a3bdf7203a80f47d6/Templatefile%5B1%5D.png?cb=90be6dbdf196ec64952c5bb1d68ca45a)
-
Select the template file in the dialog.
![Vorlagedatei-locate[1].png](/__attachments/a_acdc0db1c5b562135858aa1be3cf3648f4794c4ac4a1adffb74025d68c5e22dc/Vorlagedatei-locate%5B1%5D.png?cb=49fc48bb67de87e70be5acb999ce081e)
Selecting the output folder
To perform the import process, the import instructions must be stored in a directory.
![Outputdir[1].png](/__attachments/a_04944dbb0e23e039d4bb936403917350e6d5a07c22c505dc769b9dd29ed7301c/Outputdir%5B1%5D.png?cb=8f7936ebc0252515923187bca9311fdc)
If possible, select an empty directory or create a new one.
![Outputdir-locate[1].png](/__attachments/a_931da2173b89410efdaa5fef4828e643377d0b51968f3e61bdd779f7aed0e79b/Outputdir-locate%5B1%5D.png?cb=14422ab4e9437a12e68c3b94d365ac95)
Choosing the prefix
Output files are created according to the <My prefix>_000000000001.xml format. The prefix can be chosen freely here. Only characters that are not allowed in the operating system's file system are excluded.
![Prefix[1].png](/__attachments/a_6ae01ed6670b17f8e7be2c3c1481f062337e67fa87e8ebdcbb9f6fe36f1a7da5/Prefix%5B1%5D.png?cb=045227a7052adcc4b022216cac684998)
Setting the offsets
If the data to be imported is offset in the file selected above (i.e. does not start in column 1, row 1), the offsets must be adjusted accordingly. If the first line of the data file (or Excel table) is a header line, the vertical offset must be set to 1. (In the example below, the data for the import starts at row 3, column 1)
![Offsets[1].png](/__attachments/a_f60bdf67c500cab7ebeb5ec2f496bb16e0310f9d389ce32bb364520cfed85447/Offsets%5B1%5D.png?cb=03c187360d5cfa49ba4391fce6524bb2)
Setting the Web Service Import
-
If you do not want to import directly via the web service but only want the XML output, skip this step. In this case, the XML files are saved in the predefined output folder.
-
The tool can also be used with the 'Websphere' application server, but no web service is currently supported.
In this case, deactivate the 'Import via web service' option. Instead, the XML output folder can be set to the monitored client directory to continue with the client-side import.
-
Activate the Import via web service.
![Webservice[1].png](/__attachments/a_70d7cfb2b746f13915a812c4ed60d41315fea49062e6264cce1e7954a4ec6711/Webservice%5B1%5D.png?cb=42f26bd13a7ef0b9f29bd7c61c0e24c0)
-
Adapt the URL for the web service to your server. The URL usually has the form:
http://<HOSTNAME>:<Portrange 1-5>8080/<PRODUCT NAME CARMEN/EVIJET/HELVIS>-ejb/WebServiceController
How to get to the address of the web service
|
1 |
Select the menu item Administration / Create system information. |
|---|---|
|
2 |
An email is then automatically created. Search for the following content: [...] WebClient URL: http://dailybuild.cursor.de:18080/EVIJET-webclient WebService Interface: http://dailybuild.cursor.de:18080/EVIJET-ejb/WebServiceController?wsdl Invocation Servlet: http://dailybuild.cursor.de:18080/EVIJET/invocation/InvocationServlet [...] |
-
Enter the appropriate values for server, port range and product. For more details on web services, see the documentation for administrators (chapter web services).
![Webservice-url[1].png](/__attachments/a_485f5ed497b5d99025083ba269af3479829f1d3cde48307a61702e005bea719d/Webservice-url%5B1%5D.png?cb=01d561bc3dcbf85a095ea3fcba3f7a9a)
-
Enter a user name and password. The user should have authorization to access the web services in your system.
![Webservice-auth[1].png](/__attachments/a_3560a2eaecaecc9f44193763b0c00000668190c213d035a10187e242149c6c35/Webservice-auth%5B1%5D.png?cb=e42d76662781f09f9867dc58eb5edf00)
Test run and/or import
The actual import takes place after a test run as standard. If the configuration file proves to be faulty, the import is not started. This prevents the data from being imported only partially.
If the import worked without errors and there is an Excel table with the same structure, you can skip the test run to speed up the import process.
![Runtype[1].png](/__attachments/a_e0910e23e807d15fe125c3a433fbff5d41c441cc53a440ef2656408acedbd2c9/Runtype%5B1%5D.png?cb=c7aada2889b2c88134c594bdea359e64)
Packet size
The 'Packet size' parameter specifies the maximum number of datasets to be combined into one import statement. If the number is exceeded, a new XML file is created.
The default packet size of 800 is recommended. Significantly smaller or larger values can slow down the import.
![Package_size[1].png](/__attachments/a_f94600384fa368b7e52af96b3ecc76fd2ba7d281d9597999fbe564056837037a/Package_size%5B1%5D.png?cb=649d0cc5caec351a6ec161a0ac8b2d46)
Transaction time
The maximum time that the import of a packet (NOT the complete import) may take before it is rolled back can be set via 'Transaction time'. The minimum time is 5 minutes, the maximum 23 hours and 59 minutes.
![Transaction_time[1].png](/__attachments/a_ab8ac783b7b0d026fde72db748bf1dfa3fc37c174a1d867a0a413106404abffa/Transaction_time%5B1%5D.png?cb=f04a05e2f46cd16b9bd221a1b42a2f0a)
Use stylesheet for result
Instead of
<?xml version="1.0" encoding="UTF-8" standalone="yes"?>
the web service result files now start with
<?xml-stylesheet href="file:///<Laufwerk>:/<Pfad>/Standard.css" type="text/css"?>
This allows the file to be opened and formatted with the browser, for example. If only the check mark is set, the path automatically points to the default.css in the Importer folder. If a stylesheet is specified in the text field, this path is set.
Execute/Cancel the import process
-
Start the import process using the Start button.
![Run[1].png](/__attachments/a_184f41b2ba14c635227209dc0459bd3737848fd0b79c4120c0fc63382da4d8fe/Run%5B1%5D.png?cb=e69bd8c8f41250a06dacb0d39c321075)
-
First, the XML import statements are generated from the source data file in the selected output directory. Usually, this conversion will only take a small amount of time.
-
If Import via web service was selected, a connection to the web service of the CRM server is then established and the data is imported in a test run or actual import. This process can take some time depending on the amount of data.
![WhileImport[1].png](/__attachments/a_c2b7c7117c7363c5904eb771f88b11b3bfe594ef7735568b2d4d7f739eccc188/WhileImport%5B1%5D.png?cb=de90d57b1b3ae803ea2c40d85d09a07d)
-
You can cancel the process by clicking Cancel. If the XML files are still being created, the process is aborted directly. If the web service call is already running, it is only terminated after the next call.
-
The time remaining until the end of the transaction is displayed at the bottom of the screen.
Save/load project
In the Project menu you can save your entries (e.g. source data file, configuration, offsets, web service settings) and restore them at a later time. This is useful if you want to import Excel tables and CSV files with different structures. The import parameters are saved in a project file (*.xprj).
1. First select Save project.
![Save_project1[1].png](/__attachments/a_2fbc938ce9cdfe8bd7a9d2c9bee02d6c92b961ecda67436ae64e79f4180068e3/Save_project1%5B1%5D.png?cb=27b5ad4654d9787d9fd2201c57b0ba90)
2. Select a location.
![Save_project2[1].png](/__attachments/a_20b71bb9c4d52d6d20ae17706252c2842dc2039ed7e99c68a224c0f904be48c0/Save_project2%5B1%5D.png?cb=dec23f26a5f11d10a50b584f437f2554)
3. Later, select Open project.
![Load_project1[1].png](/__attachments/a_07df46282847b101d120c165d0ba6d4b69b99599bbafb98f0b5449677d266710/Load_project1%5B1%5D.png?cb=d9704fb5b74c3df290b5e1d01cf50e79)
4. And select the saved file.
![Load_project2[1].png](/__attachments/a_6336f1e346df31ade245542cdae4c8dd3fe32ef3cc8b44da96dca7c90c467ff7/Load_project2%5B1%5D.png?cb=0922327205d9384bb863ac8e24d63339)
Column assignment
The configuration file that assigns the columns of the source data file to the placeholders of the template file, can be created in the tool itself.
-
First, a source data file must have been loaded in the interface (see step Load source data file).
-
The column assignment input mask is accessed via the project menu.
Now a dialog for entering an offset appears. The default value is the offset set in the main dialog. This is also reset when you click on Default.
![Mapping_offset[1].png](/__attachments/a_38a91fb8ff400726fc3eb2ae26c41b486bfc740d5bb7d2998ca4983410dc3611/Mapping_offset%5B1%5D.png?cb=16fe70999ea2339d2a81afdba1a37ffe)
The difference between the two offsets
The offset in the main dialog must point to the beginning of the data to be imported. The offset required here should point to the values that identify the field particularly well. For example, if there is another row with headings above the data, you can set the offset to this row.
-
If a template file was previously selected, it is already preselected, otherwise it can be selected using Browse.
The tool reads them in and lists the placeholders under 'Template key'.
-
The possible columns from the source data file are in the selection lists under "Data column". The line used is the one at the offset of the source data file set when the dialog is opened.
-
A column of the source data file is assigned to each template key.
-
The column assignment must be saved (Save, *.xxic) and then loaded as a configuration file in the main mask.
-
If you want to change it later, you can load and edit it by clicking Load.
![Mapping[1].png](/__attachments/a_d3bd5b0d3c149c17dd0e59fa99b7812722c2316f51014e13316a3a56da3f65d3/Mapping%5B1%5D.png?cb=6ae8f399479a81c7ce49f21f74888ffa)
-
Save Selection creates a copy of the selected template. This copy does not contain all fields, but only all fields that were assigned in the Data column. If the data in the source file is not always the same, you should first define a template with the superset of all fields. This button can then be used to quickly create a template that matches the existing data.
-
Assign automatically assigns the template key and the values from the selection list to each other if they are the same.
![MappingAssign[1].png](/__attachments/a_51447d4671ad3616c81cc1f9414ce2e4cfde515aeec4f5b56371f86b0691f4e6/MappingAssign%5B1%5D.png?cb=0d1c0716e60726fbfac5a5cf4b20ac66)
Find/Replace patterns
By specifying regular expressions, values from the source file can be reformatted before they are written to the XML structure. The syntax is:
<Mein Muster zum Suchen>,<Mein Muster zum ersetzen>
Examples:
MeinText,Text
^(\d{2})\.(\d{2})\.(\d{4})$,$3-$2-$1
NULL,
d[a-z]*d,MeinNeuerWert
Further information can be found in the Oracle documentation: http://docs.oracle.com/javase/7/docs/api/java/util/regex/Pattern.html
Global settings
In the project menu, under Global settings, settings can be made that apply to all projects.
![Log_Config[1].png](/__attachments/a_1861134e67658944d94f5bb8e171c0da94c1edd5d6ebefa05c0757008525cf1c/Log_Config%5B1%5D.png?cb=35c38fa6625ad22564a09c41f0a173aa)
LogPath
You can select the directory to which you want to log. By default, this is the directory of the Importer itself.
Log files
The CURSOR Importer logs into different files. All types of files (described below) create a new file if they reach a certain size. Old files are retained until a certain number of files are present, then the oldest file is overwritten again.
-
errors.log
Real errors are logged here. For example, if the server is not running, a program error occurs and the wrong encoding has been specified for the source file. This should be the first port of call if the web service could not be called. The 'Show errors in log dialog' check mark determines whether this file is loaded and displayed in the log dialog.
-
warnings.log
Warnings are logged here. For example, if the lastrun.properties was not found. This is not an error, since the default values are then used. Normally this file will not be of interest to the user. The 'Show warnings in log dialog' check mark determines whether this file is loaded and displayed in the log dialog.
-
progress.log
All activities of the Importer are logged here. For example, replacing the variables, reading in the values, etc. Normally this file will not be of interest to the user. The 'Show progress in log dialog' check mark determines whether this file is loaded and displayed in the log dialog.
-
webservice_input.log
The XML code sent to the web service is logged here. The 'Show web service input in log dialog' check mark determines whether this file is loaded and displayed in the log dialog.
-
webservice_output.log
The XML code received from the web service is logged here. This should be the first point of call if the server or web service has been reached but the desired result has not been achieved. The 'Show web service output in log dialog' check mark determines whether this file is loaded and displayed in the log dialog.
Number of files to load
Under 'Log files' it has already been described that old versions of any kind of file can still exist. The 'Load only the newest log file' option determines whether these are also loaded when opening the log dialog. This can make opening the dialog take a long time.
Show return dialog
If the web service is reached but an error is detected in the XML structure, the returned XML structure is displayed in a dialog. This can be turned off with the 'Process web service return' option.
Return dialog
If the web service is reached but an error is detected in the XML structure, the returned XML structure is displayed in a dialog.
![ViewResult[1].png](/__attachments/a_b4069b1ca00b310311bd056d0ab0a0abbfb165d05d7e1e9e0cd9c4f1d0562b05/ViewResult%5B1%5D.png?cb=46e83877fc822b60e025f084c5cf0481)
-
The individual datasets can be selected in the tree on the left.
-
The errors contained in it are now displayed on the right-hand side.
-
-
The 'Only show errors' option filters out the datasets that have reported an error.
Log dialog
![ViewLogs[1].png](/__attachments/a_b40256591f09f4784659850a7adc39d7e828f261af41d192d5d511aa0f5988dc/ViewLogs%5B1%5D.png?cb=5ce44c513e8595814d9222a78b6ea55f)
The View log files button can be used to view the contents of all files configured via the global settings.
![ViewLogs2[1].png](/__attachments/a_24b6706885efe76e902210eed4c46133005cca865883b1e1d126c487b8ca6263/ViewLogs2%5B1%5D.png?cb=061d8d3f32f8f3ce749fe0a55e82f7d9)
Use the CTRL + f key combination to open a search dialog on the tabs.
![Searchdialog[1].png](/__attachments/a_f1dda8ae5e6fde4c7093ad953fe2dc2115f263c2e99fca78553e291da12b5699/Searchdialog%5B1%5D.png?cb=acb97863a7879eee3d96b547e7b381ea)
Batch mode
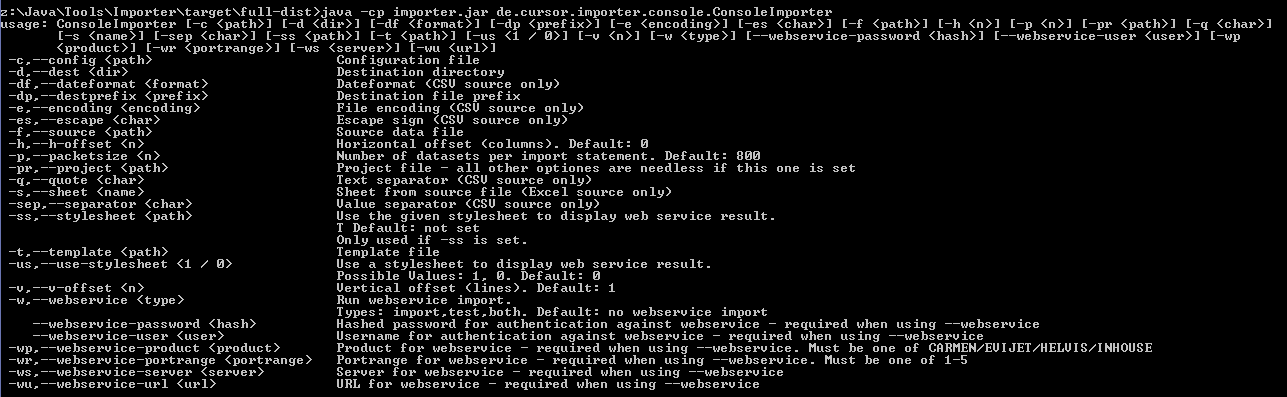
The CURSOR Importer allows operation in batch mode. The graphical user interface (GUI) is not used. Instead the settings are passed via command line parameters and the import process is started immediately. The following parameters are available:
|
Short form parameters |
Long form parameters |
Argument |
Available since version |
Description |
|---|---|---|---|---|
|
-c |
--config |
<path> |
3 |
The fully qualified path, or the path specified relative to the Importer folder, to the configuration file that is to be preset. |
|
-d |
--dest |
<dir> |
3 |
The fully qualified path, or the path specified relative to the Importer folder, to the directory in which the XML files are placed. |
|
-df |
--dateformat |
<format> |
145 |
The optionally additionally supported date format for CSV files. Default: yyyy-MM-dd'T'HH:mm:ss |
|
-dp |
--destprefix |
<prefix> |
694 |
The prefix for the generated XML files. Default: output |
|
-e |
--encoding |
<encoding> |
140 |
The encoding of the CSV file. Default: windows-1252 |
|
-es |
--escape |
<char> |
140 |
The escape character of the CSV file. Default: \ |
|
-f |
--source |
<path> |
3 |
The fully qualified path, or the path specified relative to the Importer folder, to the data file. |
|
-h |
--h-offset |
<n> |
3 |
The horizontal offset. Default: 0 |
|
-p |
--packetsize |
<n> |
3 |
The number of datasets imported in one go. Default: 800 |
|
-pr |
--project |
<path> |
215 |
The fully qualified path, or the path specified relative to the Importer folder, to the project file from which all values are read. If this parameter is set, all others are ignored. |
|
-q |
--quote |
<char> |
140 |
The text quotation marks of the CSV file. Default: “ |
|
-s |
--sheet |
<name> |
3 |
The Excel table of the data file to be preselected. |
|
-t |
--template |
<path> |
632 |
The template file. |
|
-sep |
--separator |
<char> |
140 |
The separator of the CSV file. Default: ; |
|
-v |
--v-offset |
<n> |
3 |
The vertical offset. Default: 1 |
|
-us |
--use-stylesheet |
<1 / 0> |
1261 |
Use a stylesheet to display the web service result. If the -ss option is not set, the default.css file in the main directory of the Importer is used. |
|
-ss |
--stylesheet |
<path> |
1261 |
Use this stylesheet to display the web service result. Only applies if the -us option is set. |
|
-w |
--webservice |
<type> |
3 |
After creating the XML, run the web service. Use the specified type (test, import, both) |
|
-ws |
--webservice-server |
<server> |
694 |
The server that provides the web service. Alternatively, -wu can be used. |
|
-wp |
--webservice-product |
<product> |
694 |
The CURSOR product to be addressed (CARMEN/EVIJET/INHOUSE/HELVIS). Alternatively, -wu can be used. |
|
-wr |
--webservice-portrange |
<portrange> |
694 |
The set port range of the server. Alternatively, -wu can be used. |
|
|
--webservice-password |
<hash> |
3 |
The encrypted password for logging in to the web service. Required when -w is used. |
|
-wu |
--webservice-url |
<url> |
3 |
The URL of the web service. Required when -w is used. Alternatively, -wr + -wp + -ws can be used. |
|
|
--webservice-user |
<user> |
3 |
The user name for logging on to the web service. Required when -w is used. |
To see the operating notes, the class de.cursor.importer.console.ConsoleImporter can be called without parameters:
For example, an import command might look like this (the command is wrapped to improve readability):
EXCEL
$java -cp importer.jar de.cursor.importer.console.ConsoleImporter
-c d:\ImporterBeispiele\Excelbeispiel\config.xxic -s Tabelle1 -d d:\ImporterBeispiele\Ausgabe
-f d:\ImporterBeispiele\Excelbeispiel\acts.xlsx -t d:\ImporterBeispiele\Excelbeispiel\template.xml
-v 1 -w both --webservice-url http://localhost:18080/CARMEN-ejb/WebServiceController
--webservice-password 7FC203845F060800D0CA152D46BA8269 --webservice-user bne


Mit SSL (ab 19.2 zwingen nötig):
$java -cp importer.jar -Djavax.net.ssl.trustStore="mytruststore.p12" -Djavax.net.ssl.trustStorePassword="mytruststorepw" de.cursor.importer.console.ConsoleImporter
-c d:\ImporterBeispiele\Excelbeispiel\config.xxic -s Tabelle1 -d d:\ImporterBeispiele\Ausgabe
-f d:\ImporterBeispiele\Excelbeispiel\acts.xlsx -t d:\ImporterBeispiele\Excelbeispiel\template.xml
-v 1 -w both --webservice-url http://localhost:18080/CARMEN-ejb/WebServiceController
--webservice-password 7FC203845F060800D0CA152D46BA8269 --webservice-user bne


Ab 21.1.1:
$java -cp lib/importer.jar -Djavax.net.ssl.trustStore="mytruststore.p12" -Djavax.net.ssl.trustStorePassword="mytruststorepw" de.cursor.importer.console.ConsoleImporter
-c d:\ImporterBeispiele\Excelbeispiel\config.xxic -s Tabelle1 -d d:\ImporterBeispiele\Ausgabe
-f d:\ImporterBeispiele\Excelbeispiel\acts.xlsx -t d:\ImporterBeispiele\Excelbeispiel\template.xml
-v 1 -w both --webservice-url http://localhost:18080/CARMEN-ejb/WebServiceController
--webservice-password 7FC203845F060800D0CA152D46BA8269 --webservice-user bne
CSV
$java -cp importer.jar de.cursor.importer.console.ConsoleImporter
-c d:\ImporterBeispiele\Aktivitäten\act_conf.xxic -t d:\ImporterBeispiele\Aktivitäten\ACT_template.xml
-d d:\ImporterBeispiele\Ausgabe -f d:\ImporterBeispiele\Aktivitäten\act_import.csv -v 1 -w both
--webservice-url http://localhost:18080/CARMEN-ejb/WebServiceController --webservice-password 7FC203845F060800D0CA152D46BA8269
--webservice-user bne -e windows-1252 -es \ -sep ; -q \" -df dd.MM.yyyy


Mit SSL (ab 19.2 zwingen nötig):
$java -cp importer.jar -Djavax.net.ssl.trustStore="mytruststore.p12" -Djavax.net.ssl.trustStorePassword="mytruststorepw" de.cursor.importer.console.ConsoleImporter
-c d:\ImporterBeispiele\Aktivitäten\act_conf.xxic -t d:\ImporterBeispiele\Aktivitäten\ACT_template.xml
-d d:\ImporterBeispiele\Ausgabe -f d:\ImporterBeispiele\Aktivitäten\act_import.csv -v 1 -w both
--webservice-url http://localhost:18080/CARMEN-ejb/WebServiceController --webservice-password 7FC203845F060800D0CA152D46BA8269
--webservice-user bne -e windows-1252 -es \ -sep ; -q \" -df dd.MM.yyyy


Ab 21.1.1:
$java -cp lib/importer.jar -Djavax.net.ssl.trustStore="mytruststore.p12" -Djavax.net.ssl.trustStorePassword="mytruststorepw" de.cursor.importer.console.ConsoleImporter
-c d:\ImporterBeispiele\Aktivitäten\act_conf.xxic -t d:\ImporterBeispiele\Aktivitäten\ACT_template.xml
-d d:\ImporterBeispiele\Ausgabe -f d:\ImporterBeispiele\Aktivitäten\act_import.csv -v 1 -w both
--webservice-url http://localhost:18080/CARMEN-ejb/WebServiceController --webservice-password 7FC203845F060800D0CA152D46BA8269
--webservice-user bne -e windows-1252 -es \ -sep ; -q \" -df dd.MM.yyyy
And the result would be:
![ImporterWorking[1].png](/__attachments/a_06d6962850a033bb0a21628d34919ce1050ede86fecb641f98fefe30af0ea87b/ImporterWorking%5B1%5D.png?cb=53879fd1915ebbda7f733708ae762bef)
To generate the password hash, use:
$ java -cp importer.jar de.cursor.importer.helper.PasswordStorage <Passwort>
Technical documentation
How to create a new project
If you do not yet have a configuration file for an existing template which you want to use to import an existing source file, proceed as follows:
-
Select the source data file
-
Select the Project/Column Assignment menu item
-
Select the template file in the configuration dialog
-
Configure the mapping accordingly
-
Click on the Save column assignment button to create the configuration file.
If a row with headings was inserted above the first data row in the source file, it may be helpful to set the offset to the row with the headings before opening the configuration dialog. This makes it easier to assign meaningful headings.
Creating configuration files and template files
Step 1
First, an example template.xml file is created according to the XML import schema. The file contains only a single <Entry> tag, no XML declaration and no <Entries> root tag.
The file must have UTF-8 encoding but no byte order mark.
Example:
 <Entry entity="Customer" action="UPDATE_OR_CREATE" found="ONE">
<Field name="MatchCode.Customer" identifyingField="true">
<FieldValue>
<stringValue>HELABA BANK</stringValue>
</FieldValue>
</Field>

<Field name="Name1.Customer" identifyingField="false">
<FieldValue>
<stringValue>Landesbank Hessen-Thüringen</stringValue>
</FieldValue>
</Field>

<Field name="Name2.Customer" identifyingField="false">
<FieldValue>
<stringValue>AG</stringValue>
</FieldValue>
</Field>

<Field name="Name3.Customer" identifyingField="false">
<FieldValue>
<stringValue />
</FieldValue>
</Field>

<Field name="PeAddressType.Customer" identifyingField="false">
<FieldValue>
<stringValue>STRASSE</stringValue>
</FieldValue>
</Field>

<Field name="PeStreet.Customer" identifyingField="false">
<FieldValue>
<stringValue>Ständeplatz</stringValue>
</FieldValue>
</Field>

<Field name="PeStreetNumber.Customer" identifyingField="false">
<FieldValue>
<stringValue>17</stringValue>
</FieldValue>
</Field>

<Field name="PeCity.Customer" identifyingField="false">
<FieldValue>
<stringValue>Offenbach</stringValue>
</FieldValue>
</Field>

<Field name="PeZIP.Customer" identifyingField="false">
<FieldValue>
<stringValue>34117</stringValue>
</FieldValue>
</Field>

<Field name="PhoneNoCountry.Customer" identifyingField="false">
<FieldValue>
<stringValue>+49</stringValue>
</FieldValue>
</Field>

<Field name="PhoneNoCity.Customer" identifyingField="false">
<FieldValue>
<stringValue>069</stringValue>
</FieldValue>
</Field>

<Field name="PhoneNoBase.Customer" identifyingField="false">
<FieldValue>
<stringValue>9132</stringValue>
</FieldValue>
</Field>

<Field name="PhoneNoExtension.Customer" identifyingField="false">
<FieldValue>
<stringValue>01</stringValue>
</FieldValue>
</Field>

<Field name="CustTypeKey.Customer" identifyingField="false">
<FieldValue>
<stringValue>KEINE BEZIEHUNG</stringValue>
</FieldValue>
</Field>

<Field name="EmployeeOffice.Customer" identifyingField="false">
<FieldValue>
<stringValue>ALA</stringValue>
</FieldValue>
</Field>

<Field name="EmployeeSales.Customer" identifyingField="false">
<FieldValue>
<stringValue>THR</stringValue>
</FieldValue>
</Field>
</Entry>
Step 2
The values of the fields of the above template file that are to be populated from the source data file during import are replaced by any placeholders. Placeholders have the form @$<PlaceholderID>$@. The placeholders are initially independent of the order of the columns in the source data file.
Example:
 <Field name="Name1.Customer" identifyingField="false">
<FieldValue>
<stringValue>@$CustomerName$@</stringValue>
</FieldValue>
</Field>
<Field name="PhoneNoBase.Customer" identifyingField="false">
<FieldValue>
<stringValue>@$PhoneBase$@</stringValue>
</FieldValue>
</Field>
Fields that are to be assigned a fixed value during import remain unaffected.
Step 3
Now a configuration file config.xxic is created, which assigns the columns of the source data file to a placeholder in the template file. This can be done from within the program, as explained manually below.
The file is structured as follows:
-
each line contains an assignment:
<key>=<value>starting with the key 0. -
Mandatory key: template must specify the path to the template file created above (possibly relative to the configuration file itself).
-
A placeholder is assigned to each column index of the source data file:
<Column index>=<placeholder> -
In addition, each column can be assigned a processor class that allows virtually any checks and changes to the values. However, these changes only take effect after a value has been read in. For example, you cannot change a date value in this way so that it matches the specified date format.
<Columnindex>.processors=<Class1>;<Class2>(<Arg1>,<Arg2>);..;<classN>-
Possible processor classes are currently:
-
NotEmpty -- Reports an error when a field of the column is empty
-
Regex -- Performs a search/replace using regular expressions in each field of this column (see example below)
-
IsFloat -- Reports an error if the value in the column is not a float
-
IsInt -- Reports an error if the value in the column is not an integer
-
-
Example:
template=template.xml
0=CustomerName
1=PhoneBase
2=Date
2.processors=NotEmpty;Regex(^(\\d{2})\\.(\\d{2})\\.(\\d{4})$,$3-$2-$1)
This would mean that no empty values are allowed in the third column (Date), and values of the form DD.MM.YYYY are converted to YYYY-MM-DD.
Special features for number and date formatting
Excel
Number and date values from Excel are not transferred to the XML structure as specified in Excel, but an attempt is made to adapt them to the type specified in the template. For numbers with <intValue></intValue>, for example, decimal places would be trimmed, while with <doubleValue></doubleValue> or <longValue></longValue> they would be taken over, or filled up with zeros. Date values are converted to date with/without time. A list of the Excel formats for which this works correctly is given below.
Any formatting not listed here is not supported.
Supported number formats
In all cases, both point and comma are supported as pre/post decimal separators.
-
Numbers can be formatted as standard.
![Number_format1[1].png](/__attachments/a_c3db16e864dfc1ff181f8d80b0923f36d4ed5b97ff74a4411d048cc3a1e5823d/Number_format1%5B1%5D.png?cb=d0383c9c738781f1a5d4482aecb04318)
-
Numbers can be formatted as text.
![Number_format2[1].png](/__attachments/a_d83e39d38eb80962a80feb0e32b2d65a53c0aeec6770466c1c6e04bfd6c760e2/Number_format2%5B1%5D.png?cb=fe5135fc215620e0d7f08ba3cec035e8)
-
If the numbers are formatted as number, all setting options may be used.
![Number_format3[1].png](/__attachments/a_3a631c0275c28640d32722a2976ba206c28e58b40ab97fb7ede79055513875fe/Number_format3%5B1%5D.png?cb=768b5b780be00fbb7a440a7b6f10cb38)
If a number ends with ".0" and the target is a <stringValue>, the ".0" is trimmed.
Supported date formats
-
If a date is formatted as date, all German and English (UK) formats can be used.
-
If a date already has the correct structure for the interface, in other words 1983-07-05T00:00:00 or 1983-07-05, it can also be formatted as standard or text. In this case, however, formatting is only done between these two formats, all other formats do not work here.
![Date_format2[1].png](/__attachments/a_ace8126c0f47cc51127daaa4e9f9274d9e5a89af7a9188d8e393a935f6d3b219/Date_format2%5B1%5D.png?cb=1191b57fb90fa5767b67941dc09a08e7)
In addition, any other format is supported per Excel file. After loading an Excel file, a dialog can be opened using the Settings button, in which this format can be specified. This only applies if neither of the two default formats has been recognized.
Possible date configurations
|
Letter |
Description |
Example |
|---|---|---|
|
G |
Epoch |
after Christ |
|
y |
Year |
1996 or 96 |
|
M |
Month in the year |
February or Feb or 02 |
|
w |
Week in the year |
27 |
|
W |
Week in the month |
2 |
|
D |
Day in the year |
189 |
|
d |
Day in the month |
10 |
|
F |
Day in the week of the year |
2 |
|
E |
Day in the week |
Fr or Friday |
|
a |
AM/PM |
PM |
|
H |
Hour of the day (0-23) |
0 |
|
k |
Hour of the day (1-24) |
24 |
|
K |
Hour in AM/PM (0-11) |
0 |
|
h |
Hour in AM/PM (1-12) |
12 |
|
m |
Minute in the hour |
30 |
|
s |
Second in the minute |
55 |
|
S |
Millisecond |
978 |
|
z |
General time zone |
CEST |
|
Z |
RFC 822 time zone |
+0200 |
Examples: "yyyy.MM.dd G HH:mm:ss z", "EEE, MMM d, yy", "h:mm a", "K:mm a, z", "yyyyy.MMMMM.dd GGG hh:mm aaa", "EEE, d MMM yyyy HH:mm:ss Z", "yyMMddHHmmssZ"
CSV
For number and date values from CSV, an attempt is made to adapt them to the type specified in the template. For numbers with <intValue></intValue>, for example, decimal places would be trimmed, while with <doubleValue></doubleValue> or <longValue></longValue> they would be taken over, or filled up with zeros. Date values are converted to date with/without time. A list of the formats for which this works correctly is given below.
Supported number formats
Numbers can be given as integers, separated by a period or comma.
Supported date formats
Date values can be specified in the two standard XML import formats. This is always checked first.
In addition, any other format is supported per CSV file. After loading a CSV file, a dialog can be opened using the ![]()
Possible date configurations
|
Letter |
Description |
Example |
|---|---|---|
|
G |
Epoch |
after Christ |
|
y |
Year |
1996 or 96 |
|
M |
Month in the year |
February or Feb or 02 |
|
w |
Week in the year |
27 |
|
W |
Week in the month |
2 |
|
D |
Day in the year |
189 |
|
d |
Day in the month |
10 |
|
F |
Day in the week of the year |
2 |
|
E |
Day in the week |
Fr or Friday |
|
a |
AM/PM |
PM |
|
H |
Hour of the day (0-23) |
0 |
|
k |
Hour of the day (1-24) |
24 |
|
K |
Hour in AM/PM (0-11) |
0 |
|
h |
Hour in AM/PM (1-12) |
12 |
|
m |
Minute in the hour |
30 |
|
s |
Second in the minute |
55 |
|
S |
Millisecond |
978 |
|
z |
General time zone |
CEST |
|
Z |
RFC 822 time zone |
+0200 |
Examples: "yyyy.MM.dd G HH:mm:ss z", "EEE, MMM d, yy", "h:mm a", "K:mm a, z", "yyyyy.MMMMM.dd GGG hh:mm aaa", "EEE, d MMM yyyy HH:mm:ss Z", "yyMMddHHmmssZ"
Automatic filling with the blank key
If an import is to be performed via the CURSOR Importer or directly via the XML import interface, and a lookup field in which the blank key is allowed is not populated (see the following examples), it is now automatically populated with the blank key. These changes apply to versions 12.1, 11.2.01 and 11.1.14.
Example for Excel:
![Excel_leer[1].png](/__attachments/a_ce4f8cdd45cf2d4af69886981e7c890c41409d53a53e8f0a88cd80aa1d7e1bee/Excel_leer%5B1%5D.png?cb=0ef903572e3a722ebf300fd7f453adde)
Example for CSV:
![Csv_leer[1].png](/__attachments/a_bfdbfdd888e6f7f80c0a5934d1d1a81439f4423f6d0471b68fdae5a4b0bf9111/Csv_leer%5B1%5D.png?cb=9b04a3e98cad78d71f905702e0efea78)
Example for XML:
![Xml_leer[1].png](/__attachments/a_36a95caba43cb58f6771a04921ef0da37a5aef011e226fa0e0285079fb53f9c5/Xml_leer%5B1%5D.png?cb=f757c36c659f8a9bd36c639f213f3862)
Empty Boolean, Double, Date
If an import is to be performed via the CURSOR Importer and a date, number or Boolean field is not populated (see the following examples), it is now emptied.
Example for Excel
![Excel_leer2[1].png](/__attachments/a_d345dc17a6ccbbb0515610fdc3a7a2db9820fe08c305da031ad5ff89a74e8d70/Excel_leer2%5B1%5D.png?cb=8793bf7874546ae82f4809571c859147)
![Csv_leer2[1].png](/__attachments/a_13c2096d6b7b3bb398ec7001e7fd0e88628fe1a6dd50b57512191f7a5a8b25e0/Csv_leer2%5B1%5D.png?cb=67ec42daccd6d39eecc22af58dee3e36)
Excel error: Unexpected characters in the text
If multi-line text is stored in a cell in an xlsx file, unexpected characters may appear at the position of the line break in the generated XML files and thus also in the imported datasets. For example "_x000D_". This is an Excel bug which CURSOR Software AG has no control over. As a workaround, the xlsx file can be saved as an xls file and re-imported by the Importer. This circumvents the problem.
$java -cp importer.jar de.cursor.importer.console.ConsoleImporter
-c d:\ImporterBeispiele\Aktivitäten\act_conf.xxic -t d:\ImporterBeispiele\Aktivitäten\ACT_template.xml
-d d:\ImporterBeispiele\Ausgabe -f d:\ImporterBeispiele\Aktivitäten\act_import.csv -v 1 -w both
--webservice-url http://localhost:18080/CARMEN-ejb/WebServiceController --webservice-password 7FC203845F060800D0CA152D46BA8269
--webservice-user bne -e windows-1252 -es \ -sep ; -q \" -df dd.MM.yyyy


Mit SSL (ab 19.2 zwingen nötig):
$java -cp importer.jar -Djavax.net.ssl.trustStore="mytruststore.p12" -Djavax.net.ssl.trustStorePassword="mytruststorepw" de.cursor.importer.console.ConsoleImporter
-c d:\ImporterBeispiele\Aktivitäten\act_conf.xxic -t d:\ImporterBeispiele\Aktivitäten\ACT_template.xml
-d d:\ImporterBeispiele\Ausgabe -f d:\ImporterBeispiele\Aktivitäten\act_import.csv -v 1 -w both
--webservice-url http://localhost:18080/CARMEN-ejb/WebServiceController --webservice-password 7FC203845F060800D0CA152D46BA8269
--webservice-user bne -e windows-1252 -es \ -sep ; -q \" -df dd.MM.yyyy