Customizing transports
General description
Customizing transports are another option for transferring customizing (adjustments) from one system to another. One data source in which the adjustment is made should be available. There can be any number of target systems. Customizing should be deactivated in these to ensure that there will always be an expected customizing version available. A 3-system landscape is recommended, with a development, consolidation and production system.
The following convention is used in this documentation for the fictitious web service links:
(D) Development
CODEhttp://ent-server:18080/CARMEN-ejb/CrmWebService?wsdl(C) Consolidation
CODEhttp://kons-server:28080/CARMEN-ejb/CrmWebService?wsdl(P) Production
CODEhttp://prod-server:28080/CARMEN-ejb/CrmWebService?wsdl
The (administrative) user is asked at each customizing change, which customizing package he wants to assign the customizing to. If the user does not select a package, the change is canceled.
The first packages can be exported and imported into the target system. All customizings assigned to the package will be transferred. Packages can be accepted. That means the transfer was confirmed. They can also be discarded, which will roll back all changes.
The user must ensure that a package accepted in one system is also accepted in the other systems. The same applies for discarded packages. The packages (zip files) can be manually exported and imported. There are also automated transfer options (e.g. via time-controlled web services).
Here you can see an illustration of the entire procedure:
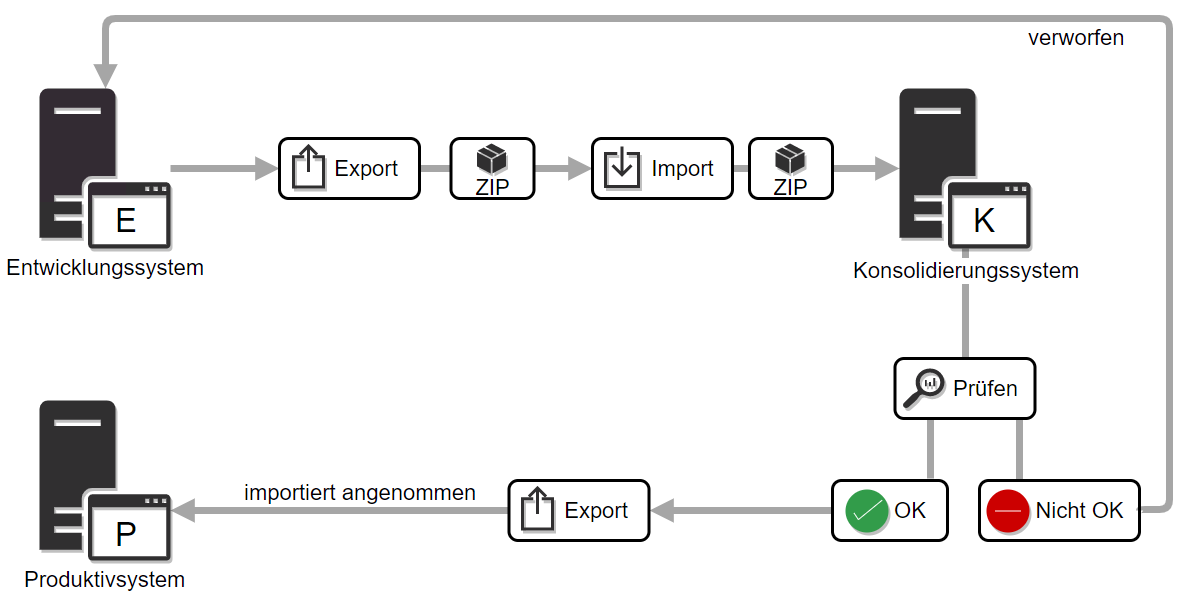
Figure: Example of a 3-system landscape with manually transferred customizing packages
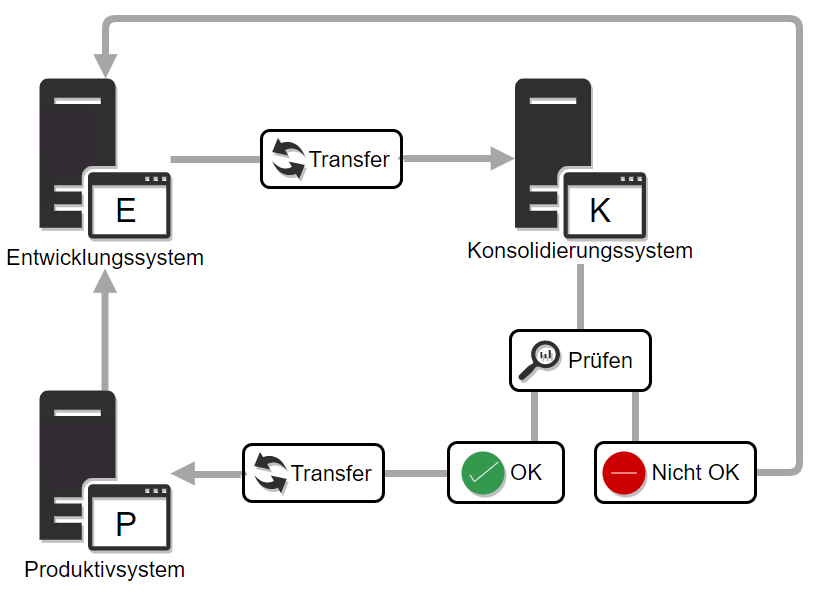
Figure: Example of a 3-system landscape with customizing packages transferred via transfer
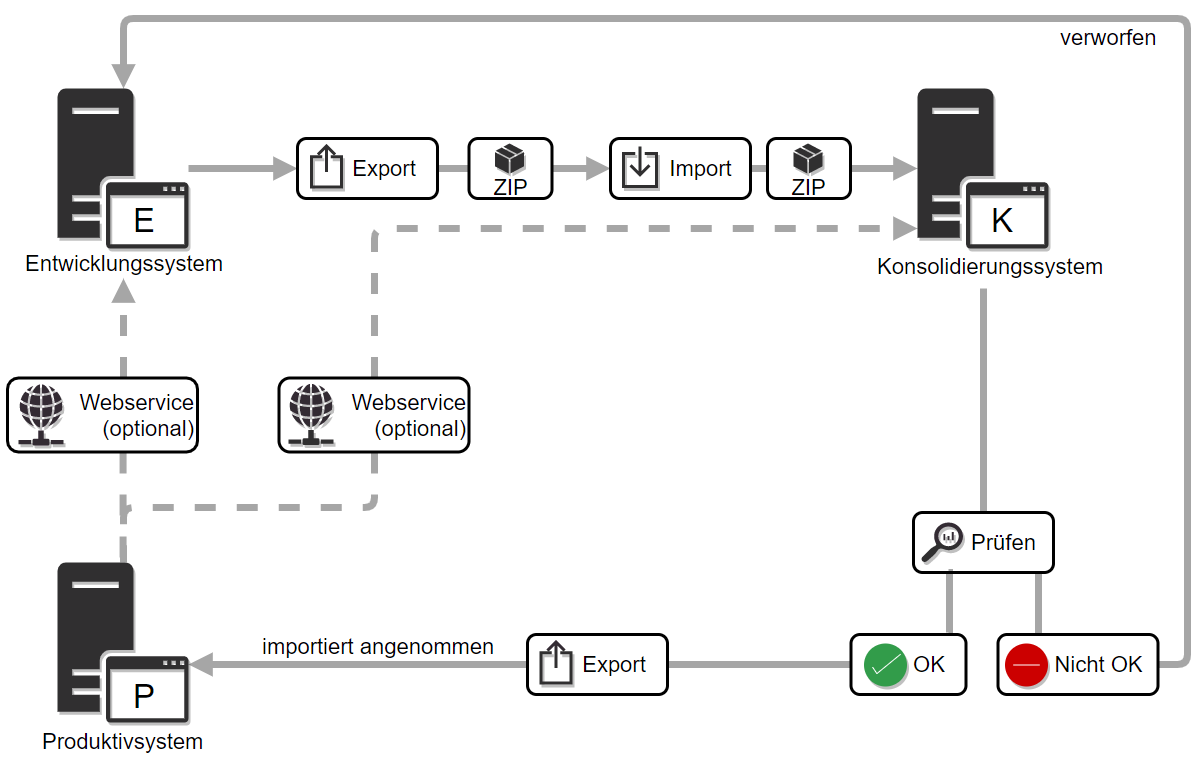
Figure: Example of a 3-system landscape with manually transferred customizing packages and those transferred by web services
Activation
The following PropertyMapper statement must be saved to enable the customizing transports:
UPDATE PropertyMapper SET PropertyValue = 'true'
WHERE id like '%/de/cursor/jevi/common/admin/serverconfig/CustomizingTransportSettings$!!$transport_enabled'
The statement dialog can be used for this purpose.
All participating systems should be at the exact same status at the time of activation. Ideally, this can be ensured by transferring a database dump from the production system to the other systems.
Once the transport has been activated, it should not be deactivated because this may result in inconsistency in the transport data. That is why the activation is done via SQL and not via a setting.
Update
When doing an update, make sure that the timers Import Customizing packages, Merge global variables and Merge keys are deactivated in all systems that communicate with each other. These should only be reactivated, once all associated systems have completed the update process.
Configuration
The behavior of the customizing transports in the participating systems is configured via several system preferences. Which of the systems in a 3-system landscape will be the development, consolidation or production system is determined via the two settings Source for customizings and Production system.
All settings can be found in the Customizing Transport settings area.
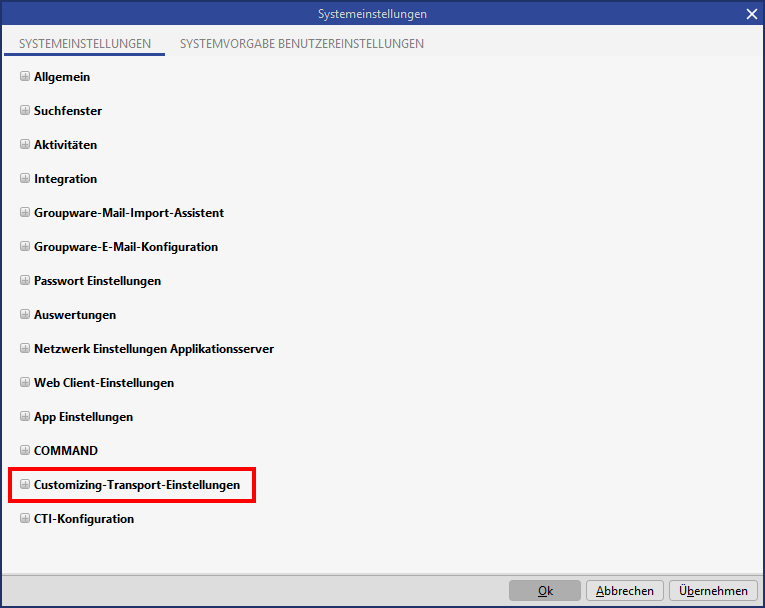
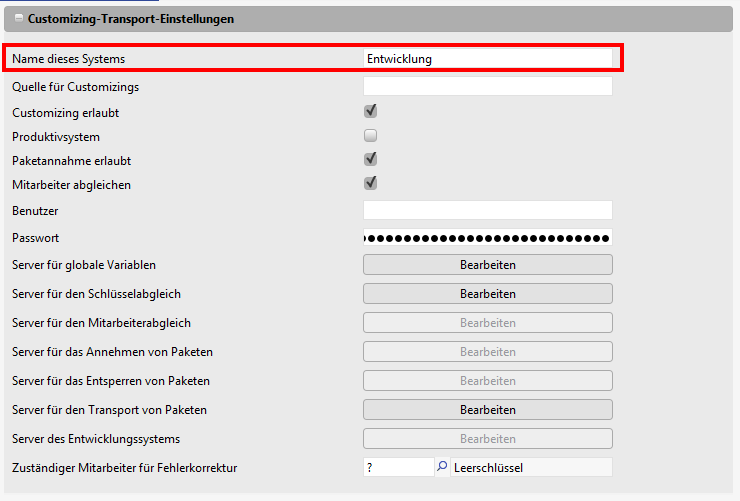
System name
This value must be filled with a freely selectable value like production system or development after the customizing transport is activated and identifies the system in the local network. This name will also be saved in the packages as the source system. Global variables use it to determine which value should be displayed. That is why this value - once set - should not be changed again.
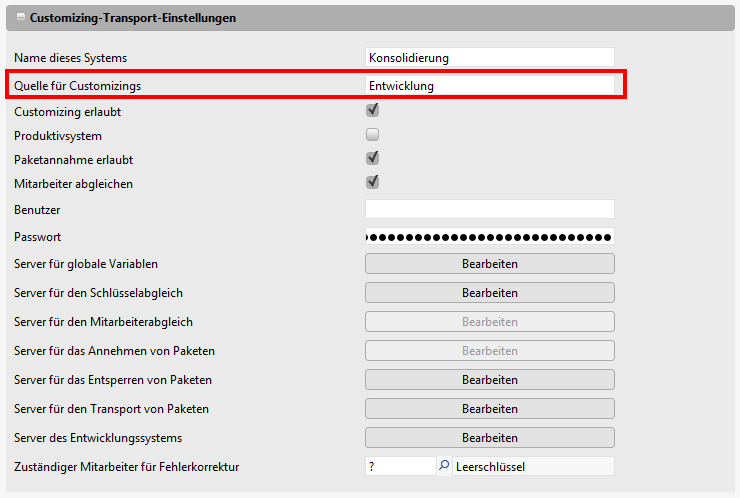
Source for customizings
The Source for customizings value determines from which system customizings should be transferred. It references the setting System name described above. Only packages from this system can be selected during the import.
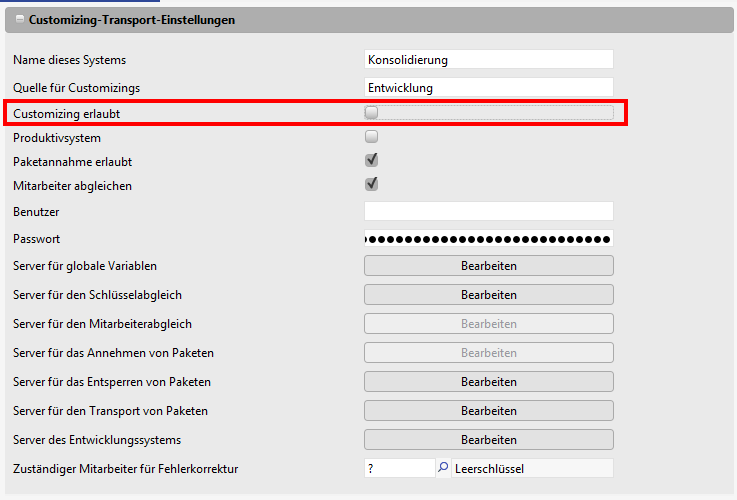
Deactivate customizing
All customizing settings are deactivated if the system preference Customizing allowed option is deactivated. This setting is unavailable if production system is set; it is always deactivated in this case.
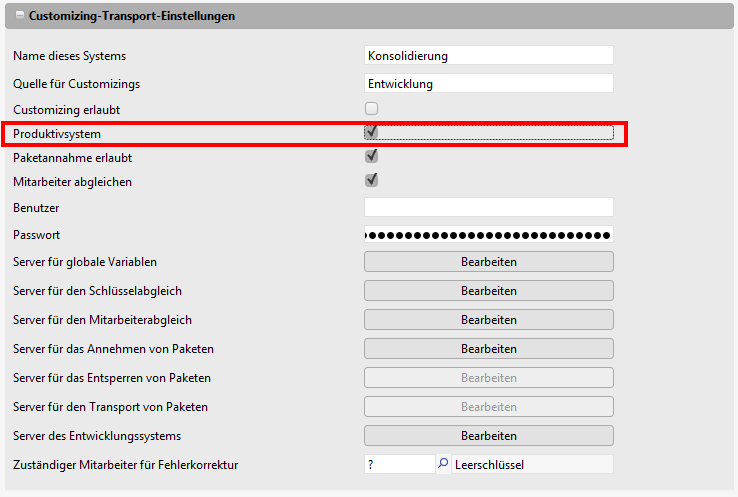
Production system
The check mark for Production system specifies this system as the production system. Imported packages are accepted directly. If the check mark is not placed, packages can be accepted or discarded once they are imported to their mask.
Synchronization of global variables
The values of global variables are automatically consolidated between all configured servers. Either the variables of another server are imported once it is selected in the interface, or a timer can be activated that will complete this task regularly.
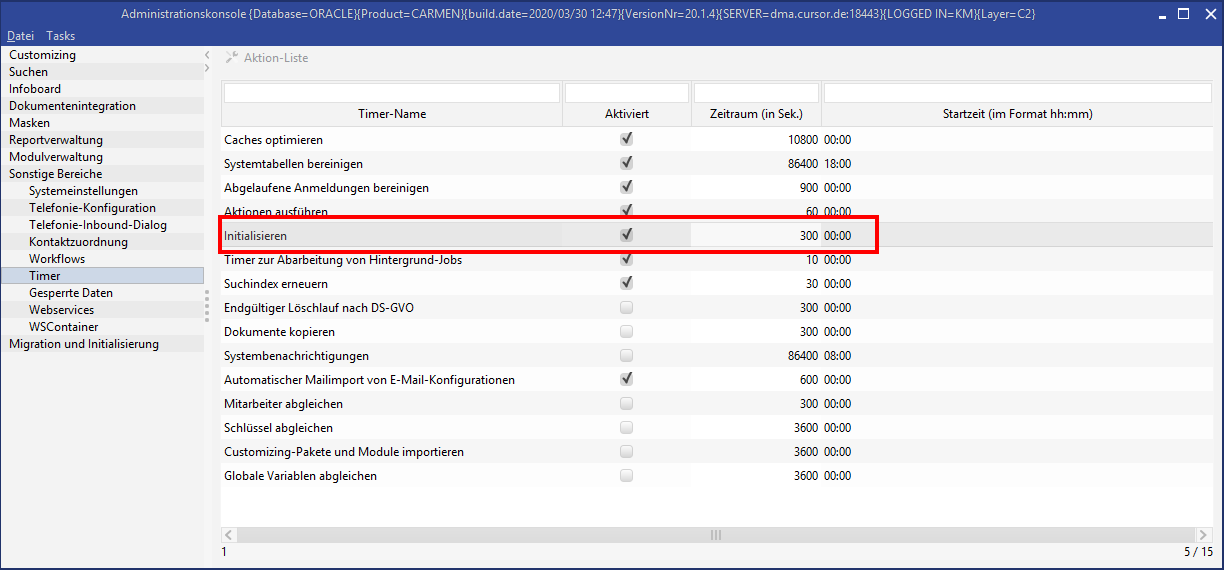
Several system settings are needed to make this work.
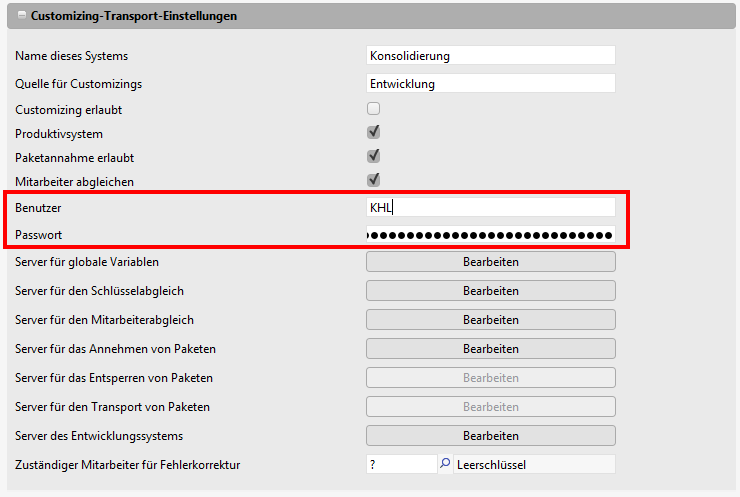
User data
A user must be created in the context of whom global variables and keys are consolidated. His short name and the encrypted password must be provided. This will be the password in clear text if Kerberos is activated.
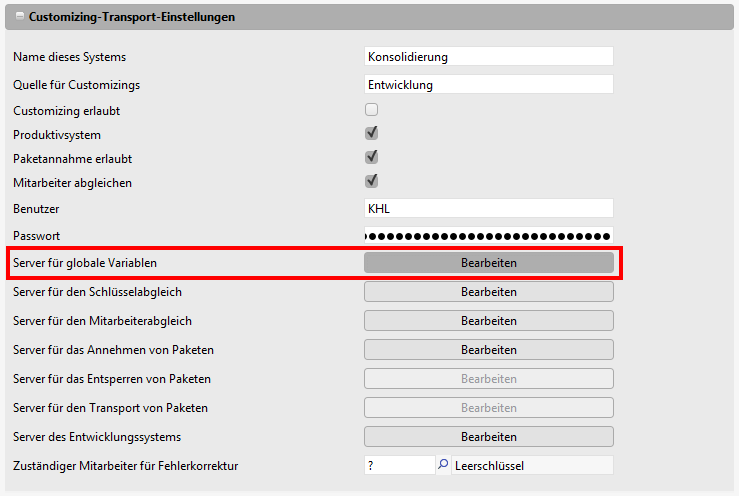
Server for global variables
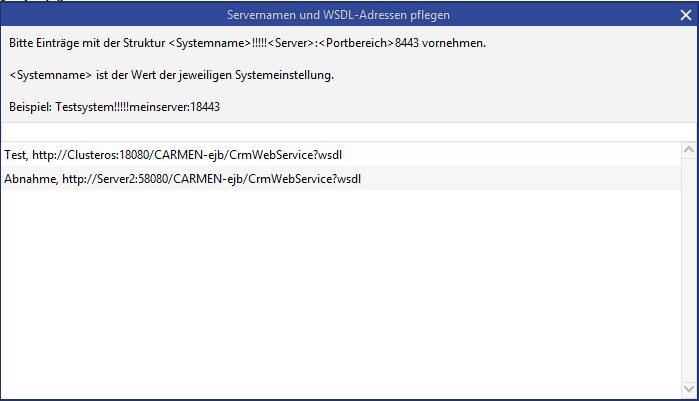
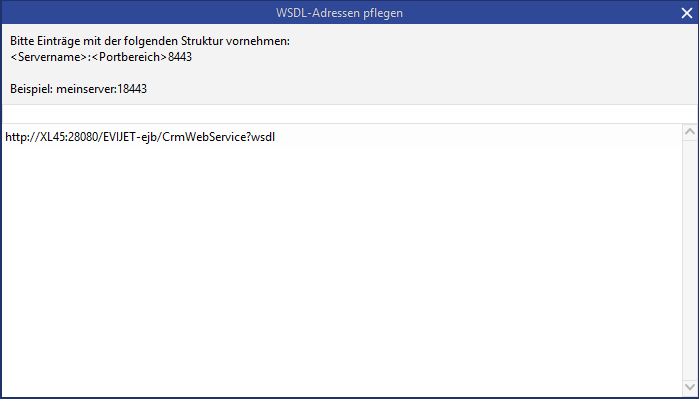
All servers to be consolidated must be included in a list:18018. The structure is <Servername>;<WSDL address of the server>. For <Servername>, see the chapter on the setting System name.
Key consolidation
The key values are automatically transferred from the production system to all configured servers. This requires several settings.
User data
See the same chapter in the section about consolidating global variables.
Server for key consolidation
All servers to be consolidated must be included in a list.
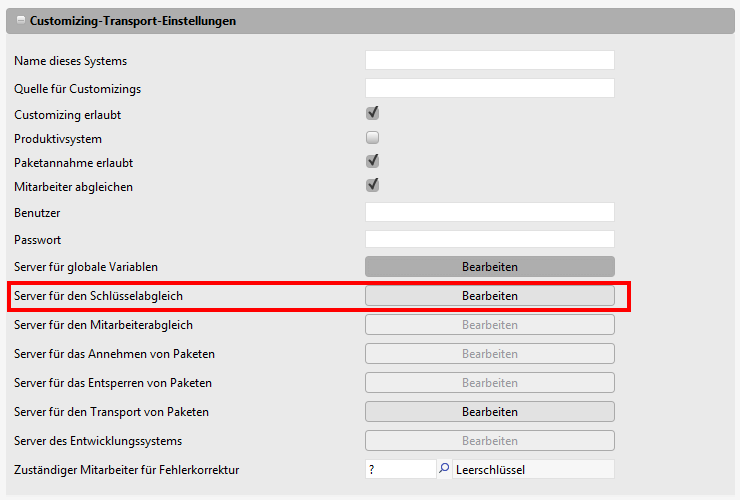
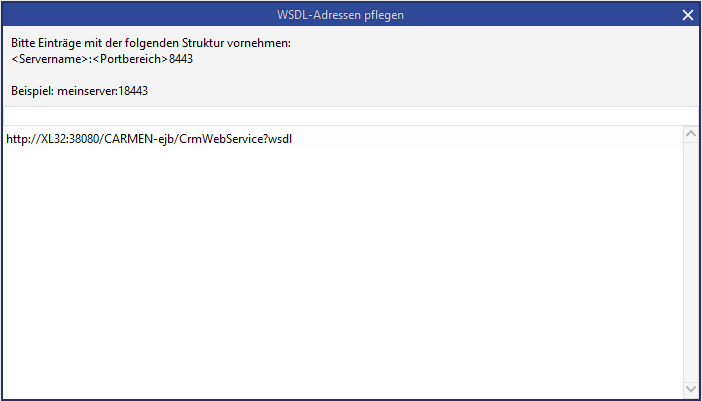
Employee consolidation
Newly created employees are automatically transferred from the production system to all configured servers. This requires several settings.
User data
See the same chapter in the section about consolidating global variables.
Server for employee consolidation
All servers to be consolidated must be included in a list.
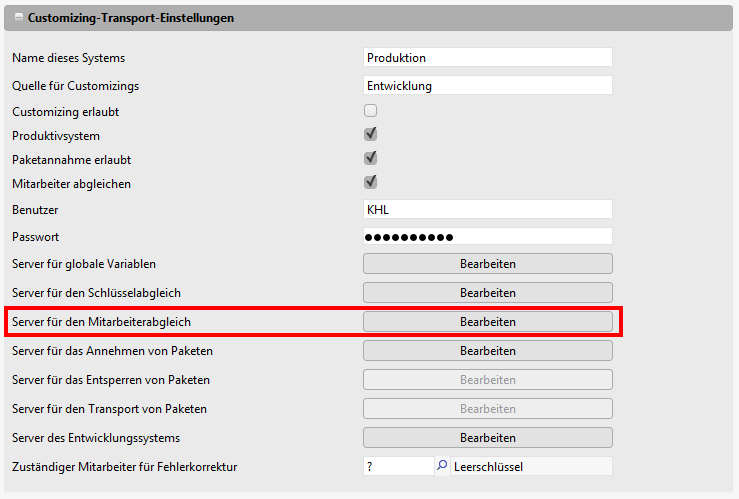
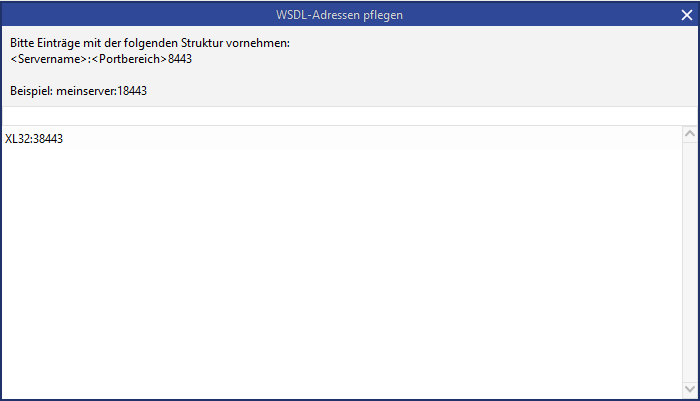
Person responsible for error correction
You can select an employee to receive activities if a conflict is discovered during the automatic key consolidation. This employee also receives an activity if an error occurs during the automatic import of customizing packages.
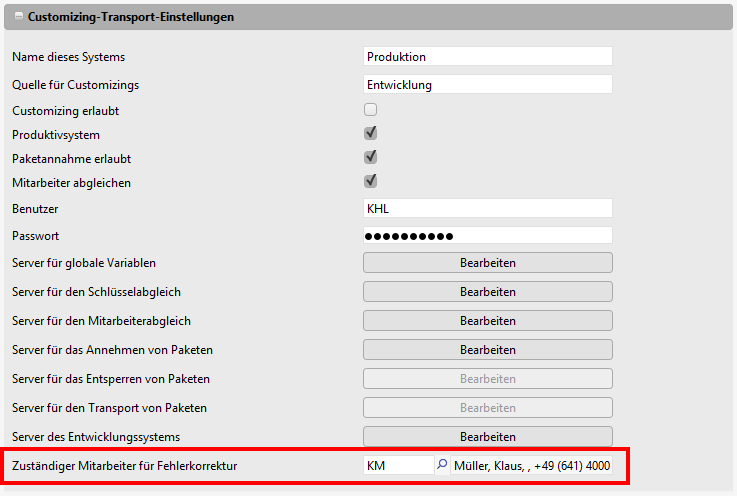
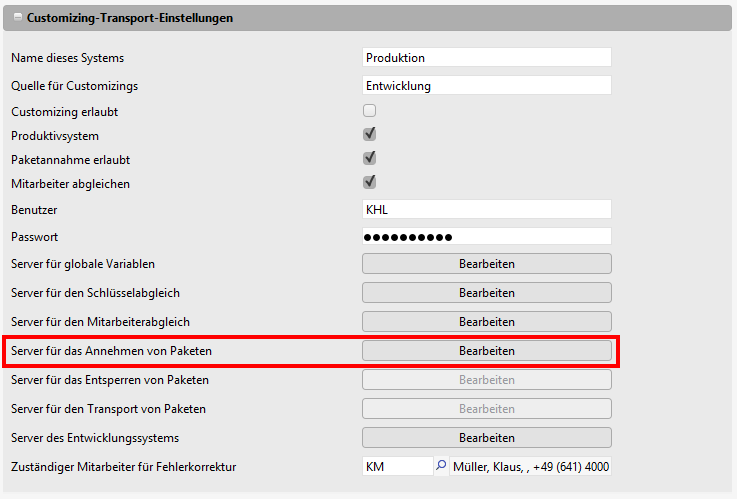
Automatic package acceptance
If a package is imported into the production system, it will be accepted automatically. Any servers saved here will accept the package at the same time. This requires several settings.
User data
See the same chapter in the section about consolidating global variables.
Server for the acceptance of packages
All servers that should accept packages must be included in a list.
Example configuration of a 3-system landscape
Example configuration of the three systems: development, consolidation and production system. CURSOR Software AG recommends this system landscape for customizing transport.
Development system
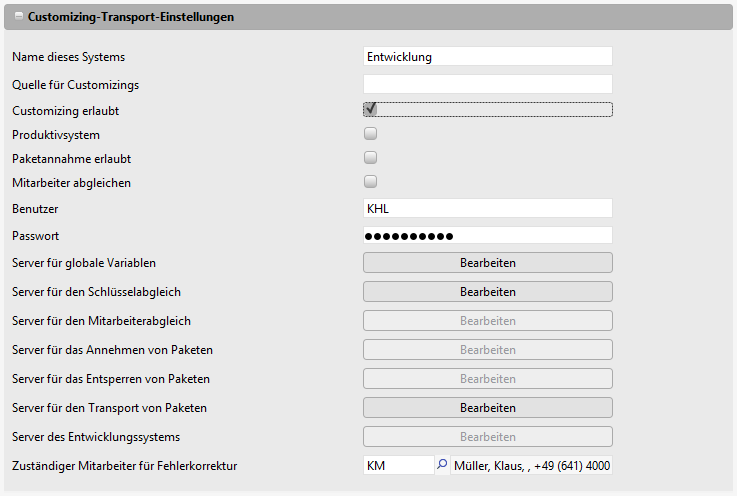
The development system, like all systems, must be given a unique name via the setting System name. The 'Source for customizings' setting is empty, because nothing will be imported into the development system. The Customizing allowed check mark is set; this is where the customizing should be done. The Production system check mark is not set.
Consolidation system
The consolidation system, like all systems, must be given a unique name via the setting System name. The setting Source for customizings is filled with the unique name of the development system, because the packages will be acquired from there. The Customizing allowed check mark is not set; no customizing will be done here. Changes are made via package imports only. The Production system check mark is not set.
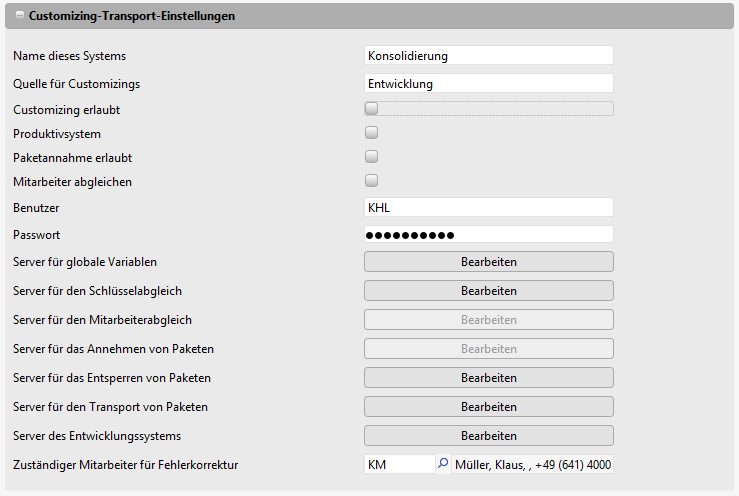
Production system
The production system, like all systems, must be given a unique name via the setting System name. The setting Source for customizings is filled with the unique name of the development system, because the packages will be acquired from there. The Customizing allowed check mark is not set; no customizing will be done here. Changes are made via package imports only. The Production system check mark is set. This check mark differentiates the system from the consolidation system; packages are accepted automatically during import.
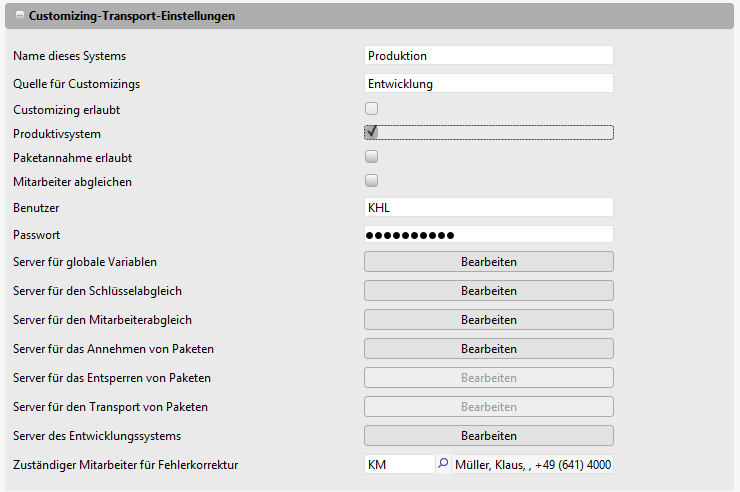
Example configuration of a 2-system landscape
Example configuration of the two systems (development system and production system). CURSOR Software AG recommends a 3-system landscape for customizing transport. However, a 2-system configuration is possible as well. The consolidation system will not be included.
Development system
The development system, like all systems, must be given a unique name via the setting System name. The setting Source for customizings is empty, because nothing is imported into the development system. The Customizing allowed check mark is set; this is where the customizing should be done. The Production system check mark is not set.

Production system
The production system, like all systems, must be given a unique name via the setting System name. The setting Source for customizings is filled with the unique name of the development system, because the packages will be acquired from there. The Customizing allowed check mark is not set; no customizing will be done here. Changes are made via package imports only. The Production system check mark is set. This check mark differentiates the system from the consolidation system; packages are accepted automatically during import.
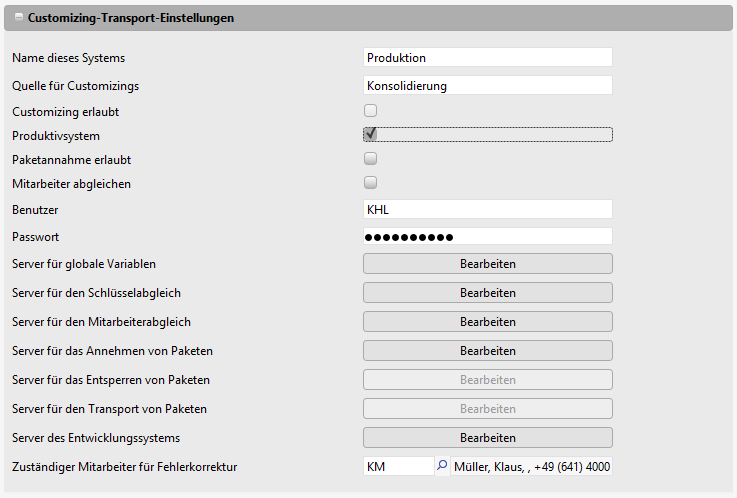
Example configuration for key consolidation in a 3-system landscape
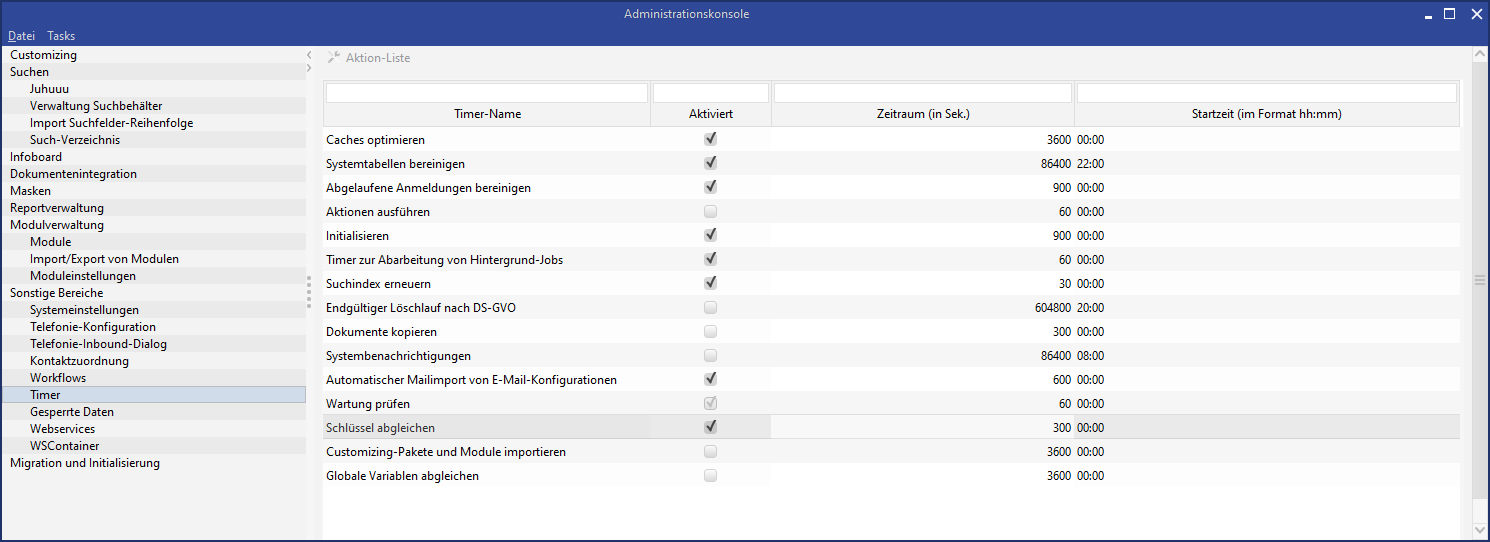
The timers of 3 systems must be activated and configured in order to ensure a smooth synchronization.
Complete consolidation of all systems if they are configured correctly (Configuration see below).
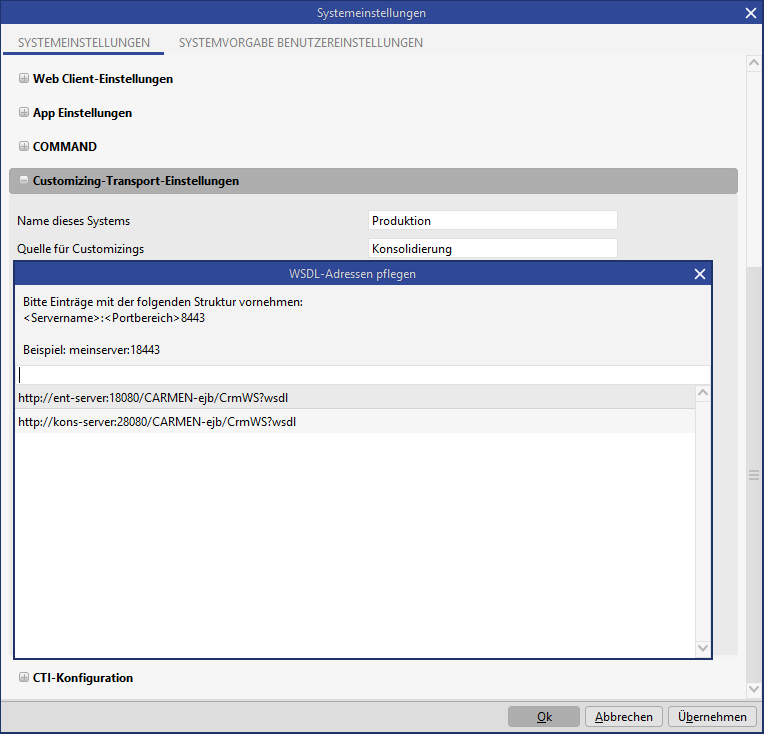
Figure: Production system
Timer settings
Surface components
The currently assigned package as well as the change history can be viewed directly for almost all customizings. One of the following components is provided for this purpose:
Component | Figure |
|---|---|
Toolbar button |

 |
Button |  |
Context menu item | 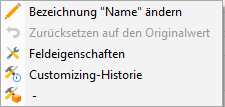 |
One component always shows the currently assigned package or “-” if no package was assigned. The other component opens the history dialog for current customizing:
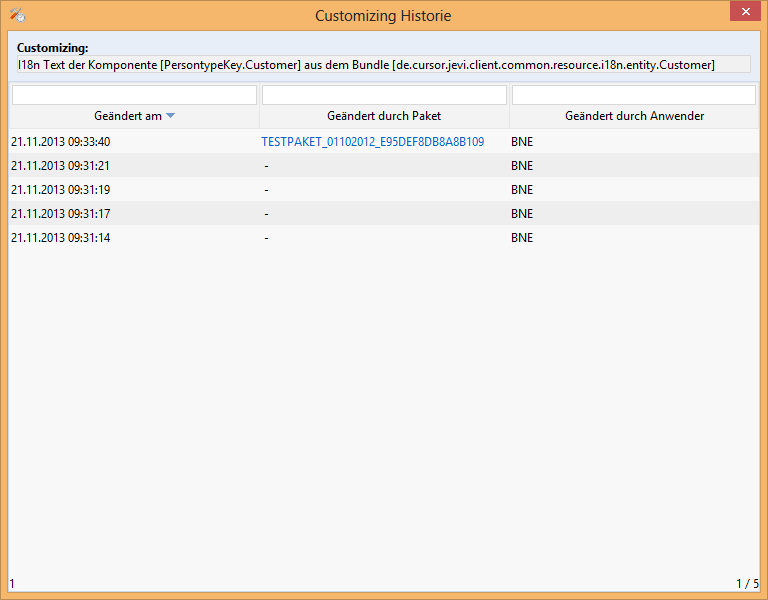
In this dialog you can see who changed which customizing and when. The customizing in the application was changed if “-” is entered as the package. If a package name is displayed here, then the user uploaded a package and thereby changed the customizing. If the user is in the main application, i.e. not in the administration console, then clicking the package name will open the package in a new level in the background.
The entities: Customizing package and Customizing
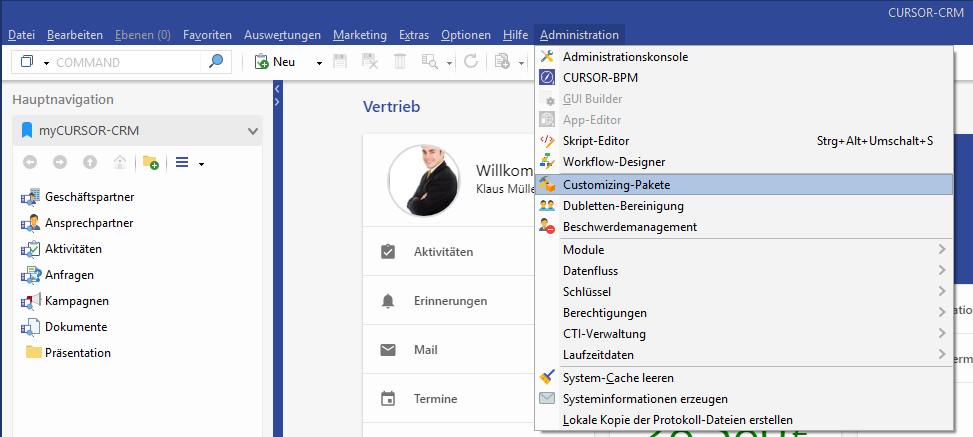
The created/imported packages can be viewed in the menu under Administration / Customizing Packages. They may have a technical/functional contact and should contain a description of the changes. In the sub area you can see which customizings are connected to this package.
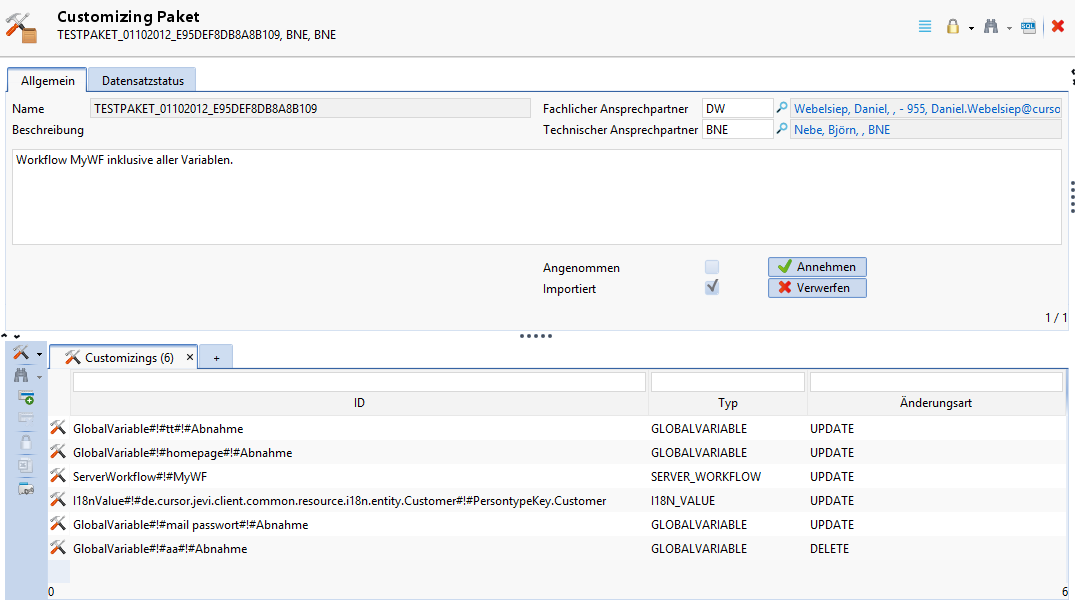
Accept/discard packages
A package can be accepted or discarded in the entity mask.
Accept means that it was successfully uploaded to the target system and the attached customizings must be approved again. The package can no longer be changed and only serves for documentation purposes. Another prompt to select a package will appear if these customizings are changed again. Packages are automatically accepted in the production system during import.
Discard means that all changes connected to the package will be rolled back. Once a package has been accepted, it can no longer be discarded.
When a package is discarded, it is not deleted but marked as "Discarded" and "Discarded on" and "Discarded by" are set. The linked customizings will be deleted, also the changes will be undone. Only the empty package remains.
Export/Import/Transfer
A wizard for the import or export of created packages is initiated in the administration console via Export/import customizing / Customizing packages. Imported packages cannot be changed and exported again. Changes should only be made in the system in which the package was created. A package can be exported multiple times as long as it was not yet accepted.
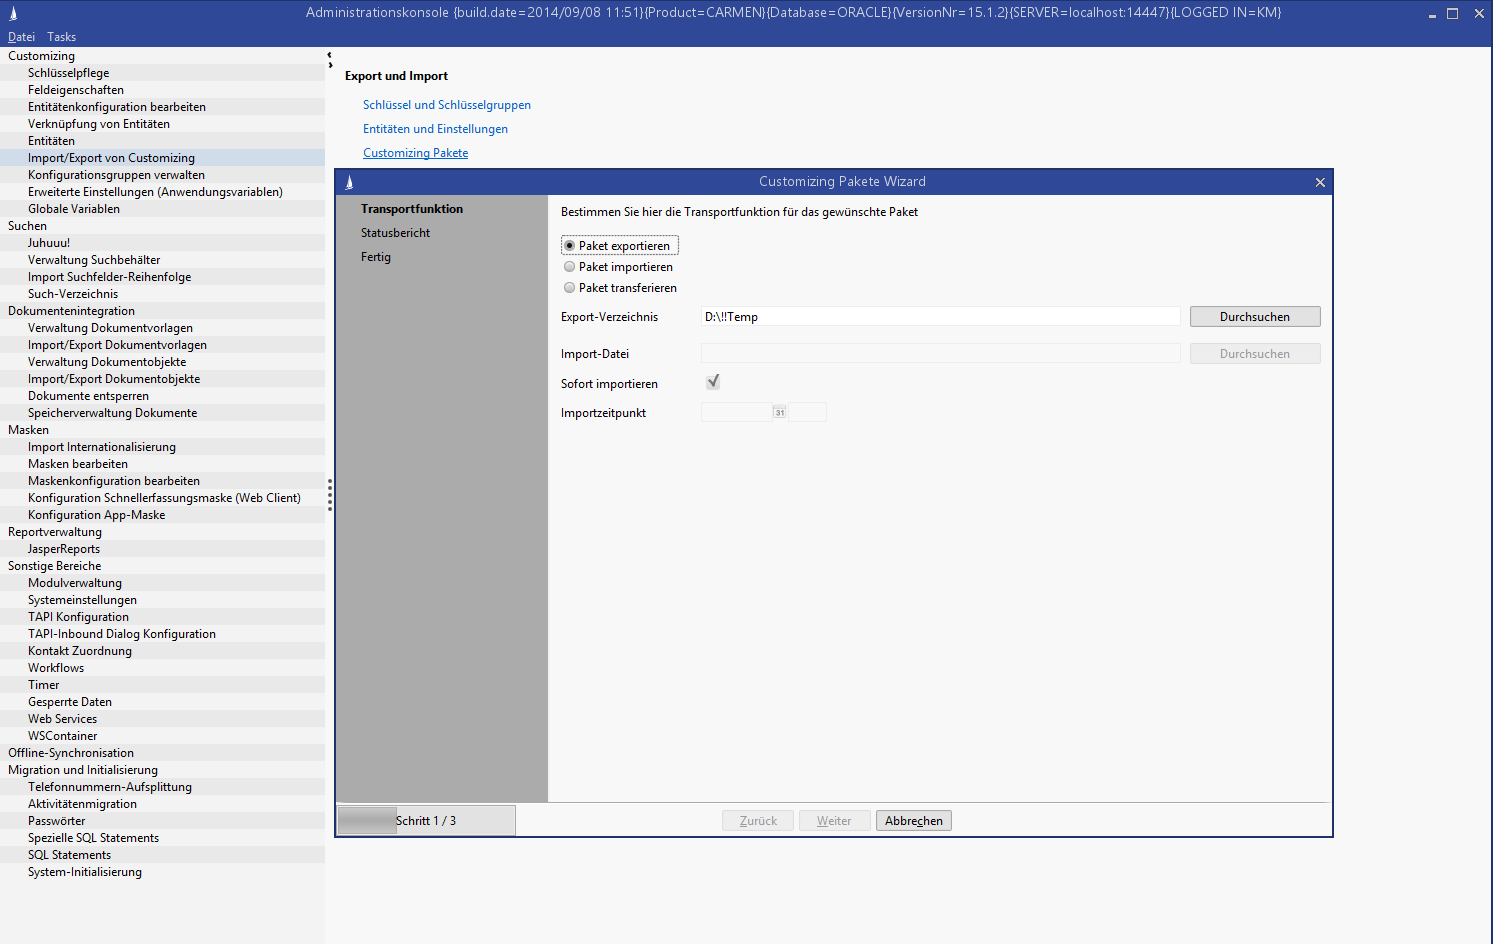
On the first page you decide, whether the package should be imported or exported or whether a directory or the package should be selected. A date can be optionally selected during the import. In this case, the package will not be imported immediately; the import will be done later in the background. See Automatic import.
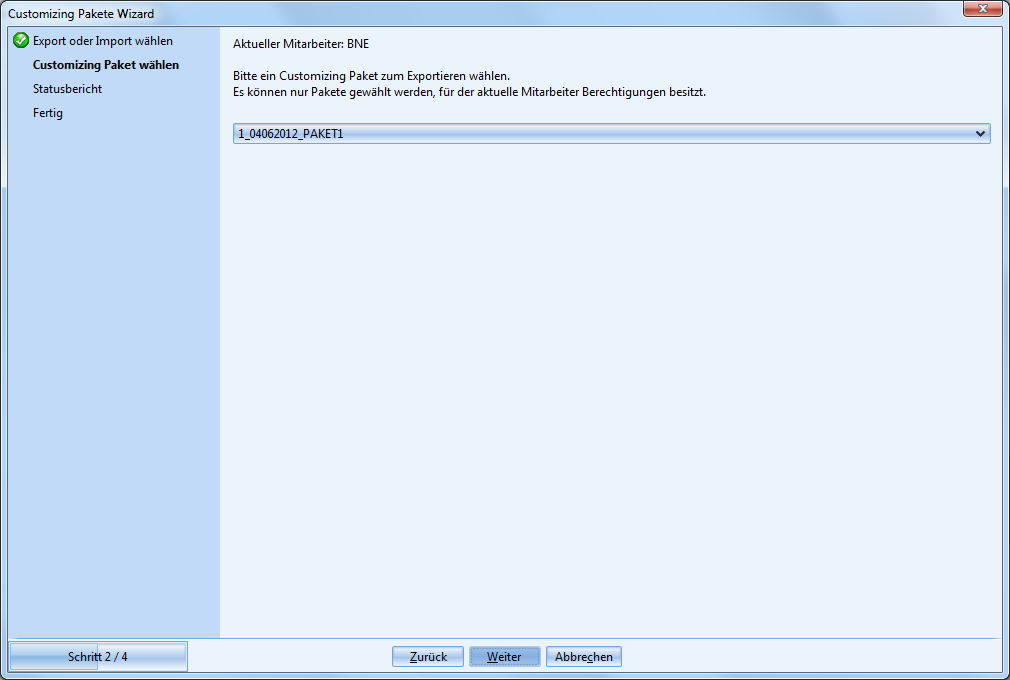
If you select 'Export', then you have to select the package on the next page. This page is skipped for import.
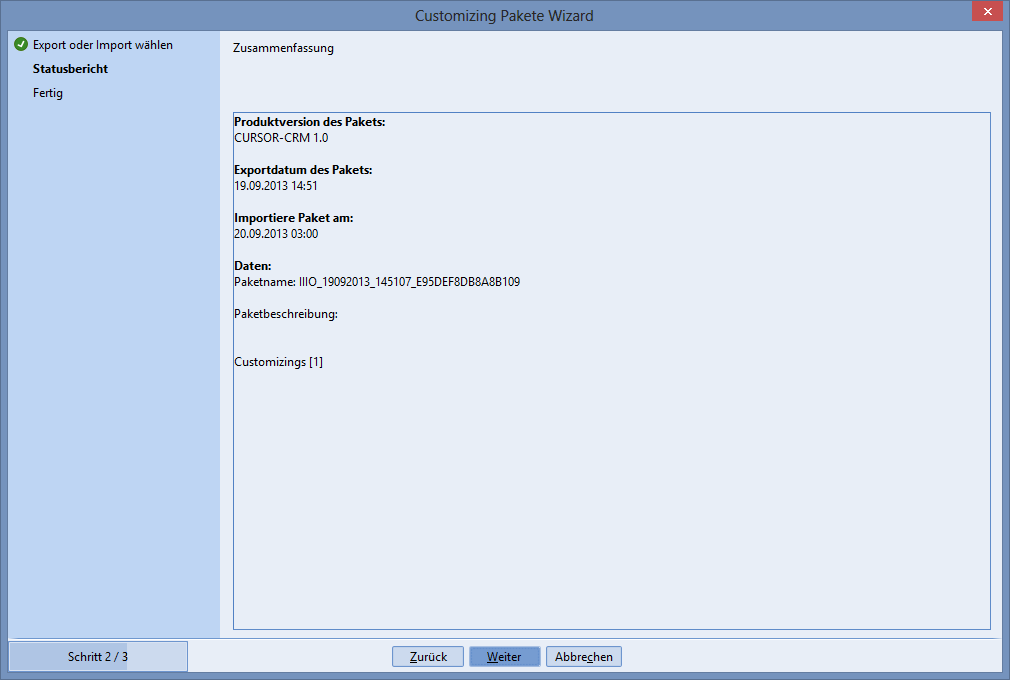
A summary of the package to be imported or exported will be displayed.

Next you have the option to block the login for all other users during the import. Any users currently logged in to the system will be automatically logged off. There will be no prior warning for the affected users; the session will end immediately.
This prompt applies only to the import.
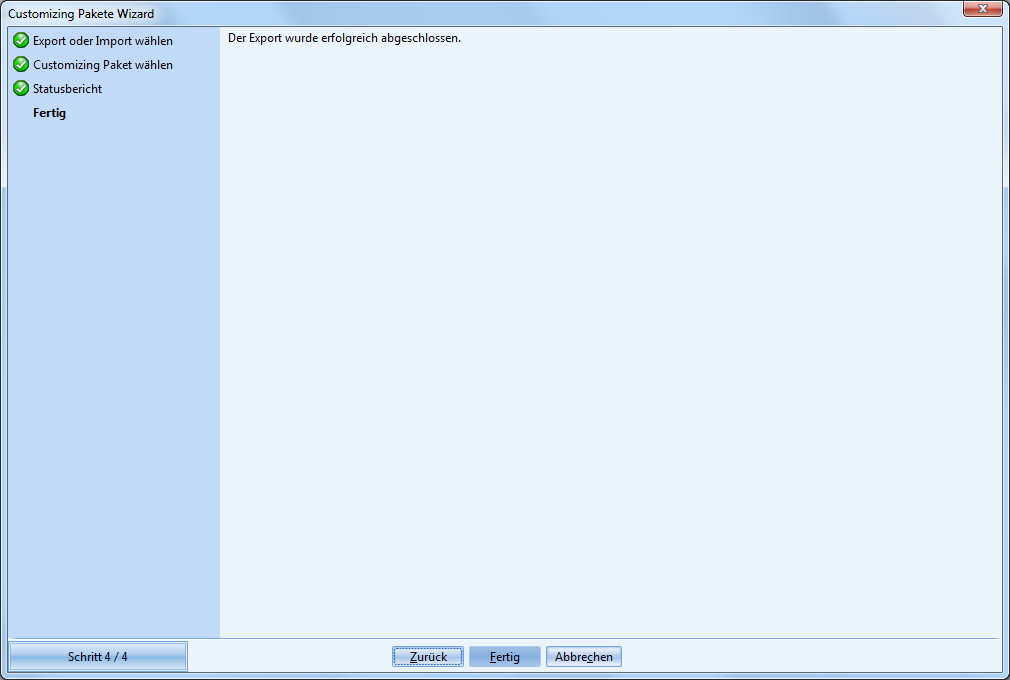
As a final step, the successful import or export is confirmed.
Automatic import
If a check mark was placed for Import later during the import, and a date was selected, then the package is moved to the application server and earmarked for import. The Import customizing packages timer regularly checks if packages are scheduled for import. It can be activated via the administration console.
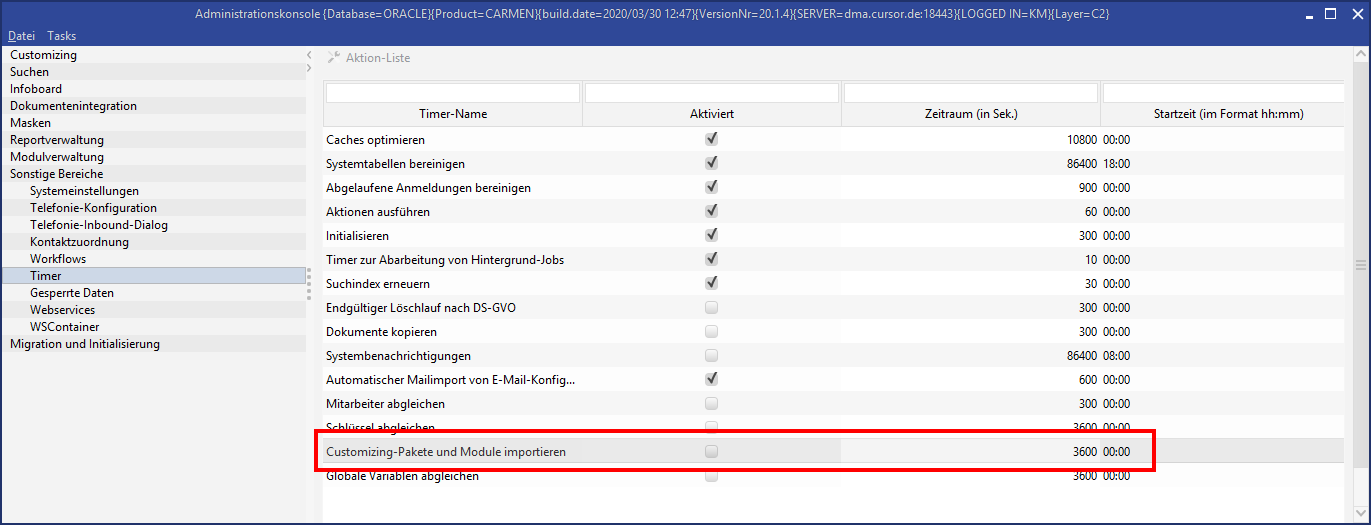
If the import fails, the responsible person will receive an activity and, if necessary, a mail. See chapter Responsible person for errors.
Batch export/import
Customizing packages and modules can be exported or imported in batches without starting the client. The settings are transferred via command line parameters and the process is started immediately.
Requirements
This is a client-side invocation. The client must therefore be configured to connect to the desired server. Furthermore, (for customising packages) the customizing transport must be active and correctly configured.
Invocation
The invocation is based on the client start file run.bat. It is started via the parameter custTransport. The command run custTransport in the client’s bin directory shows the help:
usage: run custTransport [-d <dir>] [-f <file>] [-l <file>] [-m <export/import>] [-n <name>] [-p <pw>] [--packagename <name>] [-sso <true/false>] [-t <package/module>] [-u <user>]
 -d,--directory <dir>               The full qualified path of the package to import or the directory to export to, e.g. "d:\temp\".
 -f,--filename <file>               The name of the ZIP file to export to, e.g. "myModule.zip". If no name is set a name is generated.
 -l,--license <file>                The full qualified path of the license file to import, e.g. "d:\temp\license.xml".
 -m,--modus <export/import>         The modus. Valid values are "export" or "import".
 -n,--containerid <name>            The package or module file name to import e.g. "CustomizingPackage_MY_PACKAGE.zip" or the package or module name to export e.g. "MY_PACKAGE".
 -p,--password <pw>                 Password for authentication.
    --packagename <name>            Just for backward compatibility. Same as --containerid.
 -s,--singlesignon <true/false>     "true" if the OS user should be used to automatically login. "--username" and "--password" are ignored in this case, "false" otherwise. The default is "false".
 -t,--type <package/module>         The type. Valid values are "package" or "module". Default is "package".
 -u,--username <user>               Username for authentication.
The following parameters are available:
Short form parameters | Long form parameters | Argument | Description |
|---|---|---|---|
-d | --directory | <dir> | This specifies the target directory of the export if an export is required (-m export). This specifies the directory of the package if an import is required (-m import). |
-n | --containerid | <name> | This specifies the name of the package or module in the application if an export is required (-m export). This specifies the file name of the package or module if an import is required (-m import). |
-f | --filename | <file> | If export is to be carried out (-m export), this sets the name of the ZIP file of the package or module after export. This is optional, if no name is set, one will be generated. |
-m | --mode | <export/import> | This specifies the export mode with the “export” value or the import mode with the “import” value. |
-u | --username | <user> | This specifies the short name of the user that should be used to log in the transporter. |
-p | --password | <password> | This specifies the password of the user in plain text that should be used by the transporter to log in. |
-t | --type | <module/package> | Sets with the value "module" that a module should be exported/imported, or with the value "package" that a package should be exported/imported. The default value is "package". |
-l | --license | <file> | When a module is imported (-t module -m import) this specifies the file name of the license file. This is optional, the license can also be imported later via the interface. |
--packagename | <name> | For downward compatibility only: Can be used as an alternative to --containerid. | |
-s | --singlesignon | <true/false> | If the parameter is set to "true" the parameters "-username" and "-password" are not needed. Instead, an attempt is made to perform an autologin with the active OS user. The default value is "false". Requirements:
|
A complete invocation could look like this:
Export
run custTransport -d d:\ -n MEIN_PAKET_03112014_EJF73JFKRM84B109 -u jjl -p mypw -m exportImport
run custTransport -d d:\ -n CustomizingPackage_MEIN_PAKET.zip -u jjl -p mypw -m import
Just like for a clientstart, the parameter “test”or “cons” can be transferred if the development system or the consolidation system is to be accessed.
Output
Information or error messages are output directly via the console and are also written to the client log. The error code can also be read after an invocation. In case of an error the output will be 1 otherwise 0.
Error code
call run.bat custTransport -d d:\ -n CustomizingPackage_MEIN_PAKET.zip -u ffj -p mypw -m import

if %errorlevel% == 0 ( echo Hat funktioniert )
if %errorlevel% == 1  ( echo Ist schief gegangen )
Supported customizing
Customizing | Description | Accessible via |
|---|---|---|
Action box entries | Create, delete, save action box entries | To the right of the main level |
App masks | Add/modify/delete app masks | Administration console->Edit masks |
Administration of app masks configurations | Add/modify/delete app mask configurations | Administration console ->App mask configuration |
Images | Save/delete images that can be used in masks. | Edit the “Icon” property of a component in the mask editor Administration console->Edit masks->Manage images |
BPM data cleansing | Create/modify a data cleansing of old BPM process data | Administration->CURSOR-BPM |
BPM mask | Create/Edit a mask within a BPM process | Administration->CURSOR-BPM |
BPM processes | Creation of a BPM process/Change of one of its components The BPM processes can be imported, but not published. | Administration->CURSOR-BPM |
Entities | Create/change entities | Administration console->Entities |
Client-side workflows | Create/modify client-side workflows | Administration->Workflow Designer |
Customizing dataset | Create/modify/delete "contains customizing” entity datasets | "contains customizing" entities using the default logics |
Data exports | Create, modify and delete data exports | Administration->Data flow->Data exports |
Data transitions | Saving data transitions from one field to another. | Administration->Data flow->Data transition |
Desktop configuration | Desktop configuration for system and group configuration | Right click the desktop, Options->Desktop configuration, Options->Desktop layout, Options->Desktop administration |
GDPR Processing Job | Create, modify, delete processing jobs | Administration->Data flow->GDPR Processing Job |
Entity configurations | Configure all entities (wordable, show in WebClient, etc.) | Administration console ->Edit entity configurations |
Entity extensions | Extending C0 entities in the C1 layer | Administration console->Entities |
Excel menu | Configuring the reporting menu | Administration console->Template management->Manage Excel menu |
Export format | Create, modify and delete export formats | Administration->Data flow->Data exports, button “Create, copy and edit of export format” |
Configuration of the default export format | Selecting an export format as the default export format | Administration->Data flow->Data exports, button “Create, copy and edit of export format” - on the last page of the wizard for the selected export format |
External invocations | Save external invocations, e.g. for invoking a website | Administration->Data flow->External invocation |
GeoMetaData | Create, modify, delete geometadata | Administration->Modules->GeoMetaData |
Global variables | Save global variables that can be read at various points in the application. | Administration console->Global variables |
Groups | Create, modify, delete rights groups. | Administration->Permissions->Groups |
(Group) field attributes | Modify the field attributes of all fields | Right click the field, Administration console->Field attributes |
I18n of action box entries | Internationalize action box entries | To the right of the main level->Flags |
I18n of entity names | Internationalization of an entity name | Administration console ->Edit entity configurations->Flags |
I18n of entity ShortCuts | Internationalization of an entity shortcut | Administration console ->Edit entity configurations->Flags |
I18n of external invocations | Saving internationalizations for external invocations | External invocation -> Right mouse button -> 118n External invocation |
I18n of labels | Change the internationalization of a label in the mask | GUI Builder, right click the label, Administration console-> Field attributes -> Flags |
I18n of modules | Internationalization of the name and language variables of a partner module | Administration console->Modules->Modules I18n |
I18n of person types | Save internationalizations for person types | Administration->Keys->I18n person types |
I18n of relation names | Internationalization of a relation in both directions | Administration console->Link entities->Change relation name |
I18n of reports | Internationalization of reports | Administration console->JasperReports->Flags |
I18n of report parameters | Internationalization of report parameters | Administration console->JasperReports->Flags (if a parameter is marked) |
I18n of user-defined report values | Internationalization of user-defined report values | Administration console->JasperReports->Descriptions |
I18n of keys | Internationalization of keys | Key maintenance->Flags (right) |
I18n of keys in app masks | Internationalization of keys in app masks | Administration console->Edit masks->Select app mask->Edit->Internationalization |
I18n of key groups | Internationalization of key groups | Key maintenance->Flags (left) |
I18n of language variables | Internationalization of language variables | Script library->Language variables |
I18n of searches | Internationalization of search names | Search mask->Search administration->Internationalization |
I18n of search containers | Internationalization of search container names | Administration console>Search container management>i18n |
I18n of tooltips for a field | Save internationalization for tooltips | Field attribute dialog |
I18n of variables in the TAPI dialog | Save internationalized variables for the TAPI dialog | Administration console>TAPI inbound dialog configuration>Flags |
I18n in the merger | Internationalization of note texts in the merger dialog | Merger dialog -> I18n |
Infoboards | An infoboard configuration | Administration console->Tile configuration, Infoboard desktop configuration -> Save as system board |
Interactive charts | A group or system-specific infoboard configuration | Sub area -> Right side |
Juhuuu! search | Configuration of the Juhuuu! search | Administration console->Juhuuu! |
Tiles | Create, modify, delete tiles | Administration console-> Tile configuration |
Contact mapping | Assign contact data to groupware fields | Administration console->Contact mapping |
Configuration groups | Create/delete configuration groups | Administration console->Manage configuration groups |
Units | Depositing units | Administration->Permissions-> Units |
Masks | Add/modify masks | In the mask->Administration->GUI Builder, Administration console->Edit masks |
Edit mask configurations | Edit mask configurations (order/appearance in file and new menu, sub areas) | Administration console->Edit mask configuration |
Mask scripts | Save mask scripts per entity, mask script library | In the entity + on the desktop: Administration->Script editor |
Modules | Create, modify partner modules | Used internally only when importing a partner module. |
Module dependencies | Transferring partner module dependencies | Used internally only when importing a partner module. |
Module properties | Modify module settings | Administration console->Module properties |
MyCRMs | Create, modify, delete system/group-specific area of myCRM | Right click myCRM |
PropertyConfigs | Configuration of visibility for the PropertyMapper interface | Debug->PropertyConfig |
PropertyMapper statements | Create PropertyMapper entries. | Administration console->Advanced configurations (application parameters) |
Permission submitted actions | Activate/deactivate + Change action rights | Administration->Permissions->Configure permission submitted actions |
Rights templates | Create, modify, delete rights templates. | Administration->Permissions-> Right Templates |
Rights on search/external invocations/document templates/reports/document objects | Modify rights in the entities | Rights button in the entity "External invocation", rights button in the search administration, in the administration console under JasperReport/Template management/Document object management |
Reports | Create/edit/delete reports | Administration console->JasperReports |
Key | Add/modify keys | Open the lookup browser via the lookup field -> Edit, Administration console->Key maintenance, Administration->Key maintenance |
Key groups | Add/modify key groups | Open the lookup browser via the lookup field -> Edit, Administration console->Key maintenance, Administration->Key maintenance |
Key value-dependent domains | Create/edit/delete key value dependent domains | Administration->Data flow->Key Value Dependent Domains |
Quick entry masks (WebClient) | Add/modify/delete quick entry masks | Administration console->Quick entry mask configuration (Web Client) |
Server-side workflows | Save, delete, modify server-side workflows | Administration console->Workflows |
Script libraries | Create, modify, delete script classes | Administration console->Script library |
Save as default infoboards | Set an infoboard as system default | Properties on the infoboard desktop -> Set as system default |
Save sort orders | Save sort order in the SYSEMWIDE table | Search mask->Context menu->Configuration->Save server sort order |
Save/delete column orders | Save/delete column order in table | Search mask->Context menu->Configuration->Load/save/delete system setting |
Save/delete column orders (relation-specific) | Save/delete column order in the table in the sub area for a specific relation | Sub area->Context menu->Configuration settings->Save/load/delete system settings for the relation |
Save/delete column orders (relation-specific, under all entities) | Save/delete column order in the table in the sub area for a specific entity under all other entities | Sub area->Context menu->Configuration settings->Global configuration settings->Save/load/delete global system settings |
SQL statements | Execute modifying SQL statements | Administration console->SQL statements |
Search container | Create, modify, delete search container | Administration console>Search container management |
Search | Create, modify, delete searches | Search mask->Search administration, administration console->Administration of complex searches->Import, Administration console->Search directory |
System/group default searches | Load/save/remove | Search mask->Default search->Load/save/remove system/group default search |
Table definitions | Editing table definitions of table searches in search containers | Administration console->Search container management->Double-click relevant table search column |
TAPI dialog configurations | Configure appearance and behavior of TAPI dialog | Administration console>TAPI inbound dialog configuration |
Execute timer/actions | Timer configuration. Execute time-controlled actions If the timer actions were relevantly configured before export, then they will start directly after the import has been completed. | Administration console->Timer |
Edit links | Edit links (quantity of linked data, turn off) | Administration console->Link entities |
Document object management | Create/delete/edit document objects | Administration console->Document objects management |
Document template management | Create/delete/edit document templates | Administration console->Document template management |
Key Mappings | The possible values for another field are limited based on the key from a field. | Administration->Key mapping |
Web services | Save web service configurations that can be called up via mask script | Administration console->Web services |
Repository
Dependencies exist between the customizings. Some conflicts are resolved automatically by assigning the customizing to the same package, to which the dependent customizing is assigned. The following message will then be displayed:
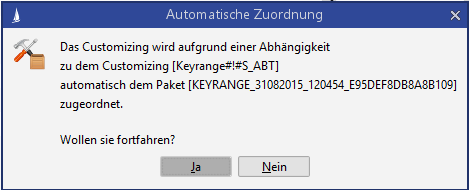
In this case, you can continue with Yes; the change will be executed and the customizing will be automatically assigned to the package. Or you can cancel the change with No.
There are some conflicts that cannot be automatically resolved, because multiple dependencies are in play that reference different packages. The following conflict dialog will appear if there is a conflict that cannot be resolved:
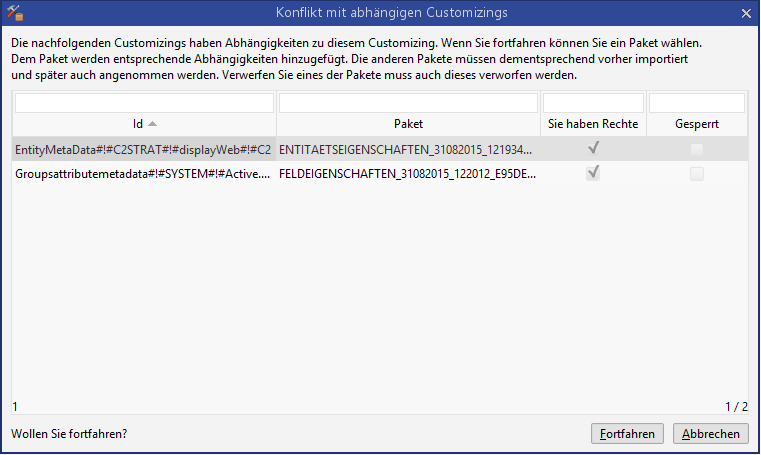
You can now choose Continue and assign the customizing to any package. All packages listed in the table are then given a package dependency to the selected package. This means that the selected package must be imported into the target system first. It must also be accepted before the other packages, and must only be discarded if all others are discarded. Alternatively, the change can be undone with Cancel.
The following are individual descriptions of contexts with the “simple” dependency dialog, i.e. with automatic assignment. If several apply at the same time, then the selection dialog and therefore package dependencies will be displayed.
Customizing | in the context of | Description of connections |
|---|---|---|
Action box entries |
|
|
Action Rights |
|
|
App masks | Behave like masks, plus additional
|
|
app mask configurations |
|
|
Images |
|
|
BPM data cleansing | no dependence | |
BPM mask |
|
|
BPM processes |
|
|
CTI dialog configuration |
|
|
Customizing dataset |
|
|
Data exports |
|
|
Document templates |
|
|
Document objects | no dependencies | |
Entities |
|
|
Entity properties |
|
|
Entity extensions |
|
|
Excel menu |
|
|
Export format |
|
|
External invocations |
|
|
Field attributes |
|
|
Global variables |
|
|
Groups |
|
|
Group field attributes |
|
|
I18n of action box entries |
|
|
I18n of external invocations |
|
|
I18n of field names |
|
|
I18n of field tooltips |
|
|
I18n of reports |
|
|
I18n of report parameters |
|
|
I18n of keys |
|
|
I18n of key ranges |
|
|
I18n of searches |
|
|
I18n of search containers |
|
|
I18n of entity links |
|
|
Infoboards |
|
|
Save as default infoboard |
|
|
Tiles |
|
|
App mask configuration |
|
|
Quick entry mask configuration |
|
|
Configuration of the default export format |
|
|
Configuration groups |
|
|
Contact mapping |
|
|
Units |
|
|
Masks |
|
|
Mask configurations |
|
|
Mask scripts |
|
|
Modules |
|
|
Module properties |
|
|
Rights templates |
|
|
Reports |
|
|
Key |
|
|
Key ranges |
|
|
Key value-dependent domains |
|
|
Script libraries |
|
|
Search container |
|
|
Searching |
|
|
System/group default searches |
|
|
Entity links |
|
|
Web service |
|
|
Customizing datasets
C1 and C2 entities can be configured as Contains Customizing. Subsequently, each dataset of these entities is treated and transferred as a single customizing. Here there are some special features, which are described in the following:
Requirements
The property Contains Customizing excludes the properties Display in Web Client, Display in App, Anonymize and Multi-unit compatible. For existing entities, these properties must therefore be deactivated before Contains Customizing can be set. In addition, no Assigned entity may already have the property Contains Customizing, since such a network of customizings can no longer be matched correctly.
Activation
In the administration console, under Entities, the check mark Contains Customizing can be set.

The entity receives a field CTIdentifier which can be used to identify and transport the datasets. The values are generated during the new creation.

The properties Display in Web Client, Display in App, Anonymize and Multi-unit compatible are disabled when the entity is created.
Subsequent activation
Contains Customizing can also be activated on existing entities (see above for requirements). In this case there are still some consequences to be considered:
All existing datasets of the entity at this time automatically receive a generated value for the CTIdentifier field and are assigned to the same package or module as the entity.
In C2, when the package is imported into the successor systems, all datasets existing there are deleted and replaced by the datasets from the development system.
In C1, when the module is imported into C2 in the target system, the C1 datasets are inserted there and the existing C2 datasets are also provided with a generated value for the CTIdentifier field and also attached to the packet. During transport into the successor systems, the C2 datasets already existing there are deleted and replaced by the C1 and C2 datasets from the development system.
Maintenance of datasets
Datasets can then be created or edited as on normal entities via a layer. Here the CTIdentifier field was dragged onto the mask to identify the dataset, but this is not necessary.

Newly created or changed datasets are transported via the assigned package or module. This means that it is also possible to subsequently change delivered datasets in C1.
![]() REST, XML Import and BPM are no longer allowed to process such entities.
REST, XML Import and BPM are no longer allowed to process such entities.
Global variables
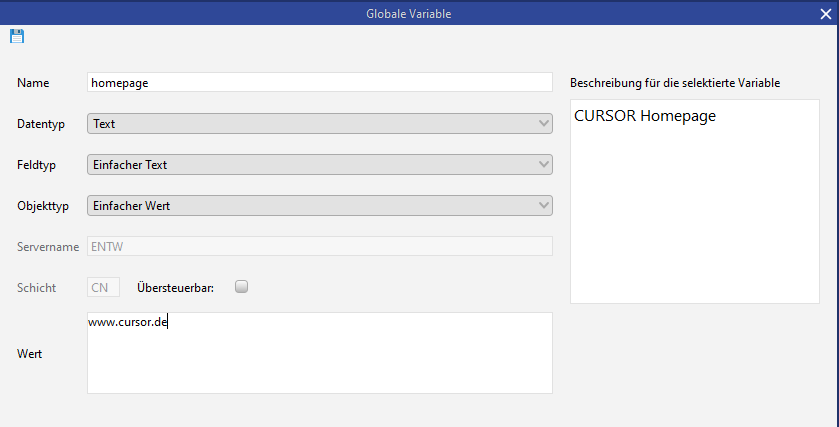
Global variables can be saved under Global variables in the administration console. A global variable is an assignment of a value to a name. In the defined areas, $GLOBAL{MyVariable} can be used to access it.
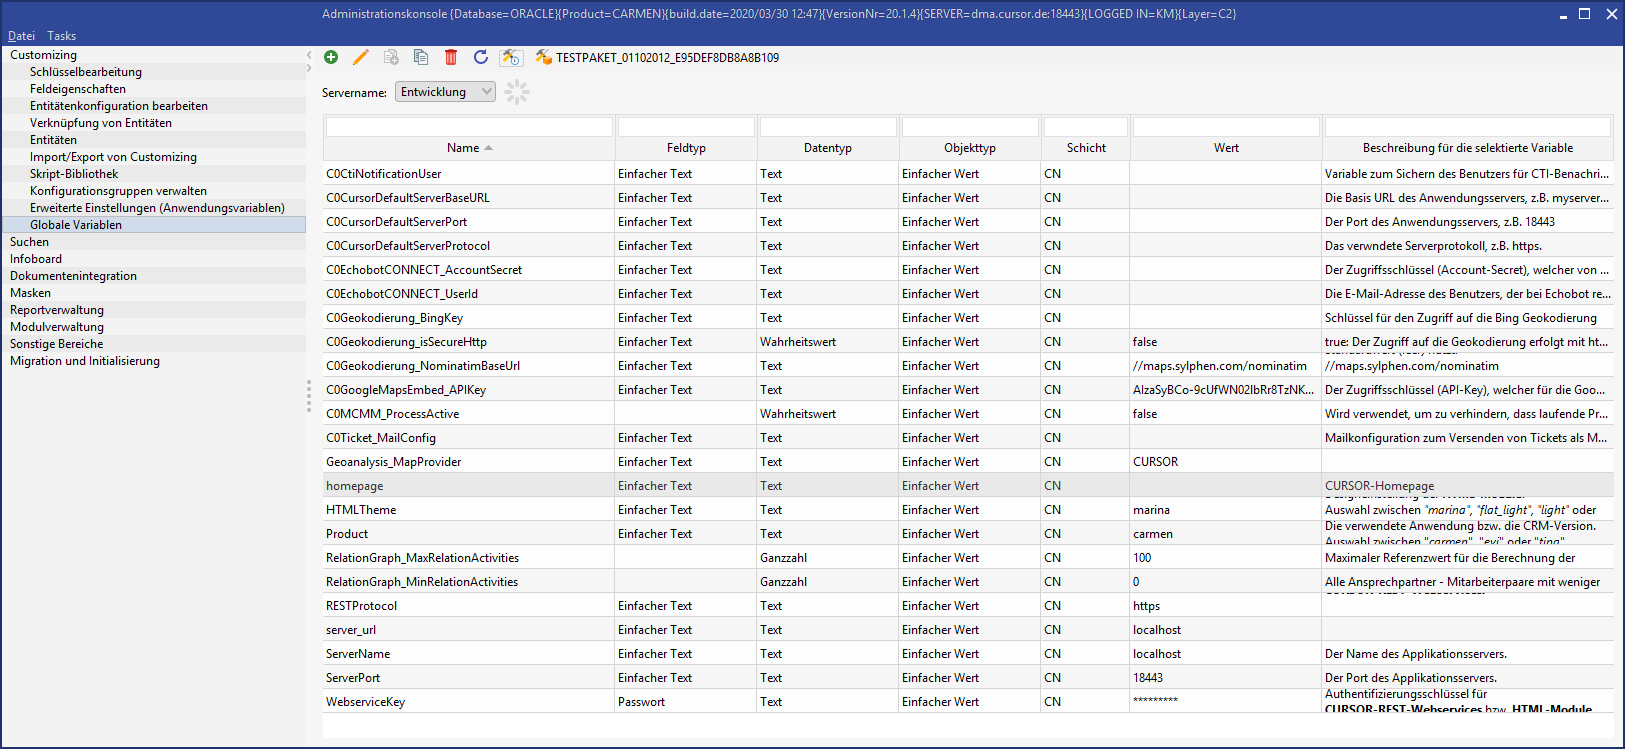
Global variables and the customizing transport
If the customizing transport was activated, a variable created in the database by the user is not just saved for the current server, but also for all configured servers. The name must be the same in the development, consolidation and production system, the value may fluctuate and will be automatically synchronized in the background between the servers if changes are made. The server is selected via the drop down list.
If global variables were created and the customizing transport activated at a later point of time, it may be the case that variables were not created for all servers. In this case, there are two options to have the missing variables be created.
If the Initialize timer is running, this task will be completed regularly.

The task can be manually triggered via the debug menu as well.
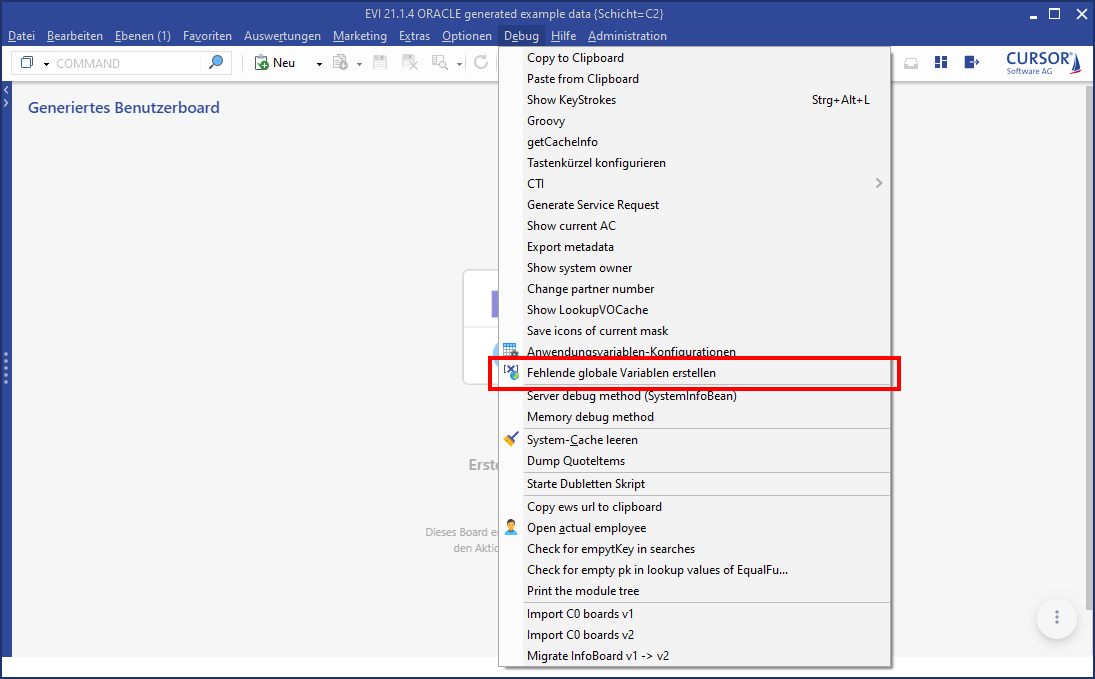
Synchronization
System settings must be made for the automatic synchronization to work. Please read the relevant chapter for more information.
Create new

Click on the icon 
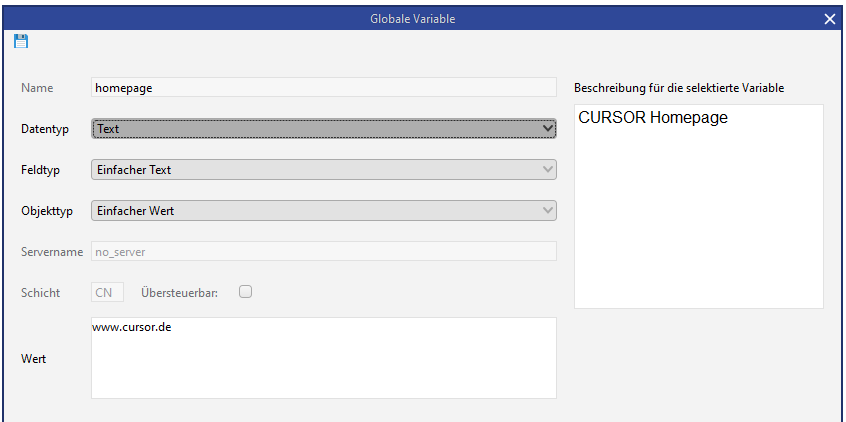
If the type is a STRING(Text), then the field type Password can be selected to save encrypted values.
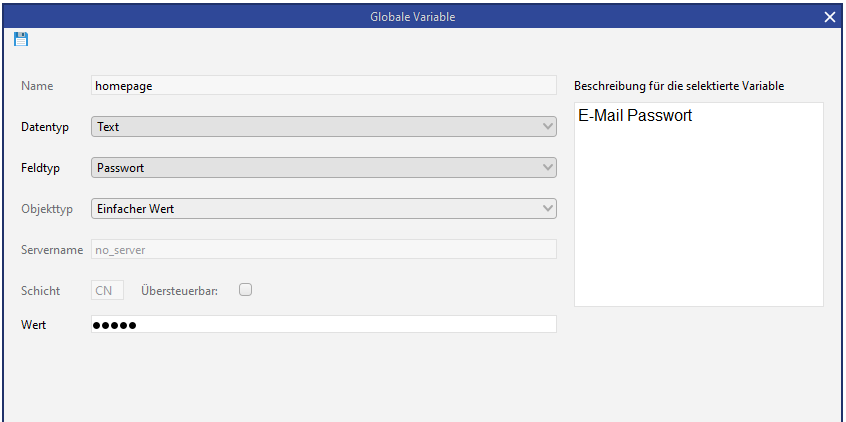
Integers and floating-point numbers as well as date and logical values may still be saved.
Date values are output in the German client in the format dd.MM.yyyy HH:mm:ss, in all other clients in the English format yyyy-MM-dd HH:mm:ss.
Logical values are output with “true” or “false”.
Integer values are output without changes.
Floating-point numbers may contain up to 2 decimal places separated with “,” and also be output without changes.
Edit

Click on the icon 
copy

Click on the icon 
Refresh

Click on the icon 
delete

Click on the icon 
Use
Global variables can only be used in defined areas. To date these are:
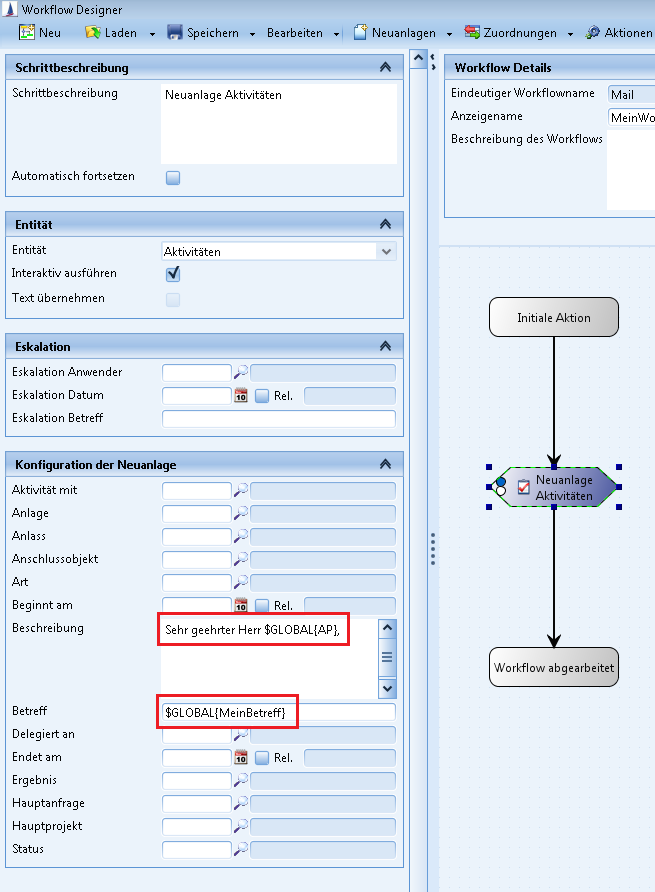
Client-side workflows
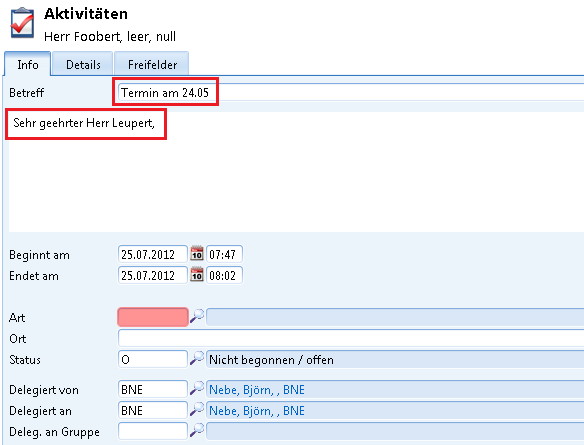
One possible application would be text fields in client-side workflows; in this example the variables MySubject and AP are used:
Configuration
Result
Mask scripts
One application option are strings in mask scripts; in this example the variable MySubject:

Configuration

Result
Reference to new method as of 15.2
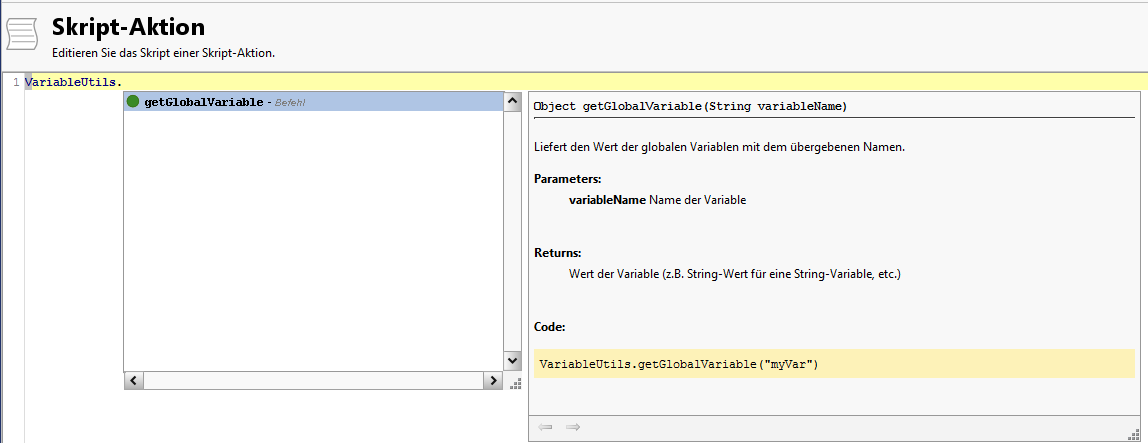
With the use of global variables listed above, there is only a text replacement of the placeholder before the script is executed. This may lead to problems with the data types of the variables. The new script method VariableUtils.getGlobaleVariable(String variableName) was therefore included with version 15.2. It delivers the value of the global variables in the matching data type (string, double, boolean, etc.).
External invocations
One optional application are strings from external invocations. ID is NOT supported. In this example, the variables MySubject, dir, MyDescription and MyTitle are used.
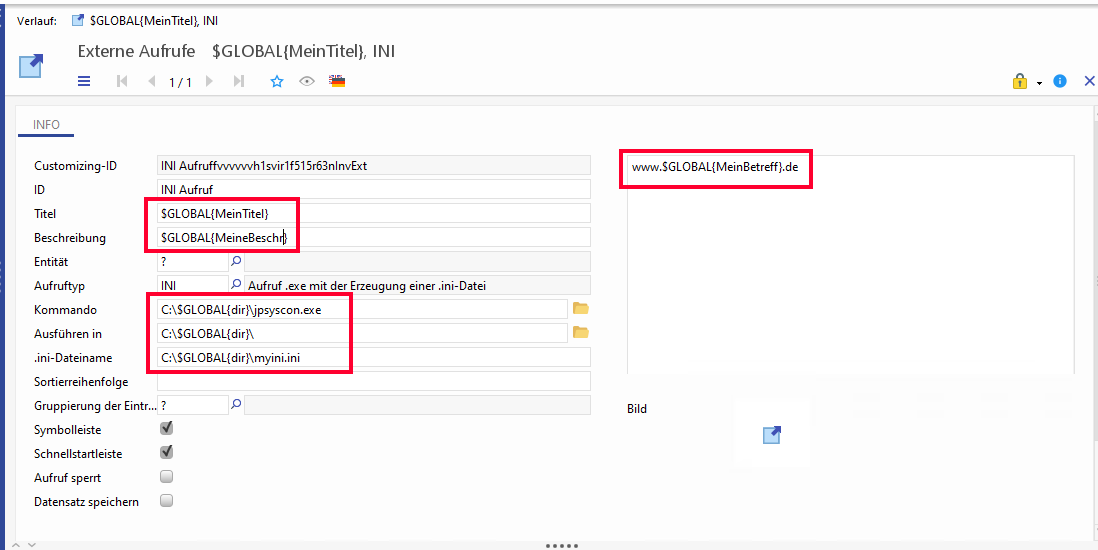
Figure: Configuration of an external invocation
BPM processes
Three possible applications are strings in the script of a start condition, strings in the script of a script task and strings in the mask script of a user task, in this example the variables execute and message.
It is necessary to make the global variable known in the library of the process, otherwise it cannot be looked up.
Start condition configuration

Script task configuration
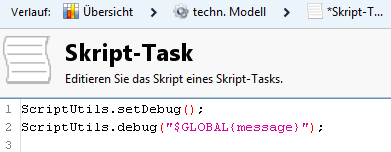
User task configuration

Invocation by method
Specifically in BPM scripts, it is possible to export global variables via a method. This does not just return a string, but also the actual data type (Boolean, integer, date, ...)
Server-side workflows
Two application options are in the ScriptAction or in the WFScriptCondition of a server-side workflow; in this example the variables url and execute:
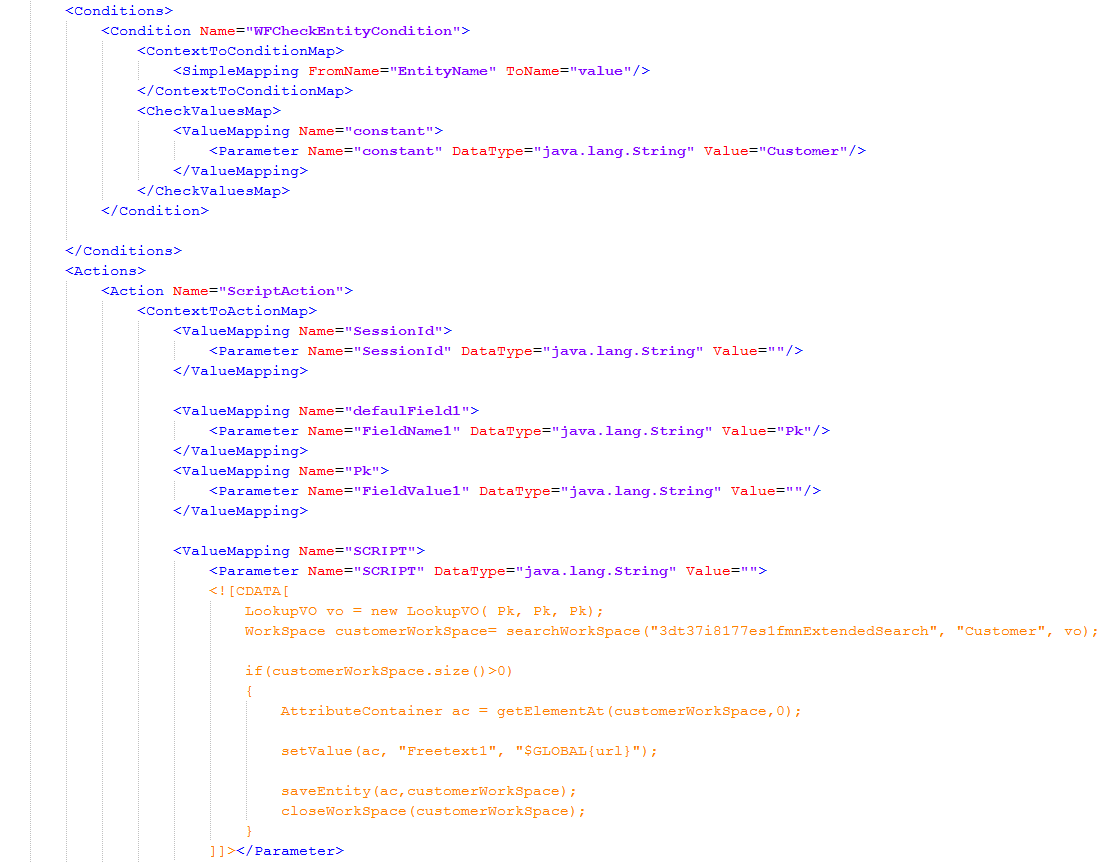
Configuration ScriptAction
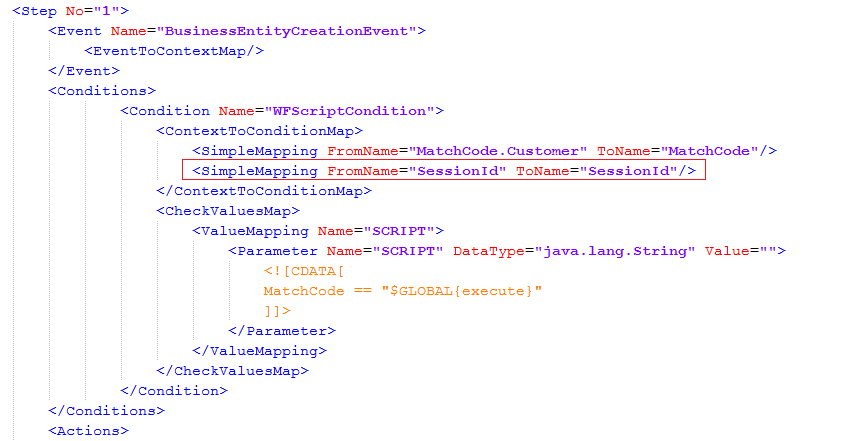
Configuration WFScriptCondition
WebService
An application case is the execution script from a web service configuration, in this example the variable code.
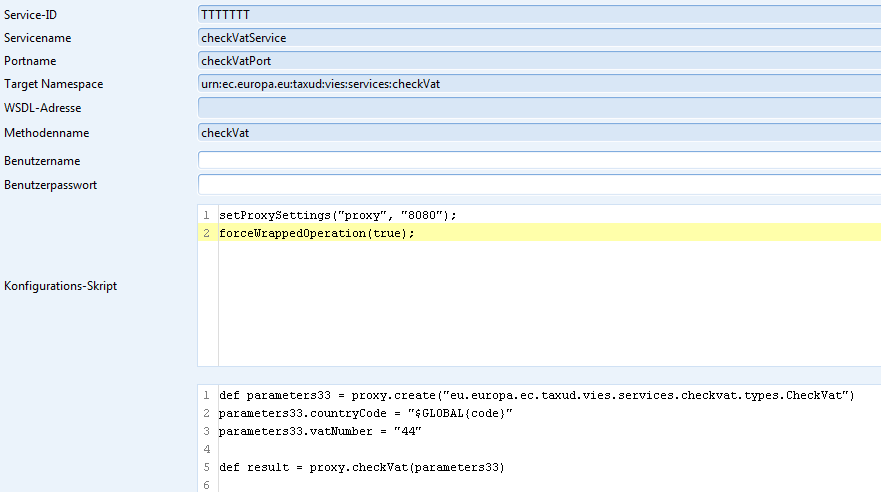
Configuration script
Document templates
One application option are document templates. All global variables are available in the search field column with the search fields. The method is analogous to the search fields, i.e. the global variable is assigned to a bookmark. The only available type is the TEXT bookmark type.
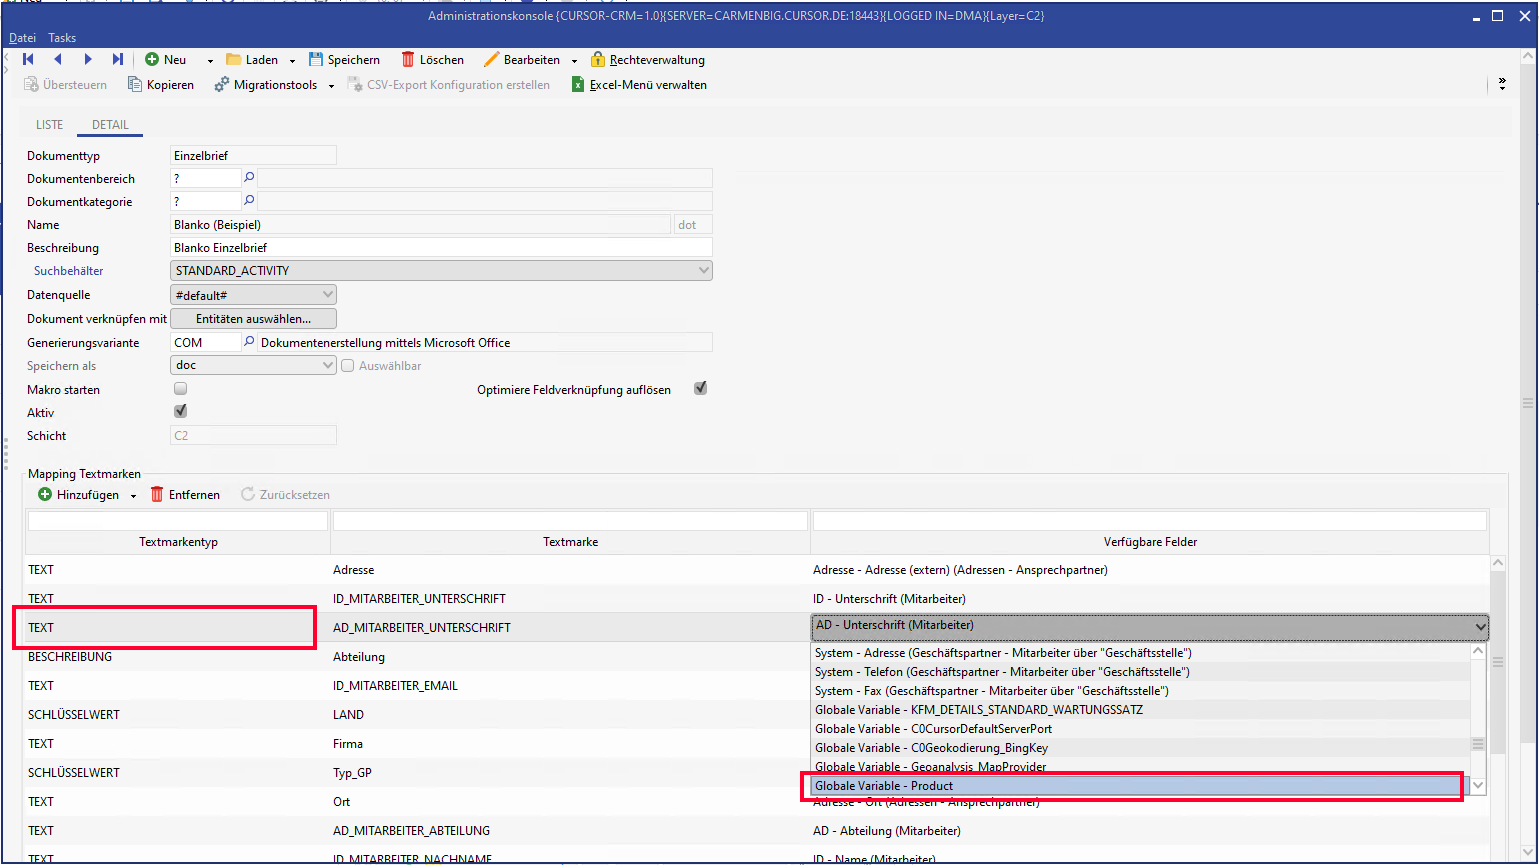
Figure: Global variable is assigned to a bookmark
CSV export configuration
In the configuration for the CSV export, which can be saved in the PropertyMapper.
INSERT INTO PropertyMapper (Pk, id, property, PropertyType, principal, PropertyValue, CustLayer, Active, CreateDate, CreateUser,
UpdateDate, UpdateUser, STATUS, RightPk, ClientNo, MassData)
VALUES ('SYSTEM.ExportConfig', '/de/cursor/jevi/common/export/ExportConfigWorker$!!$MeineId', '' ,'SYSTEM', '',
'<ExportConfig type="CSV" file="$GLOBAL{myfilename}">
<Format fileFormat="UTF-8" dateFormat="dd.MM.yyyy hh:mm:ss" numberGroupDigit="." numberDecimalSymbol=","
booleanTrue="true" booleanFalse="false" nullValue="null" binary="Export fuer diesen Datentyp nicht moeglich" />
<SeparatorFormat separator=";" lineSeparator="#" tableSeparator="::" tableLineSeparator="%"
replaceSeparator="" replaceLineSeparator="" replaceTableSeparator="" replaceTableLineSeparator="" />
<Field name="MatchCode" fieldName="MatchCode.Customer" valueType="VALUE" fieldType="SIMPLE" />
<Field name="Name1" fieldName="Name1.Customer" valueType="VALUE" nullValue="" fieldType="SIMPLE" />
<Field name="DateOfOrigin" fieldName="DateOfOrigin.Customer" valueType="VALUE" nullValue="" fieldType="SIMPLE" />
<Field name="Freenumber1" fieldName="Freenumber1.Customer" valueType="VALUE" nullValue="" fieldType="SIMPLE" />
<Field name="Activities" aliasName="GPAktivitaeten" fieldType="TABLE">
<Field name="Activities_Subject" fieldName="Subject.Activity" valueType="VALUE" fieldType="SIMPLE" />
<Field name="Activities_DelegatedTo" fieldName="DelegatedTo.Activity" valueType="VALUE" fieldType="SIMPLE"/>
<Field name="Activities_DelegatedBy" fieldName="DelegatedBy.Activity" valueType="VALUE" fieldType="SIMPLE"/>
</Field>
<Field name="PersontypeKey" fieldName="PersontypeKey.Customer" valueType="KEY" nullValue="" fieldType="SIMPLE" />
</ExportConfig>', 'CN', 1, GETDATE(), 'TECH_USER', GETDATE(), 'TECH_USER', NULL, NULL, NULL, 0)
JasperReports
When editing or creating reports, all available global variables are transferred to the report internally as parameters (not including TIME_CONFIG variables). All global variables with the prefix GOBAL_ are displayed in the report design and can be used like normal parameters in the report.
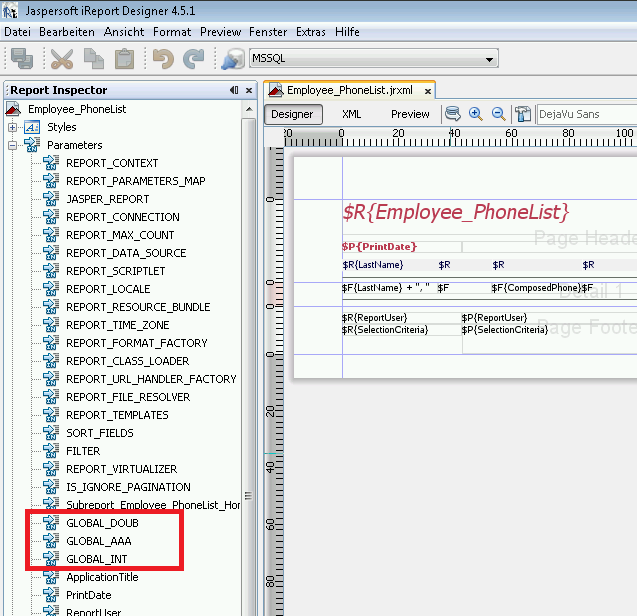
Advanced configurations (application parameters)
Global variables can be used in two ways for application parameters.
They can be used as normal in variables from a String type.
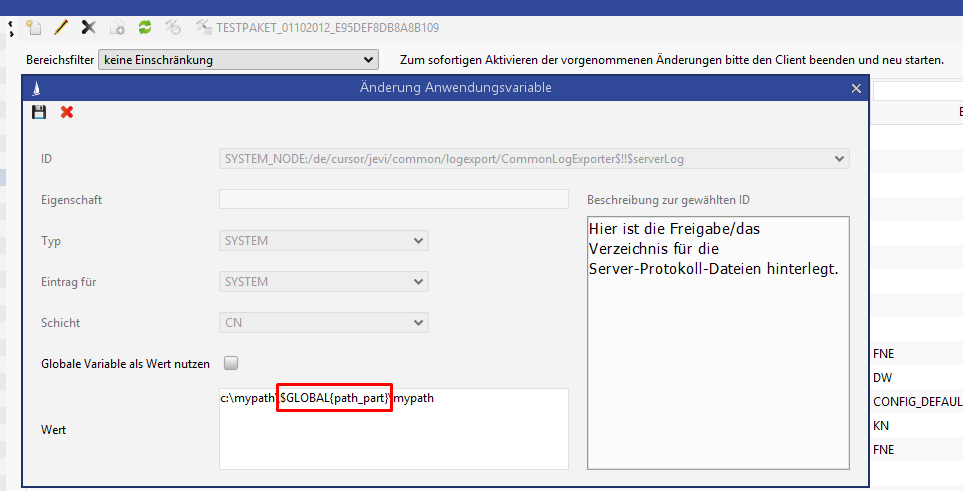
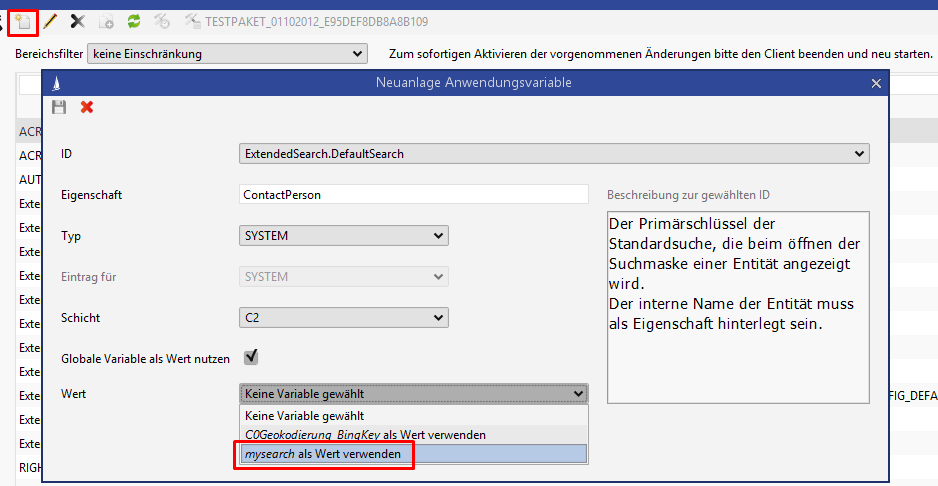
In String, integer or Boolean type variables, global variables of the same type and same layer (CN or C2, C1, C0) can be selected via the selection list. The global variables content is used as content for the application parameters. The check must be set for Use global variable as value.
Automatic key synchronization
To prevent conflicts with keys that were created via interfaces or external sources, a mechanism was created to synchronize the keys as much as possible or to otherwise at least refer to the conflict. The servers in the production system must be specified if the transfer should be made to them.
Inserting the key
Internal keys have the flag InternalKey.S_Keytab or InternalKey.KeytabNum. Keys from external sources that do not set this flag are automatically synchronized. After synchronization, the Merged.S_Keytab or Merged.KeytabNum flag will be set, which signalizes that this key does not have to be compared again during the next run.
Configuration
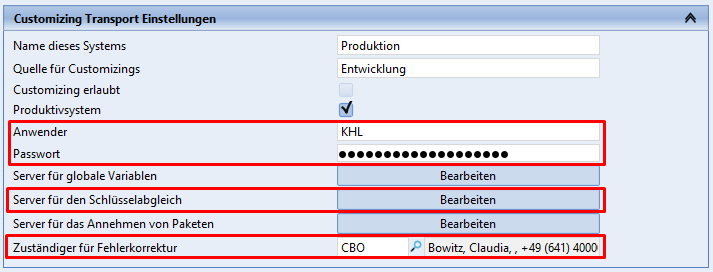
The four settings marked in the figure must be made.
First the employee short name and the encrypted password in the context of which the key synchronization is performed must be determined. The password is found in the database and is also needed in this form to login to the web services. If Kerberos is used, the password is not encrypted.
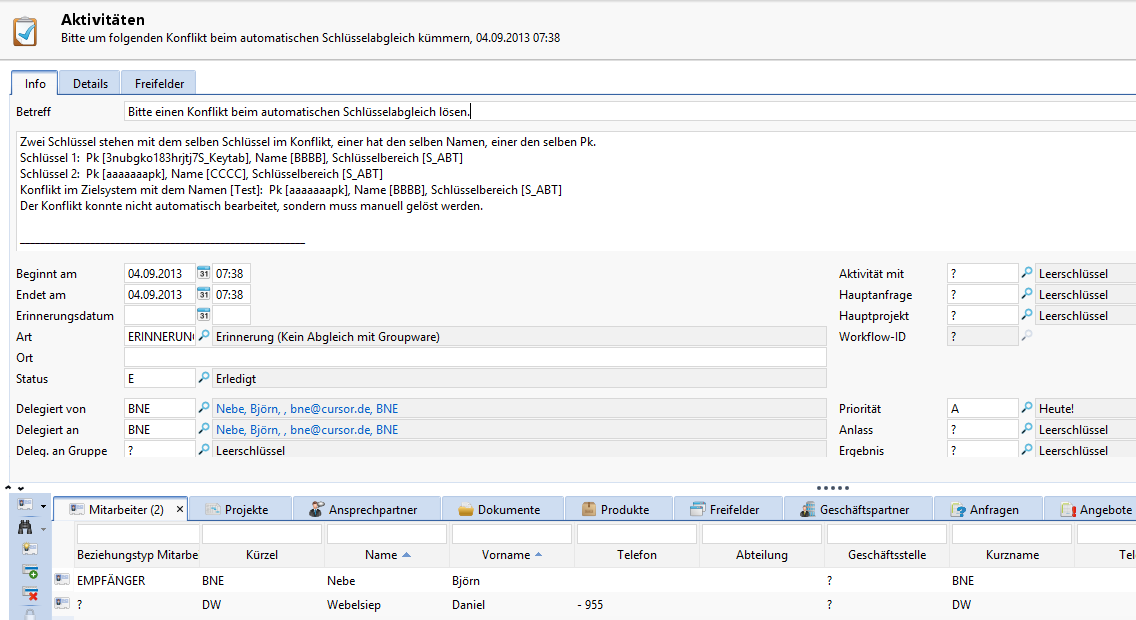
An employee can be selected who will then take care of any possible conflicts. An activity will automatically be assigned to them in the event of an error.
The server’s WSDL addresses in which the transfer occurs must be specified as a final step.

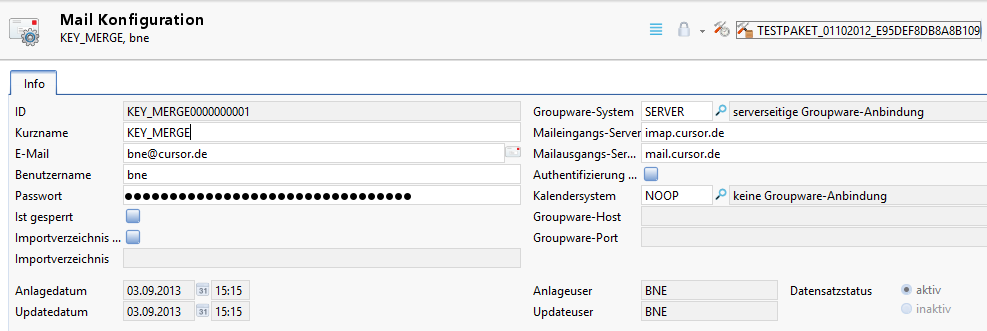
If desired, an email may be sent to the responsible employee - in addition to the activity. A mail configuration with the short name KEY_MERGE must be entered as well.
Execution
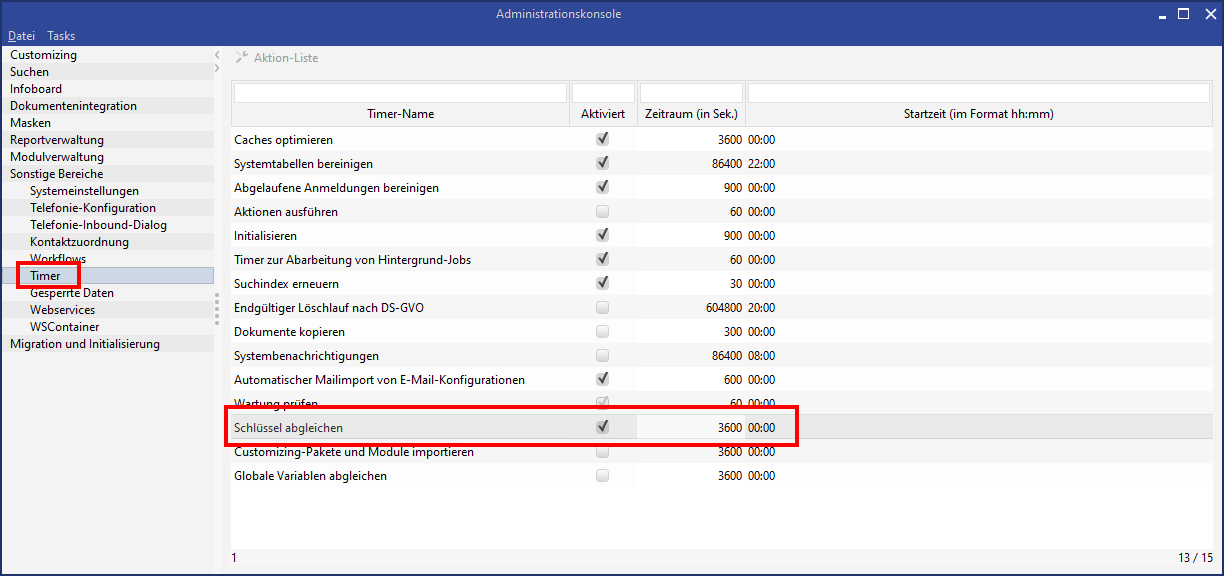
The timer must be activated in the production system (the system from which the transfer should occur) to perform the synchronization.
An activity will be saved for the responsible employee for each conflict. In addition to this, the employees who are assigned to the customizing package as a contact person will be linked, provided that the affected key is assigned to a package.
Automatic employee synchronization
To prevent conflicts with employees who were created in the different systems with different Pks, a mechanism was created that transfers the most important employee data to the other systems. The servers in the production system must be specified if the transfer should be made to them.
Creating an employee
The employee created via the interface receives the flag Merged.Employee = false. Such employees are synchronized automatically. After synchronization, the flag will be set, which signalizes that this employee does not have to be compared again during the next run.
Only the fields ShortCut, Technicaluser, EmployeeMainGroup, ConfigurationKey, RightTemplate, UserPassword, FirstName, LastName, Sex, MatchCode and (with 18.1) MainUnit are transferred. All other fields must be maintained if necessary.
Configuration
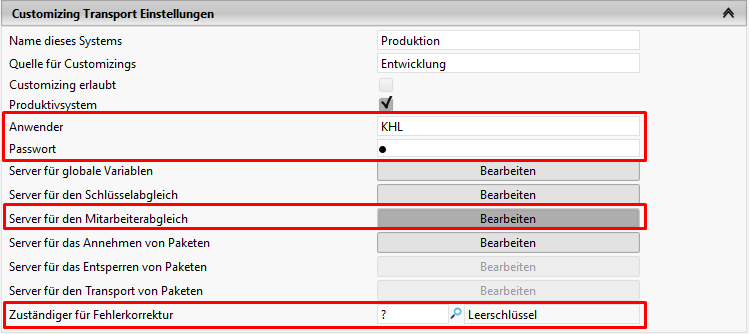
The four settings marked in the figure must be made.
See the last chapter Automatic Key Synchronization for the short name, password and responsible individual and to generate mails.
The server’s WSDL addresses in which the transfer occurs must be specified as a final step.

Execution
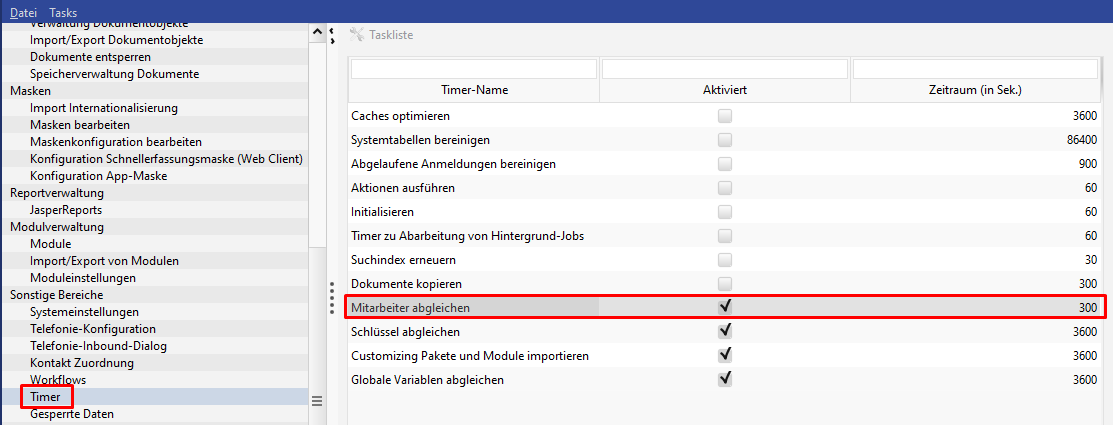
The Synchronize employee timer must be activated in the production system (the system from which the transfer should occur) to perform the synchronization.
SQL statements
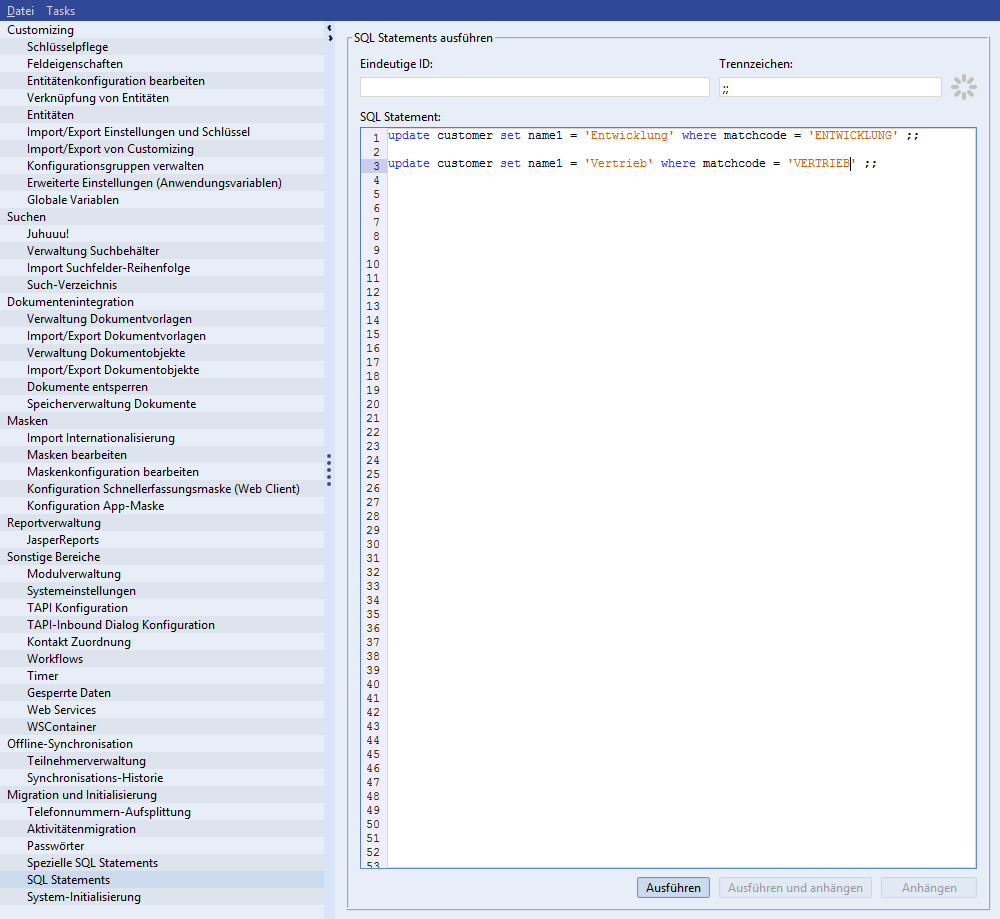
SQL statements can be saved directly to the database via the admin console using the menu item Migration and Initializing / SQL Statements. One or multiple statements can be entered in the SQL Statement field. If multiple statements are saved, a separator must be placed in the Separator field. There are now multiple options for the execution:
Execute: The statement will be saved.
Append: The statement is not saved, but is added to a customizing package instead. In the target system, this statement will be saved after importing the rest of the customizing. Attention: If the package is discarded, the saved statements cannot be undone.
Execute and append: The two previous steps are executed sequentially.
If a statement fails, all statements will be rolled back unless the data structure was changed under Oracle.
Activate statements
Since direct access to the database is permitted, the dialog is not visible to anybody by default. The right for an action right must be explicitly assigned.
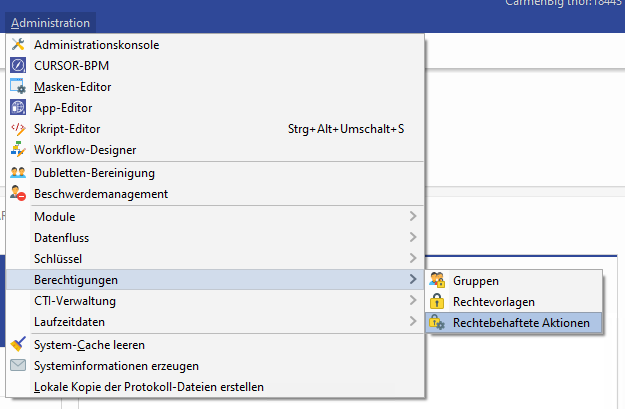
Figure: Administration menu
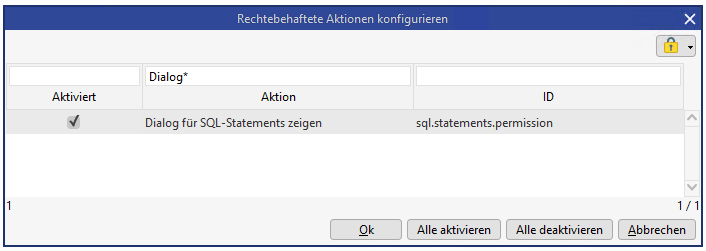
Figure: Action right
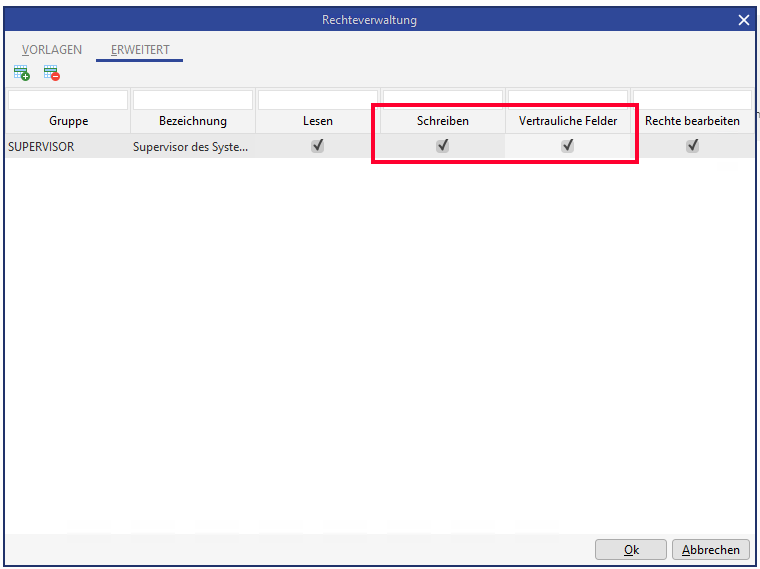
Figure: Configuration
