Introduction
The 'Searches' are an important part of CURSOR-CRM. These searches are queries that have been given a name via which they can be called, edited and executed by the user. CURSOR-CRM/EVI already contains a basic package of such searches as delivered. These are required for the application to work. All information that appears on the screen in lists or on forms is queried from the database using these searches. They also ensure that reports, serial letters and serial emails can be created and that the individual documents are supplied with data.
Users can use lots of these searches and configure them according to their needs (but the actual search is not changed). However, you can do even more: You can create copies of these searches and change these copies. In addition, you can create new searches for questions for which no searches are yet available.
The basic goal of working with searches is always to make using the program more efficient. This can affect many areas. Examples include:
-
performing recurring work steps more quickly: "What is the processing status of applications and enquiries?"
-
creating address lists and other lists for export to Excel.
The administrator is faced with even more extensive search tasks: the program areas 'Reports', 'Serial letters and emails' and 'Single documents' are also based on such searches. However, several such searches are combined here to form larger units, known as 'complex searches'. The administrator has the task of creating and managing these complex searches, as well as designing the link to reports (for Reports) and to document templates (for Single and Serial letters).
This chapter describes the various aspects that can be summarized under the term 'search'. It provides a comprehensive overview of both how to use the most important masks and forms and how to design searches.
This document is primarily intended for administrators and "power users". Here you will find information for effectively designing your searches. In principle, however, the contents conveyed are of importance for all users, because error-free work with a database is only possible with precise knowledge of the interrelationships.
The search masks
The search masks represent the most important interface to the search area: new searches are created here, existing searches are adapted and of course the searches are also executed. Therefore, these search masks should be the focus of attention at first. The individual elements of the search masks are described below.
Functions of the buttons in the search mask
The function of the button and keyboard/mouse combinations can be configured for all search dialogs.
-
The button Search
Click to search by the entered criteria and display the results in a list.
The search is started by clicking ENTER in a search input field and the result is also displayed in the search list.
The user must select and open the required dataset.
Requirements: Under Options/ System preferences / Search dialog, the Behavior of the <Enter> key is configured as Search.
If the Search and Open option has been selected via a drop-down menu, the first dataset found is opened (default setting). -
The button Apply
Opens the dataset marked in the results list.
The remaining datasets of the result list can be looked up from the list view.
The only exception: Double-clicking or clicking ENTER in the search results list displays the selected entry in the detail mask. -
The button Search and adopt
The button can be hidden by the administrator. The button is also no longer displayed in the menu or context menu.
Requirements: Under Options/ System preferences / Search dialog the Display the <Search and Adopt> button selection box is deactivated. Default setting is 'activated'.
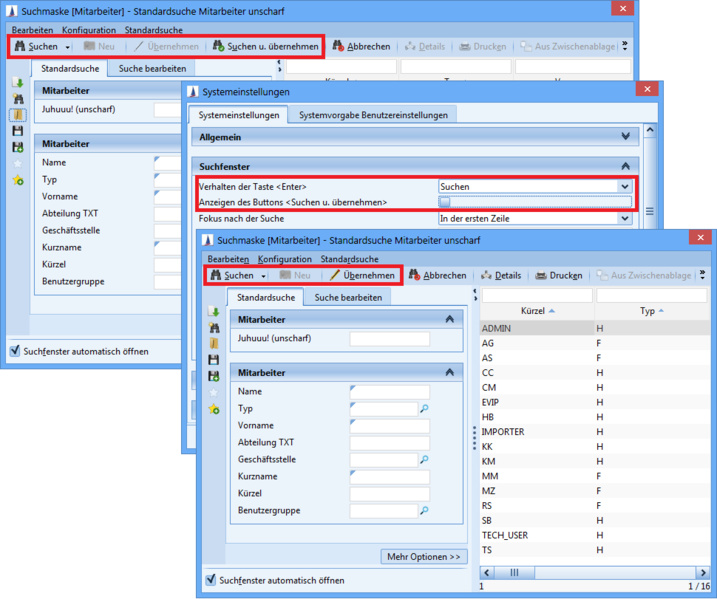
Figure: System preferences for buttons on the search mask.
-
The button Cancel
Closes the dialog without applying the selected data. -
The button Details
Shows an overview of the assigned data
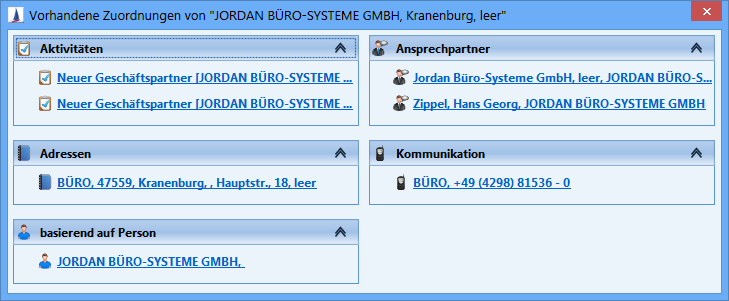
Figure: Assignment overview in the search mask
-
The button Print
Generates the default report as a PDF file that can be printed.
Search lists in the search dialog
The layout of the search mask can be functionally improved by the user preferences. The search lists contain the name and description of the search. The list is sorted by the name of the search.
In the user options the area was called 'Search Dialog' (formerly 'Advanced search color scheme').
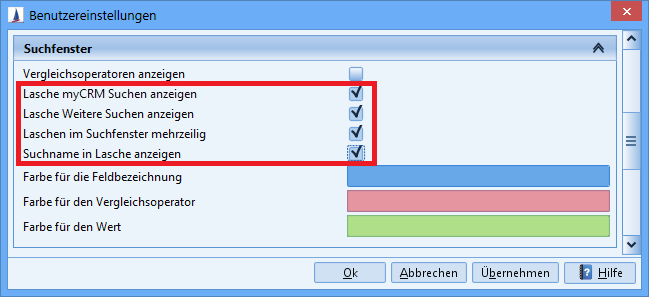
Figure: User Preferences / Search Dialog.
The area contains the following options:
-
Show tab for myCRM searches
-
Show tab for other searches
-
Show search name in search tab
-
Multi-line tabs in search dialog (the single-line or multi-line display of the tabs in the search mask)
Hint
As an administrator, you can define the settings system-wide via Options / System Preferences / System default for user preferences.
If the options have been activated, the search lists are displayed in the search mask.
There are minor differences between the search mask for entities and the mask for reports, serial letters and serial emails. These differences are highlighted separately below.
Tab for 'myCRM searches'
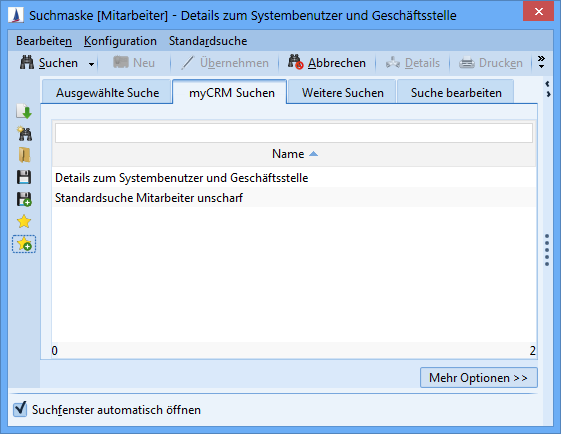
The list of all searches of the current user that are stored in their myCRM area is displayed. The display name from myCRM is shown.
Only available in search mask for entities and reports!
Show tab for 'Other searches'
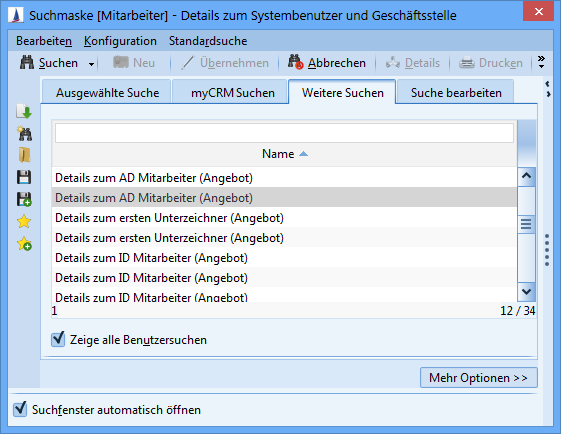
Shows the list of all searches for which the user has access rights.
Special feature for search mask to entities:
As with search administration, the Show all user searches filter option is also available here. The user can use the user preferences to specify whether all user searches are displayed or only their own searches (Show all my searches).
This filter option also applies to the administrator. Search administration should continue to be used for editing system searches.
Tab title
The title of the Search Fields tab changes as follows:
-
When the search dialog is opened, the tab is called Default search.
-
If the user loads another search, the title of the tab is Selected search. When the initial search is reloaded, the tab returns to the title Default search.
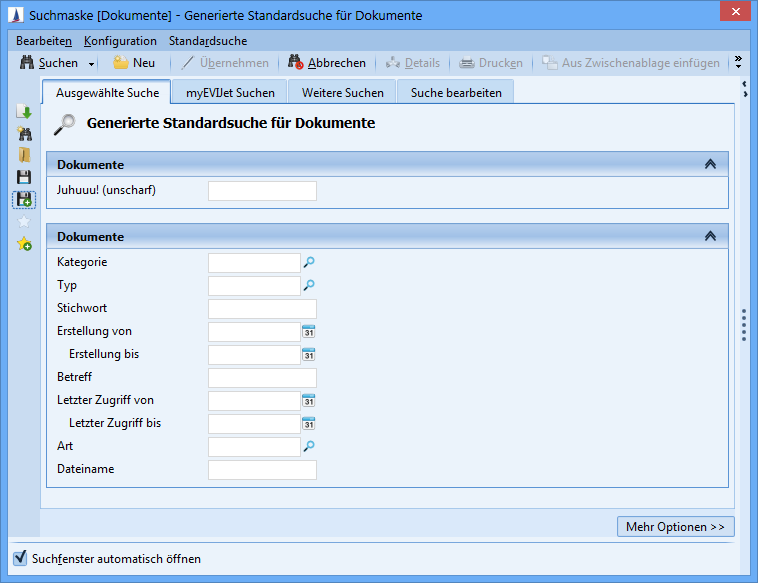
Search information in 'Default search' tab
Formerly 'Search fields'
The internationalized name of the search is displayed above the first group. A tooltip is available to quickly view even long texts. If the search mask is accessed directly from myCRM, the display name from myCRM is displayed instead of the internationalized search name.
The title bar - what the search is based on
In the title bar, the entity for which the search mask was started is displayed in square brackets. This is an important aspect: all searches within this search mask are necessarily based on this entity. This also means: each entity has is its own search mask, which contains the searches available for this entity. And: there is no overall list of all searches. So if you want to start a certain search, you have to know for which entity it was created.
The name of the entity is followed by the name of the search that is currently loaded. Basically, if a search mask is displayed, a search is always loaded. Of course, this raises the question: which search is displayed when the search mask is started? And why this one? The answer: when starting the search mask, the so-called default search is displayed. If such a search does not exist (which should be unlikely), the generated default search is displayed. You can replace these searches with any other search. You can also define which search should be your personal default search that is loaded automatically when the search mask is started. This is explained in detail in a separate chapter on default searches.
The search field area – entering conditions
The left-hand area of the search mask is called the search field area. Here you can enter your search criteria. The fields displayed here depend on the specifications in the loaded search.
The vertical toolbar
This bar contains 19 buttons. These are divided into two groups:
-
The top nine buttons are used to manage searches.
-
The bottom ten buttons relate to the Editing the search area. They are therefore only visible and active if the Edit search tab is in the foreground.
|
Loads standard search |
Through this search the standard search is loaded. If there is no default search, the generated default search is loaded. |
|
Creates new search
|
Clicking this button discards the currently loaded search and loads the Generated default search for [entity name]. You can then edit this search and save it under a freely definable name using the two buttons for Save or Save as. |
|
Opens search management dialog
|
Another dialog opens with this switch which displays a complete list of all searches created for this entity. In this dialog you can load or delete searches, among other things. This search administration is described in a separate chapter. |
|
Saves current search |
Saves the currently loaded search |
|
Saves current search under a new name |
Here you save the currently displayed search under a new name. Hint When assigning the name, place your user token at the beginning of the name. This makes it easier to manage searches, as they can be sorted very easily in the search administration. |
|
Saves changes to the search with its individual selection criteria in myCRM
|
If a search is loaded via the myCRM area, the button for saving or updating the search in myCRM is available. This means that changes can be saved directly in the same myCRM search entry. It is no longer necessary to manually delete the old entry and rename the new entry. The button is inactive if the search was not loaded from the myCRM area. |
|
Copies the current search with your individual selection criteria to myCRM |
Even employees without authorization to save the search can now save the search criteria entered. For this purpose, all selection criteria are recorded in the myCRM entry when copying the search to myCRM. When the myCRM entry is accessed again, the original search is loaded and filled with your own search criteria and then displayed. You can also save selection criteria for new or generated searches. Before saving the search, the user can define a custom name for the search entry. This eliminates the need to manually rename the search entry. The Copy search to myCRM button is also available in the toolbar on the left side of the search dialog. Before an entry is created in myCRM, an information dialog that can be deactivated is displayed to indicate to the user that an action has taken place. |
|
Saves search in a XML-document |
Clicking on this button opens a viewer, via which you can save the currently loaded search in XML format as a file. This allows you to back-up your searches yourself. In addition, this XML layout allows a reliable view of the relationship between the fields used in the search and the fields displayed in the program interface. As follows: In any form, hold down the CTRL key and move the mouse pointer to the desired field (without clicking with the mouse). In the status bar at the bottom left of the screen, the information searched for is displayed in square brackets in the following format: "normal" field vs lookup field: This information is therefore English terms, such as customer.location. You can now find the same information in the XML version of the search. The fields displayed in the search entry area are listed in the same order. The information being searched for can always be found after the <AttributeName> tag. Example:
By comparing this information, you ensure that you are using those fields in the search that you really want to query. |
|
|
Creates the export configuration with multiple nested searches. All fields selected in the search are added to the configuration. The configuration can be edited manually in the wizard. |
|
|
Clicking this button opens a viewer with which the currently loaded search can be saved in SQL-form as file. |
The search options
The More Options>> button allows you to make important settings for the display and the number of output datasets.
|
Maximum number of results (max. 10.000) |
Here you can pre-set the number of the datasets displayed in the search result. There is a fixed upper limit of 10,000 datasets. If a search would return more than 10,000 datasets, the search is terminated with an error message. If the set fixed upper limit is reached, an information message appears indicating that further data is available. Hint To display the maximum number of results, enter -1. |
|
Show relational operator |
Through this button you can enable and disable the display of the relational parameters for the search result fields. |
|
Extended toolbar |
The Save SQL and Save XML buttons can be shown or hidden in the options area via the selection box Extended toolbar. The default value is switched off. The purpose is to simplify the search mask. Rarely used functionalities should be moved to the background. |
|
Allow duplicates |
With this button the double display of datasets can be enabled respectively disabled. Since this is a very important setting, it is explained in detail in the chapter Editing Searches in connection with designing searches. |
|
Checking the execution costs |
Before executing searches, the system estimates the execution costs. If, for example, a search is insufficiently restricted on larger amounts of data, the following message appears so that the system is not unnecessarily burdened with long-running searches. 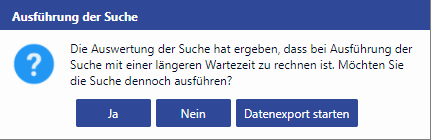
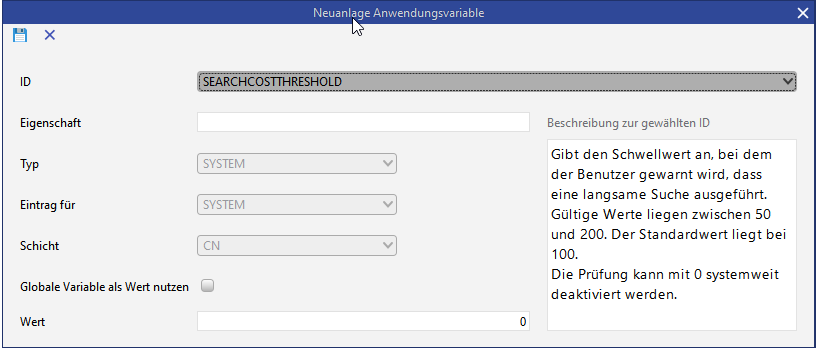
In search editing, the execution cost check can be disabled and saved for the current search. Administration The threshold value for the execution cost check can be configured by the administrator in the application parameters.
|
The 'Open search dialog automatically' setting
If this flag is set, the corresponding search dialog is always displayed when the entity is opened. This is the default setting. If the checkbox is cleared, an empty window for the entity is displayed. To start the search dialog, click on the binoculars icon in the application toolbar.
The search results area
The right part of the search mask is called the search results area. The columns displayed here depend on the settings in the loaded search. To do this, assign a corresponding characteristic to the fields that you want to see as a column in the search results area.
The column configuration is defined per relation and not per search. The column layout on the search mask looks different (e.g. for documents for activities, documents for contact persons, or documents for business partners). In order to offer different search result layouts to different user groups, the administrator must create a new search with the corresponding column configuration.
Configuring the search results area
You can change the appearance of the search results area to suit your own requirements. You can influence the order and width of the columns and the order of the datasets displayed by the following actions:
Changing the column width
Click on the right edge of the column header of the column whose width you want to change, hold down the left mouse button and move the margin in the desired direction.
Moving/swapping columns
Hover the mouse pointer over the column header of the column you want to move, click with the left mouse button and keep it pressed. Now move the mouse pointer to the column in front of which you want to insert the column to be moved and release the mouse button. The column is inserted there.
Defining the sort order of datasets
Clicking with the left mouse button on a column header sorts the datasets according to their values in this column. A small triangle indicates that this column is used for sorting. The tip pointing up or down indicates the sorting direction: ascending (tip pointing up) or descending (tip pointing down). Clicking on the column header again reverses the sort order. If you want to use several columns for sorting, click on them one after the other while holding down the Shift key. The order in which you do this determines the order in which the columns are sorted: first, the system sorts by the column clicked first. If the entries in this column are identical, the system sorts according to the values in the second selected column and so on. Tip: since it is no longer possible to determine the order in which the columns were selected for sorting the datasets, the columns in question should first be placed in the appropriate order.
If you want to set your changes as default settings, you can save them as user preferences. To do this, follow the instructions below:
-
Click on the menu item Configuration and select the entry Save as user preferences.
OR -
In the search dialog, right-click on the column header of the table and select the Configuration settings entry from the context menu. From the submenu, select Save as user preferences.
The next time you open the search mask, the settings made are automatically displayed as the default setting.
The user preference takes precedence over the system-wide settings. This also applies if the system setting has been changed in the meantime.
If you want to return to the system settings permanently, select the menu entry Load system preference and save it as the user preference.
These settings can be saved for the list view, the search dialog (search results area) and for list displays in the sub area. The order of the columns in the list view and in the search results area is always the same.
Using the column filter
Input fields for column filters are located above the column headers. These column filters can be used to further limit the current search result without having to run the search again. You can use wildcards when inputting such a filter:
|
Wildcard |
Description |
|---|---|
|
* |
replaces no, one or more arbitrary characters. |
|
? |
replaces exactly 1 arbitrary character. |
|
t and f |
For columns with checkboxes, you can use the letters t and f to filter for the content that is checked or not checked. Entering the whole word true or false returns the same result. |
|
!query |
!query searches for all rows, that do NOT contain the query |
|
!!query |
!!Query searches for all rows that contain !query (Escape mechanism with duplication) |
|
! |
! searches for all rows in which the field value is empty (can be quite useful at times) |
Alternatively, a "zero-width negative lookahead" regex can be used for the search:
-
(?!query)*"does not start with" -
(?!*query)*"does not contain" -
(?!query)*equal to (approximately) !query
If you point the mouse to a field above the column headers in the results area and then stop moving the mouse, a tooltip appears with an explanation of the possible wildcards.
Save default search
The user can save the search currently displayed as their default search.
The search is not only marked as the default search of user X, but is also saved so that the most recent changes in the search are no longer lost.
The following restriction applies: If the user has changed a search, which he is not allowed to save, e.g. system search or another employee's search, he is asked to save this search under a new name. This new search is then used as the user/group/system-specific default search.
The user guide for saving searches has been optimized: dialog boxes with decision actions are used.
Search administration
Use the Search administration button in the search mask to open the dialog of the same name. This provides you with a list of the searches that are stored for the underlying entity.
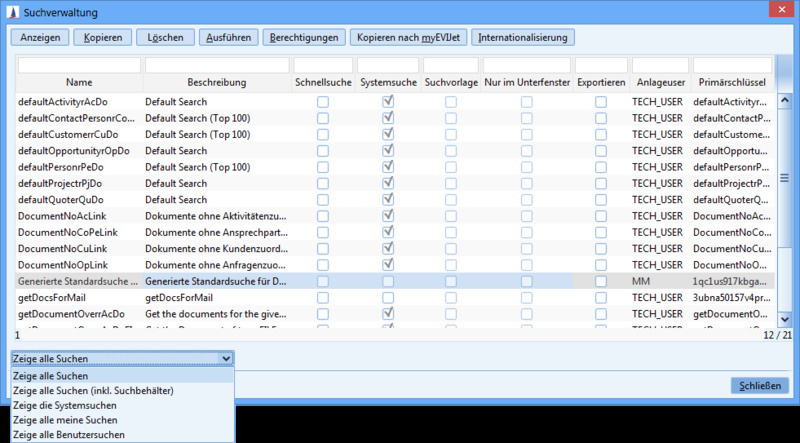
Figure: Search administration
Button
|
Display |
The search administration is closed and the selected search is loaded and displayed on the screen. |
|
copy |
Creates a copy of the selected search. This copy is added to the end of the table as a new dataset. The name of this copy is composed of the name of the original search followed by a sequential number in parentheses. Hint The name of the copy cannot be changed. However, to give a copy the name of your choice, proceed as follows:
You can now assign a new name here. This will bypass the copy button, but give you the desired result. |
|
delete |
Deletes the selected search. |
|
execute |
The search administration is closed, the selected search is loaded and then immediately executed. |
|
Rights |
Clicking on this button opens a separate window for the Rights manager. The user can define permissions for displaying and changing the search. For example, if a user group is deprived of the write permission, the users of this group can still execute the search, but they can no longer save it under the same name. The term DOE in the DOE Read permission stands for Disciplinary Organizational Unit. This setting is not activated in all versions of the program |
|
Copying to myCRM/myEVI |
The selected search is copied to myCRM/myEVI. It is inserted there in the directory that is currently open. Therefore, you should enter the desired area before copying to myCRM/myEVI. If the search in myCRM/myEVI has been stored in the wrong place, you can select one or more searches to be moved there. Then right-click the selected search and select Cut from the context menu. Then switch to the desired folder and insert the contents again using the right mouse button and Paste from the context menu. |
|
Internationalization |
A click on this switch opens an individual window with an internationalization table. Here the administrator can enter the translations for the names of searches. |
Columns
|
Unique.Name |
Name of the search. Must be unique. It is displayed in the title bar of the search mask. |
|
Description |
Freetext for a description of the search. This name is displayed in e.g. myCRM |
|
Quicksearch |
This setting can be used to define a search as a quick search. Quick searches are searches that are executed without an input mask being displayed beforehand. These quick searches are then accessed using the two binocular icons. These icons can be found in the application toolbar and in the main mask of the loaded entity. |
|
System search |
This column is only for displaying defined searches which are defined as system searches. The user cannot make any permanent changes to these searches. System searches are only visible if you set the flag in the Display system searches field at the bottom of the window. |
|
Search template |
If this flag is set, this search is offered via the binocular icon in the application toolbar as an entry in the list of search templates. This list therefore contains searches that you need more frequently and for which (unlike quick searches) a search mask for entering search criteria is initially displayed. Only the administrator can assign the Search template attribute to searches. |
|
Only in sub window |
A search marked in this way is only available to the user if the entity for which such a search was created was loaded as a dependent entity for a parent entity.
|
|
Export |
If this option is activated, this search is exported when exporting/importing Customizing, provided the corresponding entity is selected. |
|
Create User |
The user who created the search is displayed. |
|
Primary key |
The primary key of the search is displayed. |
Proceed as follows to see the searches:
-
Invite a business partner. The assigned entities are listed on tab pages in the lower area of the screen.
-
Select the Activity tab and double-click one of the activities. This will display the Activities submask and fill the screen.
-
Using the two binocular icons, you can now see the list of quick searches (i.e. all quick searches, i.e. the "normal" quick searches and the searches that were turned into quick searches using the Only in submask setting). This list should contain more entries than if you create an activity directly and then click on these icons.
Since there are no search templates in the submask (i.e. the main mask of the selected entity), a combination of search template and NUR in the submask does not make sense.
Search input fields
This chapter explains search fields and how to enter search terms.
Search field types
The information can essentially be divided into four types:
-
Alphanumeric text
-
Number
-
Date
-
Boolean values True and False. These states are displayed as checkboxes.
The effect of this classification is immediately apparent at the following points:
-
The relational operators that you can set for the fields vary according to type
-
Filter conditions
-
Sorting the datasets
|
Text fields / number fields |
The search value can contain text or numerical values or the wildcard.
|
|
Date fields |
The date must be entered exactly. The date can be increased or decreased using + or –. The is between operator can be used to search for a date range. |
|
Lookup fields |
Here you can look up the value you are searching for.
|
Wildcards in the search fields
The following wildcards are available for replacing one, no and any number of characters:
|
* (asterisk) stands for any number of characters and can be used multiple times |
|
|
_ (underscore) stands for precisely one character and can be used multiple times |
Wo_d finds word, but not world |
Relational operators
|
starts with |
Searches all terms beginning with the characters entered. |
|---|---|
|
is one of |
The term must match one of the entered values. The IN function used here therefore allows several parameters to be specified for lookup fields in one condition. You want to see your open activities. These are all activities where either O or A has been entered in the Status field. So you need an operator to perform an OR query. ‘Is one of' meets this criterion. With this relational operator, the values entered are displayed as list entries. To add entries to this list, you must click the ENTER ↵ button. |
|
is equal to |
The value to be searched must exactly match the input. Validation is carried out for key fields. This means: if a key is incomplete or incorrect, a lookup browser is displayed. |
|
contains |
Searches all terms that contain the string you entered. Such a search is also called a fuzzy search. It is generally associated with a loss in performance. |
|
is less than |
Can be used for date fields and number fields. |
|
is between |
Searches all terms that are between the entered values (including those values). |
|
is between (substring) |
Searches all terms that are between the entered values (including those values). You can also enter a start position and the length of the character string to be searched for. This allows you to search for strings that occur at a specified location within a longer string. |
|
Database function |
Here you enter an expression that is built directly into the SELECT and whose value flows into the response table instead of the field value. SQL
|
|
Database function (WHERE part) |
Here you enter an expression that is built directly into the WHERE. SQL
|
For lookup fields, the following special feature must also be taken into account:
If the comparison is performed via is equal to, a validation is performed (this means that a lookup browser is opened if the key is incomplete or incorrect). On the other hand, no validation is performed for a comparison via starts with, so the key is not checked.
Default searches
When opening a search mask, the input and results fields are always displayed in the same way. This means that a specific search is loaded automatically. You can see the name of the search in the title bar. This chapter explains why this search is loaded.
Default searches are those that are automatically loaded when a search dialog is opened. Default searches can be saved as
-
user-specific
-
group-specific or
-
system-specific
. This order also corresponds to the rank of the search. If no default searches are stored, CURSOR-CRM/EVI accesses the Generated default search and loads it.
All work steps are carried out via the Default search menu item. Depending on the permissions level, only some or all menu entries are activated here. The administrator may use all entries, a standard user, on the other hand, may use only those entries which he needs for his personal preferences.
Ideally, when storing the default search:
-
First, the administrator stores the system-specific and group-specific default searches. System-specific means: This search is the same for all users. Therefore, there is only one such default search. This search is always loaded if no group or user-specific default search exists for the logged on user.
-
If the administrator also stores group-specific default searches, these always apply to the members of this group. With this search, the configuration group of the logged on employee is used as the criterion for assignment. The same applies here: as long as the user has not created a user-specific default search, this search is loaded for them. The system-specific default search is therefore overruled by the group-specific search.
-
The administrator reserves the right to set up both types of default searches described above. The third and last type, on the other hand, is accessible to every user: every employee can define their own user-specific default search. This in turn overrides the group and system-specific default search.
If none of these default searches have been defined, provision has been made in the form of the Generated default search. This search does not exist as an actual search. Rather, it is derived from the system preferences in the admin console.
Menu entries of the default search menu item
Using the menu entries of the Default search menu item, employees can now access the three maximum default searches available to them.
|
Load the ... specific default search |
This allows the user to load any of the three types. He has access to the searches provided by the administrator, but can also use his own and switch between the searches again and again via these Load entries. |
|
Save the ... specific default search |
The user can save the search currently displayed as their default search. This also saves the most recent changes in the search.
|
|
Remove the … specific default search |
Clicking on this entry does not delete the search, but removes the Default search attribute from this search. Now you have to leave the search mask. The next time you open the mask, the next search type in the sequence is displayed. If all levels are empty, the system uses the generated default search as described above. |
Editing searches
This chapter describes the options for designing searches. The existing searches already form a good basis for working with CURSOR-CRM/EVI. However, the real added value is when you are able to refine searches and customize them to your tasks. To do this, use the Edit search tab. Here you can add conditions and connections to the loaded search.
Tab 'Edit search'
The search is displayed here as a tree structure. This tree can be changed by editing or deleting existing entries or by adding new entries. The elements of the tree can be explained most easily using a newly created search. To do this, click on Create new search in the search mask. A new, as yet unnamed search is then created based on the system preferences. You can recognize this by the name of the search: Generated default search for [ENTITYNAME]'.
With this new search, the tree already contains some elements. The entry Has [ENTITYNAME] with is at the top position. This entity forms the basis of the search. The name will be different here depending on the entity for which you started the mask. This entry cannot be deleted. The logical operator is displayed at the next position. By default, the AND operator is used, so here you see the text All following conditions apply (AND). This means: If you enter conditions in the fields that are assigned to this operator as list entries, a dataset must fulfill all of these conditions in order to be selected. The second operator type is the OR operator. If this is selected, it means for the fields assigned to this operator: A dataset must fulfill at least one of the conditions entered for it to be selected. This first operator cannot be deleted either. Below the operator you will now find the search input fields. The new search has a very simple structure. It contains a series of fields with the No restriction setting and a trashcan icon 
Keine Einschränkung
The field is displayed, but the user has not yet entered a condition. If you switch to the other tab and enter a condition here, it is automatically displayed in the tree.
The trashcan icon
This icon is displayed for the fields that have the Field can be deleted attribute. To set this attribute, hover over the field and press F2. In the dialog that then appears for the field attributes, the Field can be deleted attribute is available as a checkbox.
If other users later use this search, they may remove the field from the list of search input fields if the icon is visible. However, in certain cases this may not be desired or may even represent a security gap. For example, when the administrator creates a search for business partners, he can specify that the datasets to be displayed must meet the following condition: Assigned employee is [logged in user]. The system recognizes the logged in user and his token is automatically transferred to the search via an appropriate parameter. This means that the user who then performs this search only ever sees the data approved for him. In order to ensure that a user cannot bypass this restriction, the administrator should clear the checkbox in the Field can be deleted attribute for this condition.
The entry 'Dataset status = True'
At the end of the list of search input fields is the entry 'Dataset status = True'. This controls that only the datasets that have not been deleted are displayed. In a database, the datasets that the user deletes are not removed from the table, but are assigned the attribute 'Dataset status = False'. Such datasets no longer appear in the application, but would still be displayed in the searches. For this reason, this setting is always supplied automatically.
This is a condition that a normal dataset always fulfills. If you use an AND operator as the logical operator, this is irrelevant. However, this is different when using the OR operator: in this case this condition is always fulfilled, so that the other stored conditions no longer have any significance. You must therefore make sure that you remove this condition from the OR list. In order to query the dataset status anyway, choose a clever combination of AND and OR operators.
|
Type of field |
Standard condition |
Explanation |
|
Text |
starts with |
Everything beginning with the characters entered is found |
|
Number |
is equal to |
Must match exactly. |
|
Date |
is between |
A date range is queried by the user. |
|
Boolean (True/False) |
True/False |
Must match exactly As long as you do not enter anything, the field is 'Without restriction'. Once the setting has been changed (i.e. the checkbox has been activated), the system asks for 'True' or 'False' from this point on. This can lead to errors. Therefore, such search fields should always be preset with one of the two states instead of 'Without restriction'. |
Button for editing the search
This section explains the bottom 11 buttons of the toolbar on the left-hand side of the search mask. This button is used for editing the search.
|
Add an operator |
This button can be used to add AND and OR operators. |
|
Add a condition |
Adds a field with a specific condition operator. |
|
Add a Juhuuu! condition |
Add a Juhuuu! condition |
|
Add a relation |
Allows you to search for linked data. |
|
Add a negated relation |
Allows you to search for linked data. |
|
Edit |
Opens a dialog to edit the attributes for the selected entity, condition, operator or the 'Has-a/Not-has-a relation'. |
|
Redo |
Allows you to scroll forward through the recent changes. |
|
Undo |
Allows you to scroll backward through the recent changes. |
|
Delete the selected node |
Deletes the marked entry from the tree. |
|
Move the currently selected entry one position up |
Sort the fields on the two tabs in the search field area. |
|
Move the currently selected entry one position down |
Sort the fields on the two tabs in the search field area. |
Hint
These actions are also available via the right mouse button in the context menu, so that the buttons can be accessed more quickly.
Adding a condition
One of the most common steps when editing a search is to add a new condition. You perform this step if you need the field either as a condition field (left-hand side of the search mask), or if you want it to appear as a table column on the right-hand side in the search results area.
To add a condition, select the logical operator under which the new condition is to appear (AND or OR connection). Then click on the now activated button ![]()
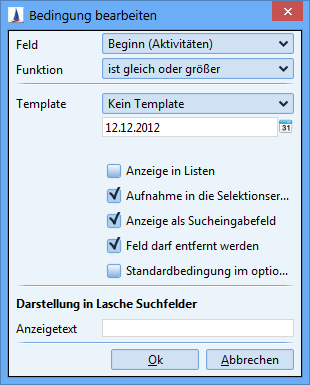
Figure: Selection options for search conditions
|
Field |
All fields of the current entity can be selected in the 'Field' lookup field. |
|
Function |
Here you choose the relational operator. The default entry is 'No restriction'. The list contains different entries depending on the type of field (text, number, date or Boolean). |
|
Template |
Depending on the entries in the 'Field' and 'Function' fields, a list of possible entries is available in the 'Template' field. These templates act as placeholders: they receive information from the system when the search is executed, such as the token of the logged-in user, the current date or the first/last day of the month.
The month can be changed in the number field similar to the other time templates. Both positive and negative numerical values are permitted. The current month is populated with '0' by default. This makes it possible to make the searches very flexible. Depending on the entries in the 'Field' and 'Function' fields, input fields for storing fixed conditions also appear below these fields. In the lower half of the dialog you define the attributes of the search field. The setting options are explained below: |
|
Display search result and selection lists |
If the checkbox is not selected, the field is displayed as a new column in the search results area. For fields with this attribute, a magnifying glass icon is added to the tree. Another effect of this attribute: a field marked in this way is displayed in selection lists, which appear when only one dataset is expected, but more have been selected. This is the case, for example, when creating a single letter if several contact persons have been added to an activity and then selected accordingly by the search, but the letter is only to be sent to one of the contact persons. |
|
Export in search result |
If the checkbox is active, the field is included in the results set. This attribute may seem superfluous at first, because the setting directly above it serves the same purpose (this is also apparent by the fact that when 'Display search result and selection lists' is selected, the checkbox for 'Export in search result' is automatically activated). The reason for this setting is derived from technical relationships relating to queries. Depending on the design of the query, (de-)activating a field can lead to different result sets. |
|
Show search input field |
Displays the field on the 'Search fields' tab. Only then is the user able to make entries here. |
|
Field can be deleted |
The user can remove this field from the search definition. This checkbox allows you to specify whether or not other employees are allowed to remove certain search criteria. Further explanations can be found above in the text. |
|
Default condition in optional query |
If the condition is in a query and the query is included in the search, this condition must also apply. Further explanations about this setting can be found later in this chapter. |
|
Layout for tab search fields |
Here you can enter an alternative description for the search fields on the 'Search fields' tab. If this field remains empty, conditions are used as labels by default. |
Creating and adapting AND/OR links
The effect of this setting has already been explained above. In order to include such a link in the tree, first select the AND / OR link to which you want to assign this new link, in the same way as for the search fields. Then select the desired operator type from the dialog that appears.

Relations
Being able to store search fields and links is a quality that opens up many possibilities. The real strength of editing searches, however, is being able to include any other entities in the search. This is done via the Has-a and the Not-has-a relations.
Procedure for adding these relations:
First select the AND/OR link to which you want to assign the relation. Right-click to display the context menu from which you can select either the Has-a or the Not-has-a relation, depending on the task. A dialog appears with a list of all available entities or relations.
It is important to make the right choice here as it cannot be changed later!
After the selection has been made, the dialog is closed and a new entry is displayed in the tree. This consists of the name of the new relation, a logical operator and the Dataset status search field with the fixed condition True.
The next steps are to include additional search fields and logical operators. This has already been explained above. The attributes of the Has-a or Not-has-a relations can also be edited in a dialog box. You reach this window by selecting the relation in the tree and then pressing F2.
The Has-a relation
The properties dialog of a has-a relation looks like this:
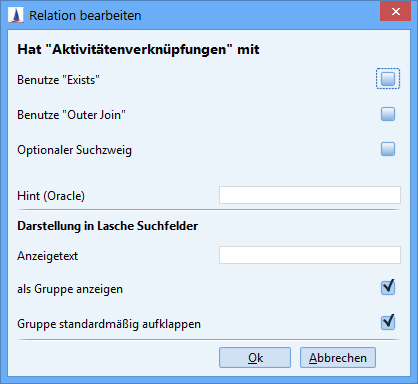
|
Use "Exists" |
If this check mark is set, the search uses an EXISTS function when executing the SQL query in the database. See also the detailed explanations later in this chapter. |
|
Use "Outer join" |
If there are two tables with differences, these can be combined to form an outer join. |
|
Optional query |
An active checkbox causes the program to consider the query when executing the search only if the user has entered a condition in the query. See also the detailed explanations later in this chapter. |
|
Hint (Oracle) |
An execution plan for the search can be stored under Oracle. This may increase the execution speed of the search query. |
|
Display text |
The display text on the tab can be defined here. |
|
Show as group |
If this check mark is set, the relation (also called "query") is displayed as a separate group on the 'Search fields' tab. |
The Not-has-a relation
A Not-has-a relation differs from a Has-a relation in one key point: in this case the check mark Use exists is always set. The query therefore always uses an EXISTS clause (in this case in the form NOT EXISTS...). This results from the type of question posed by an owned-not relation: there must be no dataset in the dependent search for the dataset from the parent entity. Whether there is one, two or more, however, is irrelevant. This logic also means that no data can be displayed in the selection result from an entity that is included via a not-has-a relation.
Input variables for searches
Detailed description
For reports, it may be necessary to be able to generate dynamic conditions depending on the input of a value. For example, you might want to consider three date periods, whereby only the first range is to be entered, since the other periods have defined dependencies. This is initially only intended for use in database functions.
Definition of a variable
Variables are included in the search using the "Variable definition" function. In the detailed view, you can enter a variable name and the value in this function.
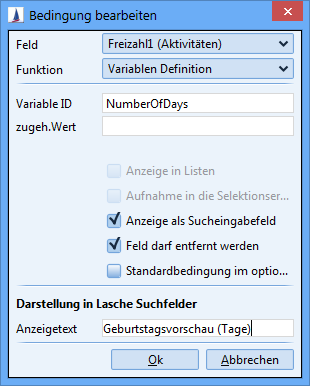
A value can now be entered in the first Search fields tab.
Using the "Variable definition" function
-
Selecting this field only determines the data type (text, number, date, etc.) and, if necessary, the lookup value range. The field itself is not included in the selection. For this reason, the selection fields "Show in list" and "Export in search result" are deactivated.
-
The uniqueness of the name of the search variable is checked when the condition is saved (OK button). The condition can only be exited if the "Variable ID" field is populated and has a unique name within the search.
-
You can only delete a search variable or change the name of the search variable if it is not already used in a database function within the search.
-
The function cannot be selected in the Default search tab, since the definition of the variable name is only supported in the Edit search tab.
-
To use the new function without restrictions, you must have the right to edit database functions. The standard user cannot define or change variable names - only their variable value.
-
Selecting a template is not available.
Using a variable
The variable is used within the DBFunction. The variable name must be structured according to the following syntax: ${[variable name}, e.g. ${NumberOfDays}
The variable is replaced in the DBFunction by the user's input value, whereby several variables can also be used in the DBFunction. You can anticipate the variable value within the DBFunction, for example by adding in x days to the corresponding database syntax. The format of the fields, for example date or number, will take on the form in the database function as it is set on the server. This makes client-side input independent of the formatting used in the function.
Searching for a birthday range in an entered interval would look like this, for example:
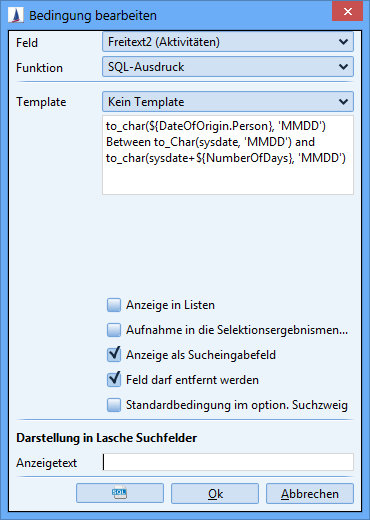
If you want to make the number of days that the birthday preview should take into account, the DBFunction would look like this:
to_char(${DateofOrigin.Person},'MMDD') Between to_char(sysdate,'MMDD') and to_char(sysdate+${NumberOfDays},'MMDD')
where ${NumberOfDays} would be a variable on a numeric field as shown above.
Special features of date and lookup fields
A name extension makes it possible to influence the formatting:
${MeinDatum#ddMMyyHmmss} 29.07.09 00:00:00
${MeinDatum#ddMMyy} ; 29.07.09
${MeinDatum#ORA} TO_DATE('2009-07-29 00:00:00', 'YYYY-MM-DD HH24:MI:SS', 'NLS_DATE_LANGUAGE = German')
${MeinDatum} ; 2009-07-29 00:00:00.0

${MeinLookup#KEY}
returns the key field of the lookup field.
Effects for search users
The user does not have to edit the database function directly and therefore does not need a search input field for the database function, since the use of variables allows the required values to be passed into the DBFunction. In the above case, the user receives a numeric input field in the form of the search variables in order to specify the preview period for the birthday preview.
Extending groups in the search dialog
Expand groups
On the first tab of the search mask, the fields are divided into individual groups. For each group you can define whether it should be opened or closed by default. The 'Open group automatically' attribute can be set via the 'Edit search' tab. It is available for relations (Has-a) as well as operators (AND/OR). The setting is saved per search.
Subdivision of groups
By default, the groups represent the relations (Has-a branch) from the current search whose property is enabled as 'Show group'. Now, an operator (AND/OR branch) can also be defined as a group.
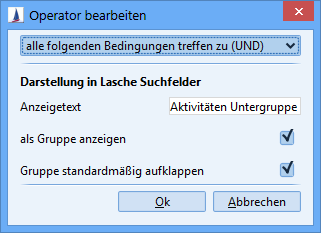
Advantage
A group can be divided into several subgroups. To do this, operators must be added within the relation and the required fields distributed to the corresponding operators. To output an operator as a group, only the Show as group attribute needs to be activated in the operator and the display name must be assigned.
Example
In the following example, there are three AND operators in the has activities has-a relation. The individual AND operators are each defined as a group with the display names
-
1. AND branch
-
2. AND branch
-
3. AND branch
defined.
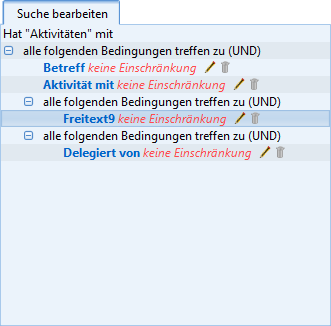
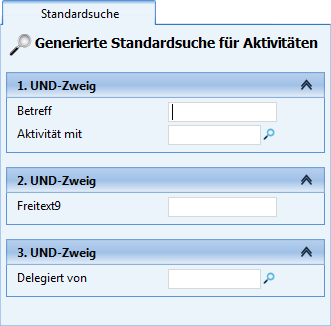
-
Normally, the operators are not output as groups. The 'Show as group' attribute is disabled by default in the operator.
-
If no condition is assigned to a group, the group is not output (in the above example, the output of the 'has activities' group is suppressed, since all conditions are assigned to the AND operators).
Sequence of the groups
The groups represent the relations ('Has-a') and, if applicable, operators (AND/OR) from the current search whose 'Show as group' attribute is activated. The order of the groups is determined by the order of relations and operators in the search. If a relation is moved in the search, the corresponding group in the first tab is also moved to the new position.
Special case
For consecutive groups, the position of the groups is swapped. Consecutive means that there are no conditions between the groups.
Example
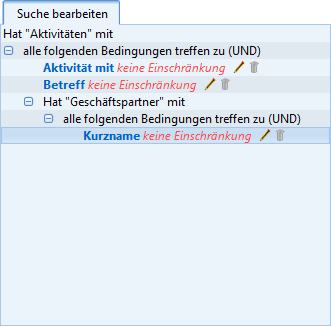
In the following case, the Activity and Business Partner relations from the current search are to be displayed as groups. In the standard case, the groups are output in the following order:
-
Activity
-
Business partner

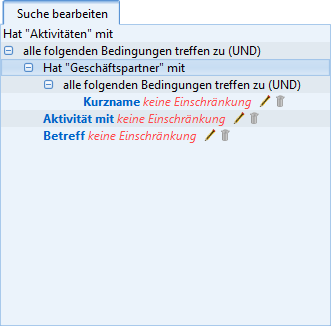
If you want to change the order of the Activity and Business Partner groups, you only have to move the Business Partner group up so that there are no further conditions between the two groups. The groups are now displayed in the following order:
-
Business partner
-
Activity

Database function
Warning
The database function must not contain any DDL commands (for example, Drop Table XYZ).
The database functions have a multiline input mask. The length limit for the input field can be configured via the system preferences. (Options / System Preferences / Search Dialog – Maximum count of characters for SQL statement entry). The default value is 1000 (characters).

Editing the database functions is only available to users with the 'Manage DB functions' right. Standard users cannot select the function or change the contents of the database function.
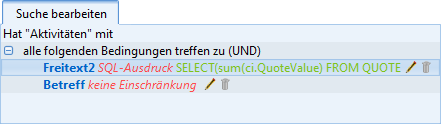
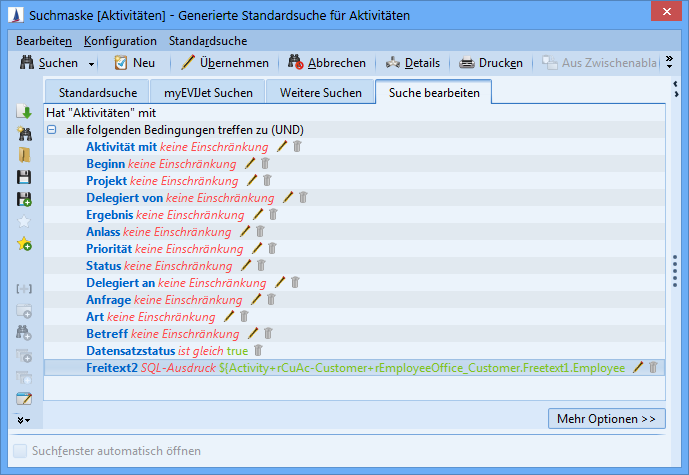
Figure: Show in the tree view of the 'Edit search' tab
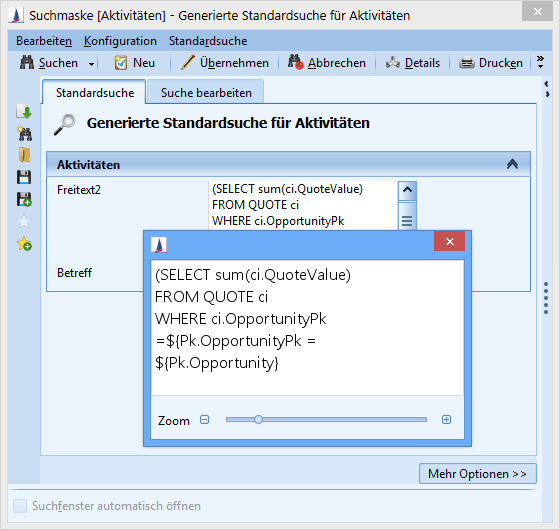
Figure: Show in the search tab
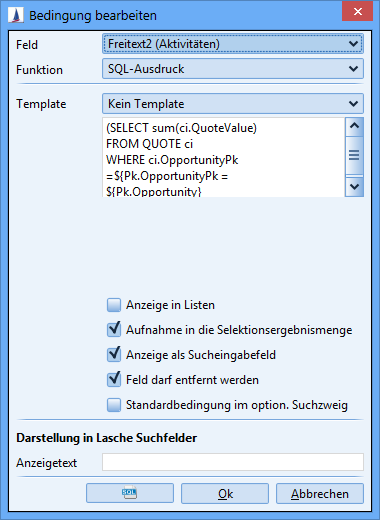
Figure: Display in the editor of the tab Edit search
Variables in DB function
Within the DB function, a complete relation name can be used to precisely qualify the desired entity. It is defined according to the CSV export. For example, you can use the free text from the employee in the activity with the following value.
Activity+rCuAc-Customer+rEmployeeOffice_Customer.Freetext1.Employee
[QuellEntität+RelationName]-[QuellEntität+RelationName].FeldName.Entität
Basic considerations when editing a search
When editing a search, the following factors must be taken into account:
-
What is the question for which the search is to be created?
-
What is the relationship between the entities and relations used in the search?
-
Which fields from the entities are required for the search input and search result fields?
Here are some basic tips:
-
A search request, although it sounds simple, can be very time-consuming to implement.
-
A concept is urgently needed, if only because certain settings cannot be changed later in the search. These must then be deleted and created again. For example, you cannot subsequently convert a has-a relation into a not-has-a relation.
The following examples are intended to explain in particular the various settings for has-a or not-has-a relations. To keep these examples as comprehensible as possible, the set of entities has been limited to two: different lists with data on the business partners and contact persons are to be created. The following cases are possible:
Case 1:
The list is to contain data on business partners and contact persons. Such a list often forms the basis for serial letters.
Case 2:
The list is to contain business partner data, but not contact person data. The relation to the contact person is therefore only for selection purposes (example: I need a list of business partners who have at least one contact person who has the 'Purchaser' role). Each business partner should therefore only appear once in the list, regardless of how many contact persons they have who fulfill this condition.
Case 3:
the inverse of case 2, i.e. a list in the format: All business partners who DO NOT have a contact person with the 'Purchaser' role.
Case 4:
Both business partners without a contact person and business partners with contact persons should appear (a distinction should be made here again: how often should the business partners with contact persons be displayed: once or according to the number of their contact persons).
|
Case |
Type of relation |
'Use EXISTS' |
|---|---|---|
|
1 |
Has-a |
No |
|
2 |
Has-a |
Yes |
|
3 |
Not-has-a |
Yes (mandatory, since fixed) |
ACTUAL relations
The starting point is the search mask for the business partner. We specify: there is one business partner CURSOR to whom 7 contact persons are assigned and one customer Adidas for whom no contact person has been created.
Step 1: Create new search
Search by MATCH CODE = CURSOR, result: 1 dataset. Search by MATCH CODE = ADIDAS, result: 1 dataset.
Step 2: Add the 'Has contact person' has-a relation.
Search by MATCH CODE = CURSOR, result: Seven datasets, all of which have the same entries in the result table (i.e. are duplicates).
Search by MATCH CODE = ADIDAS, result: 0 datasets.
Step 3: Add more search fields to the 'has contact person' relation
For example, you can add the first name, last name and department here. You do not make any changes to the attributes of these fields. These fields are therefore included in the selection result set.
Search by MATCH CODE = CURSOR, result: Seven datasets, all of which have the same entries in the result table (i.e. are duplicates). Search by MATCH CODE = ADIDAS, result: 0 datasets.
Step 4: In the new search fields, set the attribute "Display search result and selection lists"
Search by MATCH CODE = CURSOR, result: 7 datasets showing the 7 different CP in 3 new columns at the end of the table. Search by MATCH CODE = ADIDAS, result: 0 datasets.
Conclusion and recommendations for designing searches:
-
Allow duplicates
The 'Allow duplicates' setting must be used carefully. If you want to output data from the dependent entity (in this case the contact person), you should definitely activate the 'Allow duplicates' checkbox. In order to ensure that each existing dataset is actually output, you can always enter the unique 'Primary key' search field in the 'Has-a relations' and select the attribute 'Export in search result'.
-
Export in search result
You only need to set this characteristic if you actually want to output fields from the dependent entity or if you want to know the correct number of datasets (example: How many contact persons does CURSOR have? We only want the number. We're not interested in the names of the contact persons).
Step 5: For the relation, set the 'Use Exists' attribute.
Search by MATCH CODE = CURSOR, result: 1 dataset Search by MATCH CODE = ADIDAS, result: 0 datasets.
Step 6: Create a new search and this time add the CP via a Not-has-a relation.
Search by MATCH CODE = CURSOR, result: 0 datasets Search by MATCH CODE = ADIDAS, result: 1 dataset.
'Optional query' setting
When searching for the creation of serial letters, the employee should be offered many input options. However, the queries in which the user makes no input should not be used for the selection.
If the query is a 'Has-a relation' and the 'Use "EXISTS"' checkbox is not set, this query automatically has a restrictive effect. To remove this restrictive effect of a query, there is the 'Optional query' setting. This means that this query is only taken into account if the user has entered search values in it.
For this logic to work, conditions with this characteristic are excluded from the Show search input field. This is also why the 'Dataset status' field is not displayed (because this characteristic is also set there).
The setting does not apply for the 'No restriction' selection criterion. That would not make any sense either.
Another example:
A free field has been defined, which is given the name 'Trade Fair'. This free field has key values for the various trade fair events which the company attends. These fields have been defined to invite business partners to the trade fairs of interest to them.
A search for business partners now has a 'Has-a relation' to this free field. In a search, only business partners with a 'Trade Fair' free field should appear. Therefore, the characteristic 'Default condition in optional search branch' is not set for this field in the 'Ownership relation'. The field is therefore checked and the query is consequently evaluated for the 'Trade Fair' free field. This means that the optional query is always included in the selection.
The user can see the field for the key (the respective trade fair) and populate it with key values. If he does not enter a key, he receives all customers who have such a free field.
If you now set the 'Default condition in optional query' characteristic, then, if the user does not enter anything in the fields for this query, all customers are available for selection, even those without such a free field.
Notes on how to use the search
Relations
-
'Not-has-a’
Here the option 'Use exists' is always used implicitly in the query.
Options in the relation (query)
-
'Optional query'
-
Using search result fields within an optional query makes no sense, since the query is usually removed from the search.
The same applies to the 'Show in list' optionWhen adding one or more conditions to a search, the flags for "Show in list" and "Export in search result" are always set automatically. Usually you will also need the two fields as output if you have added them to the search.
-
An optional query is no longer removed from the search as soon as the user makes a change to a field of the optional query.
Example: Changing the function or changing a value.
-
-
Default condition in optional query
If the administrator uses this option, make sure that the condition is entered completely first and then the option is activated.
Background:
Each time the condition is changed, the 'Default condition in optional query' option is automatically disabled. This principle is used to detect that the condition has been modified by a user.
-
Restrict maximum results set
The option in the has-a relation editing dialog has been removed. When loading an existing search with this option activated, it is automatically deactivated and the number of search results is reset to the default value (usually 100). -
'Outer Join'
Version 10.2 and higher: As soon as a query is marked as outer join, its dependent queries branches are also selected via outer join.
Version 10.3 and higher: Dependent queries are no longer selected implicitly by outer join, but by inner join. If these are also to be selected via outer join, the outer join option can be explicitly selected in the query.
Given:
• Search with the following structure: Contact person -> 'owns activities' -> 'owns inquiry' (inquiry is below the activity)
• Activated OuterJoin in 'owns activities'
• no OuterJoin in 'owns inquiry'
• The search contains search result fields from the 'owns activities' query
Principally applies to all versions:
All contact persons are found, even those who have no activity.
Different behavior between versions
Up to 10.2: Due to the implicit OuterJoin in 'Has-a inquiry', the search result fields for activities are populated, even if no inquiry is linked to the activity.
Version 10.3 and higher: Due to the InnerJoin in 'Has-a inquiry', the search result fields for activities are populated with empty values, even if no inquiry is linked to the activity.
-
Use exists
The use of search result fields within a query with the 'Use exists' option activated should be avoided, since their search fields are not included in the search result set.
You should only enter conditions to restrict the selection.
-
Hint
Only taken into account when using Oracle as the database.
Functions
-
Standard functions
The administrator can enter conditions in the 'Edit search' tab. It is not absolutely necessary to select the function. By default, the condition is initialized with the 'no restriction' function. The user can now enter his selection criteria in the first tab. To spare the user having to select the functions, the 'no restriction' function is now replaced by the associated standard function for all corresponding fields. The standard functions are defined as follows, depending on the data type:-
'String' data type (text without lookup) = 'starts with' function
-
'String' data type (text without lookup) = 'is equal to' function
( NOTE The entered value is validated.) -
'Integer' data type = 'is equal to' function
-
'Date' data type = 'is between' function.
-
'Boolean' data type (yes/no) = 'all' function (corresponds to 'no restriction')
-
-
Saving changed functions
IMPORTANT Changes on the first tab are only saved if the condition (function and selection criterion) is valid.
A condition is valid if its selection input fields are filled with values.
A change to the function in the first tab is only saved in the search if the input field has been populated. If this is not the case, the function change is not taken into account when saving the search.
The restriction described does not apply to the 'Edit search' tab. Changes are always saved here. -
Has count - will be omitted in the future
-
Can only be used in dependent queries (not in the top level)
-
Only one-time use within a search.
-
Examples with further explanations
A simple list of contact persons from A - K
For the Last Name field, use the is between function and enter the values A and L.
-
The is between function in the Last name field must be set to A to L, so that the last customer beginning with K is also found.
-
If there is a CP simply called L, you must enter another condition: Last name does not start with L.
-
The Last name field can also be defined so that it does not appear in the input range (Show search input field: deactivate the checkbox here).
Contact person with product interest
You want to create a query for many different aspects. However, these should only be taken into account during selection if the user also enters something.
-
First you have to define the starting entity. In the example, this is the contact person.
-
A 'Has-a relation' with another entity (e.g. 'product interest') has been added to this contact person.
-
With this relation you now edit the properties: in this case click on the Optional query checkbox. This means that this relation is only taken into account in the query if the user has made an entry in this branch.
-
Now the 'Default condition in optional query' checkbox must be activated in the field 'Dataset status = active'. This setting means that the field is not interpreted as "edited by the user". Basically, this setting must be set if something other than 'no restriction' has been set for a function.
Single field search
Detailed description
The single field search is primarily based on the Juhuuu! search index. A search must be administered accordingly so that it can be used as a single field search. The administrator can use keywords to allow the user to search exactly in certain fields. To do this, the administrator defines keywords in the fields of the search that the user can use in the input field of the single field search.
Requirements
To be able to use the single field search, the following conditions must be met:
-
The "Single field search" system preference must be activated
-
The "Single field search" option must be activated in the search
-
The search must have a Juhuuu! condition in the main branch of the search.
If the default search of an entity satisfies the listed conditions, the search mask is no longer displayed when an entity is opened. The user is presented the list view directly and can enter his search conditions directly in the single field search.
Using the single field search
The single field search is triggered via the ("magnifying glass") button or the ENTER key. The single field search must contain entries if the "Check search criteria before execution" system preference, otherwise no search is executed. If several datasets are found, the hit list is displayed in the list view. If exactly one hit is found, the application automatically switches to the detailed view. If no results are found or the hit list contains more than the maximum permitted number of search results, the search is aborted and the user is informed. The previous search result is retained.
Keywords are automatically recognized as you type. For example, if the keywords "Company" and "City" are defined, the keyword "Company" is displayed in the selection list when the letter "C" is entered. Using the up and down cursor keys, the user can select a keyword and press ENTER to enter it in the single field search. A keyword that is already in use cannot be selected again and is interpreted as text for further entries. If several keywords are defined in a field, only one of these keywords can be used in the single field search. For example, if the keywords "BP" and "Company" are defined in the "Company" field in the business partner, the keyword "Company" is no longer recognized after you enter the keyword "BP". The selection list can be opened with all available keywords using the Down cursor key or the key combination CTRL + Space. The first five available keywords are displayed in alphabetical order.
A keyword must always be followed by a text that is included in the search. Implicit keywords are an exception. The text is only used up to the next space character. To prevent this, text phrases can be used with quotation marks.
Entries that are not assigned to a keyword are entered in the Juhuuu! search field.

Implicit keywords
Usually, the user enters a keyword and then defines the search text. For certain search fields that contain only a small number of possible values, the administrator can define implicit keywords to make search entry easier for the user.
For example, the Type field in the business partner contains the values C (Company), H (Mr.), and F (Ms.). Here the administrator could assign the keyword "Type" for the field of the same name, so that the user can restrict the search by person type in the single field search. The user's entry could then look as follows:
"Type H Klaus Müller"
The system now searches for all business partners with the person category "H" (Mr.) that contain the text Klaus Müller (Juhuuu! search).
However, the administrator can now define implicit keywords for the individual person types. For implicit keywords, the user no longer needs to specify a field value. This is defined in the keyword. An implicit keyword is defined as follows:
"Keyword[field value]"
In the example, the administrator can now define the following three keywords for the Type field:
-
Company[C]
-
Mr.[H]
-
Ms.[F]
The above search input of the user can now look like this:
"Mr. Klaus Müller"
The search result is the same as in the example above. The person type is restricted to the value H and the business partner Klaus Müller is searched for. However, the user no longer needs to know that the person type "Mr." has the key value "H". The search input is thus closer to natural language and is easier to understand.
Identifier field
In addition, identifier fields can be selected in the search (usually these will be one or two fields). If the user only enters one search word, this is first searched for in the search fields one after the other (exact). If the hit list remains empty, the search word is transferred to the Lucene search. Here the search is executed several times and the next identifier field is set in each case. The same rules apply to the search functions as to the normal single field search. The first search that returns a result is displayed to the user. The order of the searches is determined by the sequence of the fields marked as identifier fields in the search.
Example searches
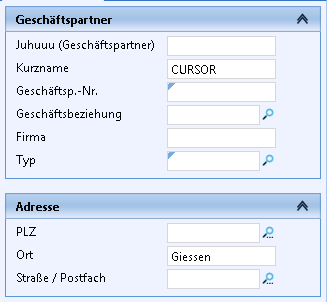
To illustrate how the single field search works, the following search is defined for business partners:
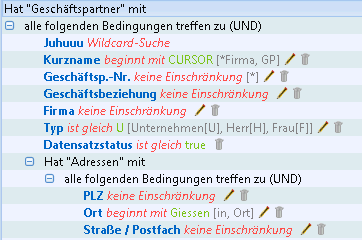
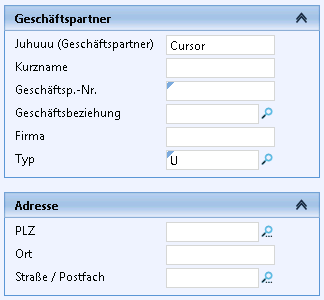
The Match Code field is marked as identifier field and the keywords "Company" and "BP" are defined. The Business Partner Number field is also marked as the identifier field. Three implicit keywords "Ms.[F]", "Mr.[H]" and "Company[C]" are defined for the Type field. You can search explicitly for the City field in the address relation using the keywords "in" and "city".
Search value: Company Cursor in Giessen
The text "CURSOR" in upper case letters is transferred to the Match Code field and the text "Giessen" is transferred to the City field.
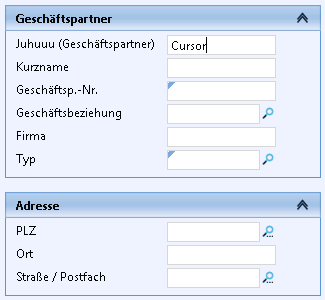
Search value: Company Cursor
The implicit keyword "Company" is transferred to the Type field with the "C" field value. Since the text "Cursor" is not assigned to a keyword, it is entered in the Juhuuu! search field.
Search value: Company Cursor GP NSI
The text "CURSOR" is entered in upper case in the Match Code field. Since the keyword "Company" is already used for the Match Code field, the keyword BP is interpreted as text and passed to the Juhuuu! search field.

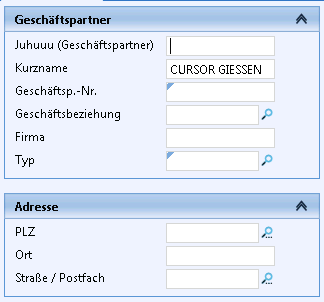
Search value: Company "Cursor Giessen"
The text "CURSOR GIESSEN" is entered in upper case in the Match Code field.
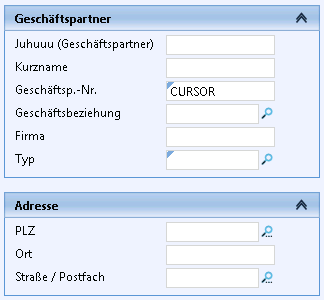
Search value: CURSOR
When entering a search word, the searches for the identifier fields are first executed one after the other. Finally, the search word is passed to the Juhuuu! search field. The subsequent searches are executed one after the other until a search returns a result.

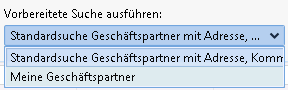
Prepared searches
In addition to the single field search input field, the user can select the available quick searches from a list. The quick searches are executed directly. When executing a quick search, the input in the single field search is cleared. The current search of the search dialog is displayed as the top search.
Extended search
The "Advanced search" button takes the user to the search dialog. Entries from the single field search are transferred to the search dialog. If the user performs a search via the search dialog or changes the search, the input in the single field search is cleared and the changed search is displayed in the list of prepared searches.
Search logic
User entries in the input field of the single field search are checked when the search is executed and inserted into the current search. The currently set search is used and thus the configured search functions are also taken into account. When the single field search is executed, the saved status of the search is always used.
Since the input is made as text, not all functions are supported by the single field search. If unsupported search functions are used in fields, the inputs in the single field search are ignored and passed to the Juhuuu! search field. Existing search parameters are overwritten by the inputs in the single field search. If the input text cannot be converted into the data type of the search field, the input is considered invalid and is not taken into account.
Text fields
If only uppercase is allowed in the text field, the single field search automatically converts the search word into uppercase letters.
The following search functions are supported in text fields in the single field search:
-
starts with
-
does not start with
-
ends with
-
does not end with
-
contains
-
does not contain
-
is one of
-
is none of
-
is equal to
-
is not equal to
-
is greater than
-
is equal to or greater than
-
is less than
-
is less than or greater than
-
no restriction
-
is between
-
is not between
For the "is between" and "is not between" functions, only the first parameter is populated. The second parameter remains empty. For the "is one of" and "is none of" functions, the input parameter is added to the existing list of values.
Memotext fields
Not all text field search functions are available for Memotext fields. However, the same rules apply here otherwise.
The following search functions are supported in memotext fields in the single field search:
-
starts with
-
does not start with
-
ends with
-
does not end with
-
no restriction
Number fields
Since parameters are entered as text in the single field search, digits of text must be converted to numbers. The numbers are entered in the country-specific number format, e.g. #.####,# (Germany) or #,####.# (USA). A distinction is made between integer values and floating point numbers. If the user is only allowed to enter integers in the search field, decimal places are not taken into account. Restrictions of possible numerical values via the field attributes are not taken into account in the single field search.
The following search functions are supported in number fields in the single field search:
-
is one of
-
is none of
-
is equal to
-
is not equal to
-
is greater than
-
is equal to or greater than
-
is less than
-
is less than or greater than
-
no restriction
-
is between
-
is not between
For the "is between" and "is not between" functions, only the first parameter is populated. The second parameter remains empty. For the "is one of" and "is none of" functions, the input parameter is added to the existing list of values.
Boolean fields
In the single field search, Boolean fields can only be passed the values "true" and "false". All other values are interpreted as "false".
The following search functions are supported in Boolean fields in the single field search:
-
is equal to
-
no restriction
Date fields
The single field search supports searching by date values. The date values are interpreted and converted specifically to each country. The input of time values is not supported by the search mask and therefore no by the single field search either. Date values must be entered in full, e.g. "31.12.2013" or "31/12/2013".
The following search functions are supported in date fields in the single field search:
-
contains
-
does not contain
-
is equal to
-
is not equal to
-
is greater than
-
is equal to or greater than
-
is less than
-
is less than or greater than
-
no restriction
-
is between
-
is not between
For the "is between" and "is not between" functions, only the first parameter is populated. The second parameter remains empty.
Lookup field
For lookup fields, the input is entered and validated if necessary. There is no validation for picklist fields.
The following search functions are supported in lookup fields in the single field search:
-
starts with
-
does not start with
-
ends with
-
does not end with
-
contains
-
does not contain
-
is one of
-
is none of
-
is equal to
-
is not equal to
-
is greater than
-
is equal to or greater than
-
is less than
-
is less than or greater than
-
no restriction
-
is between
-
is not between
If the "is equal to", "is not equal to", "is one of" and "is not one of" functions are used, the lookup value is validated. If no unique lookup value can be validated, the input is considered invalid and is not taken into account.
For the "is between" and "is not between" functions, only the first parameter is populated. The second parameter remains empty. For the "is one of" and "is none of" functions, the input parameter is added to the existing list of values.
Numeric lookup fields
For numeric lookup fields, the input is converted into an integer and validated if necessary.
The following search functions are supported in numeric lookup fields in the single field search:
-
is one of
-
is none of
-
is equal to
-
is not equal to
-
is greater than
-
is equal to or greater than
-
is less than
-
is less than or greater than
-
no restriction
-
is between
-
is not between
If the "is equal to", "is not equal to", "is one of" and "is not one of" functions are used, the lookup value is validated. If no unique lookup value can be validated, the input is considered invalid and is not taken into account. If the input text cannot be converted into an integer, the input is also considered invalid and the search field is not populated.
For the "is between" and "is not between" functions, only the first parameter is populated. The second parameter remains empty. For the "is one of" and "is none of" functions, the input parameter is added to the existing list of values.
Administration and configuration of the single field search
-
'Single field search' system parameter
The Single field search system parameter in the System Preferences / Search Dialog area controls the general availability of the single field search in the application.
-
Configuration of the search mask
A search can be marked as a single field search. The following preconditions are necessary for this:
-
Activated 'Single field search' system parameter in the 'Search dialog' area
-
The 'Single field search' option is activated in the 'Options' section of the search.
-
The search contains a Juhuuu! search condition in the uppermost query
If the above conditions are met, the following functions are available in the 'Edit search' area:
-
One or more keywords can be assigned to a condition.
-
Keywords must not contain any spaces.
-
Implicit search values can be defined for keywords. If this keyword is used, the next text in the input is not passed to the search, rather the implicit search value. The implicit search values are defined in square brackets after the keyword.
Examples: Keyword[search value], "Mr[H]", "Ms[F]", "Company[C]"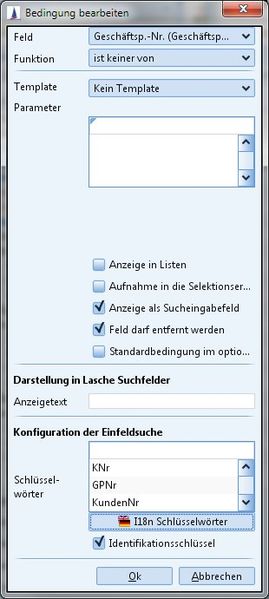
-
-
The keywords can be internationalized.
-
(Technique: All information is stored within the search.)
-
The application ensures that the keywords entered within the search are unique for each language. The system checks for uniqueness both when you enter data in the condition and when you maintain internationalization
-
A condition can be flagged as an identifier field.
-
The 'Identifier field' attribute and the keywords of a condition are visualized in the 'Edit search' tab in the tree.
Layout:
[* (if identifier field activated) + comma-separated list of keywords in the current language ]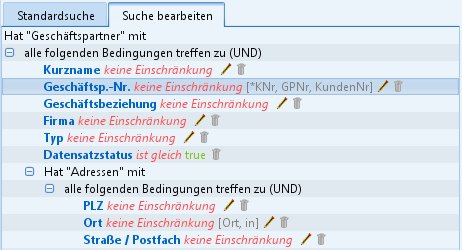
The above functionalities are not available in Juhuuu! search conditions.
Search templates
Search templates are at first nothing more than normal searches. The administrator assigns them the 'Search template' flag in the search administration. This determines that these searches are included in the list of search templates in the binoculars icon in the toolbar. If the user selects such a search template, the search mask with the loaded search is displayed. This is where a search template differs from a quick search, which can also be accessed using the binoculars icon, among other ways.
Only the administrator can store search templates. This is to avoid too many searches being entered as search templates and thereby losing the benefit of these templates.
'CompareTemplate'
The 'CompareTemplate' template exists for the 'is equal to ' and 'is not equal to' function, with which two fields from the search with the same data type can be compared. The template is complementary, i.e. the template must be used with a reciprocal reference in the conditions of both fields.
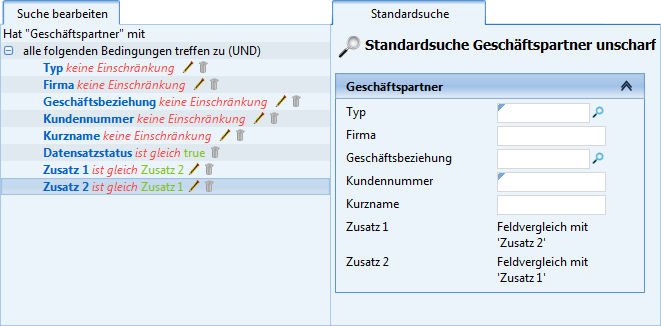
When editing, the comparison field can be selected via a drop-down list.
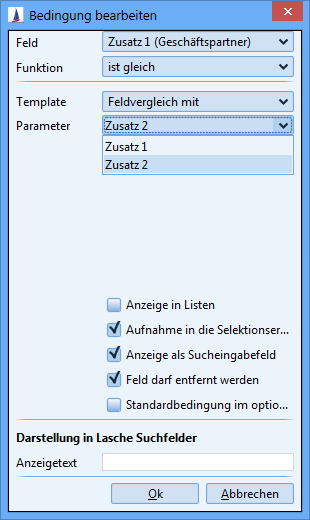
If a setting on a template is incorrect when executing or when saving the search, it is removed to avoid errors.
Search in the sub-data area
Quick searches in the sub-data area are carried out via the binoculars button. Clicking here also removes the set upper limit (for example 100).
Quick search
Quick searches are defined by the fact that no search mask is displayed. This means that the user cannot make any input. A search is defined as a quick search in the search administration. Here you set the 'Quick search' flag for the selected search. (Clicking the 'Copy to myCRM/EVI' button has a similar effect. Searches that exist there are also executed in the same way as quick searches).
System searches for the sub-data area are also quick searches internally. Finally, entities displayed in the tree are selected here.
The following table gives an overview of the different ways to access quick searches.
|
Method |
Where? |
Note |
Is a new level opened? |
|---|---|---|---|
|
1 |
Binoculars in the application toolbar |
Only possible if an entity with stored quick searches is open |
No |
|
2 |
Binoculars in the toolbar of the entity main mask |
|
No |
|
3 |
Via the quick search mask on the CRM/EVI desktop |
A new quick search appears here after some time |
Yes |
|
4 |
Copying to myCRM/myEVI |
To do this, open the search administration and select the desired search. Use the 'Copy to myCRM/myEVI' button to paste the search. |
Yes |
|
5 |
Using the Quick Searches tab |
This tab may be hidden. You can unhide it in the myCRM/myEVI section of the Options / User Settings menu |
Yes |
|
6 |
Favorites menu item, then the Quick Searches menu item |
|
Yes |
|
7 |
Binoculars in the toolbar of the entity sub area |
This switches from the sub area to the main mask area. The data from the sub area is displayed in the list view of the main mask area. The search mask then opens automatically. For details see Quick searches in the sub area |
No |
Quick searches in the sub area
The search button is now available in the vertical toolbar of the sub area. The search button's drop-down menu displays the quick searches available for the current sub area. The behavior is as follows:
-
Click on search button
This switches from the sub area to the main mask area. The data from the sub area is displayed in the list view of the main mask area. The search mask then opens automatically. -
Selecting a quick search in the search button
This switches from the sub area to the main mask area. The quick search is executed and the selected data is displayed in the list view of the main mask area. -
Selection of a quick search in the search button and press and hold the CTRL key
This switches from the sub area to the main mask area. The data from the sub area is displayed in the list view of the main mask area. The search mask then starts automatically with the loaded quick search.
The quick search has not yet been executed!
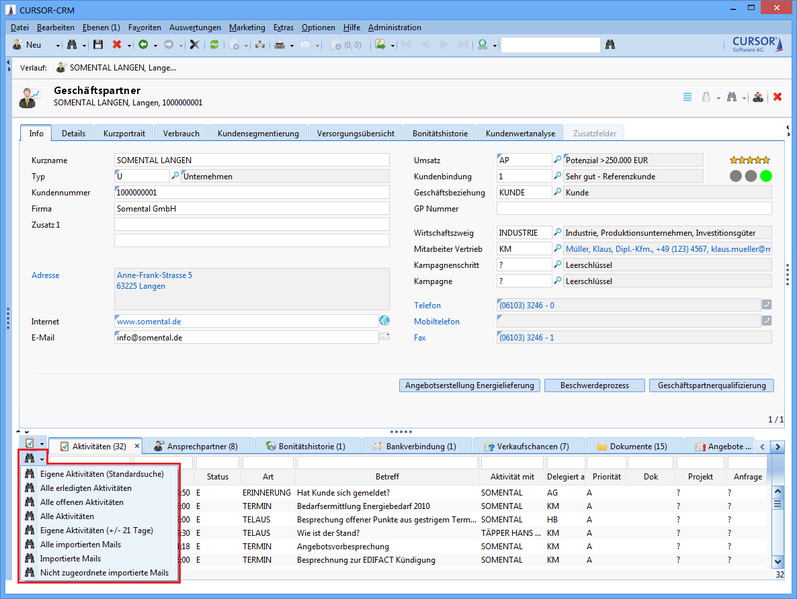
Figure: Quick searches in the sub area
Support from the administrator when using searches
Entering the PK or the plainkey is also supported.
Field attributes
The search to be used can now be looked up in the 'Lookup search' entry in the system-wide field attributes. After selecting the search, its plainkey is displayed in the field attributes dialog. (In the previous versions the PK of the search had to be entered manually).
Mask scripting
For all search methods in mask scripting, the user can use the plainkey or the PK of the search as an argument. The interfaces have not changed. Both the Plainkey and the PK are only taken into account when determining the search. Procedure: If the search cannot be determined using the plainkey, the search is determined using the PK.
Search methods in mask scripting
-
existsSearch
-
searchWithParams
-
searchOutput
-
searchCount
-
searchSingleRow
-
searchSingleValue
-
searchSingleValueForLookup
Settings and restrictions for searches
The detailed configuration of the searches is explained under System Preferences > Search Dialog.
For performance reasons, the maximum number of search results is limited to 10,000. However, if this limit is to be increased, a separate mass data server (application server) on a 64-bit operating system is recommended, as this is the only way to allocate enough RAM to the JBoss.