Basics
The application offers the option to initialize other software products. Single or fixed parameters, as well as values from e.g. the currently open mask can be forwarded to the invoked program.
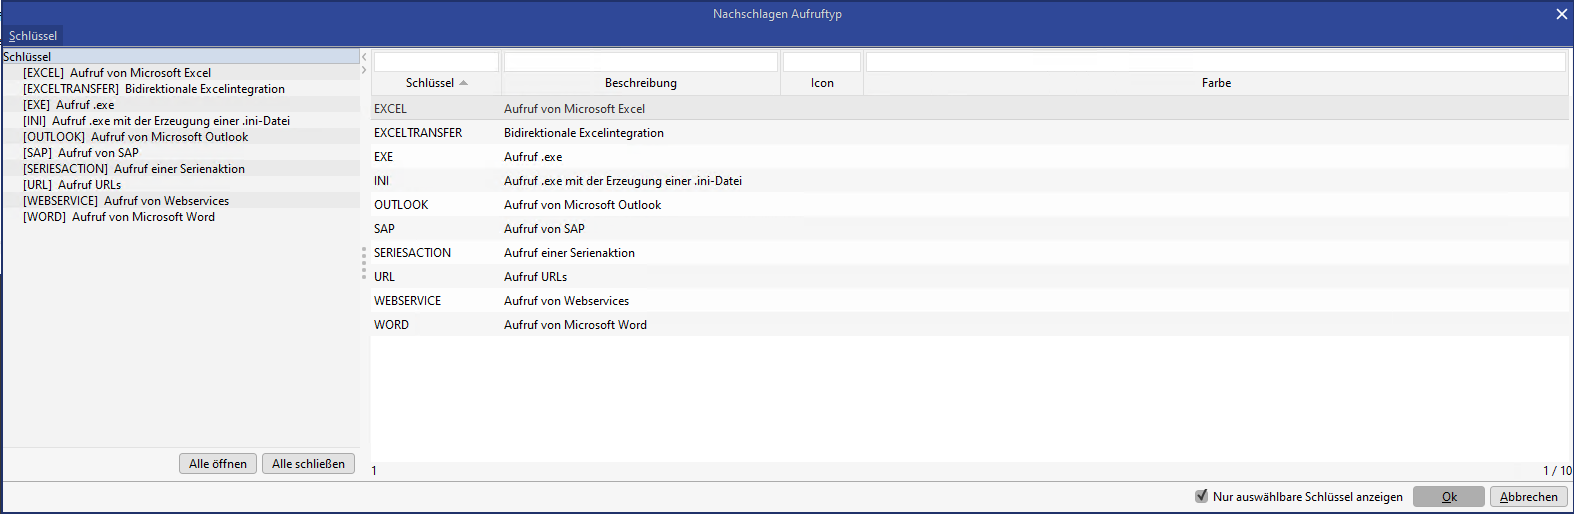
We differentiate between several invocation types:
|
Type |
Remark |
|---|---|
|
EXCEL |
Microsoft Excel invocation |
|
EXCELTRANSFER |
Bidirectional Excel integration |
|
EXE |
Invocation of an executable Windows EXE file |
|
INI |
.exe call with creation of an .ini file Only in the Windows Client |
|
OUTLOOK |
Microsoft Outlook invocation; |
|
SAP |
Invocation of functions and masks in SAP |
|
SERIESACTION |
Invocation of a serial letter from an entity Only in the Windows Client |
|
URL |
Invocation of a website via the system-configured standard browser |
|
WEBSERVICE |
Web service call Only in the Windows Client |
|
WORD |
Microsoft Word invocation |
All invocations are logged in a separate table. You can access the invocation interface in the administration menu via the node External invocations. A search window opens, where you can search directly for a specific existing invocation or you close the search window and click the button New to create a new dataset.
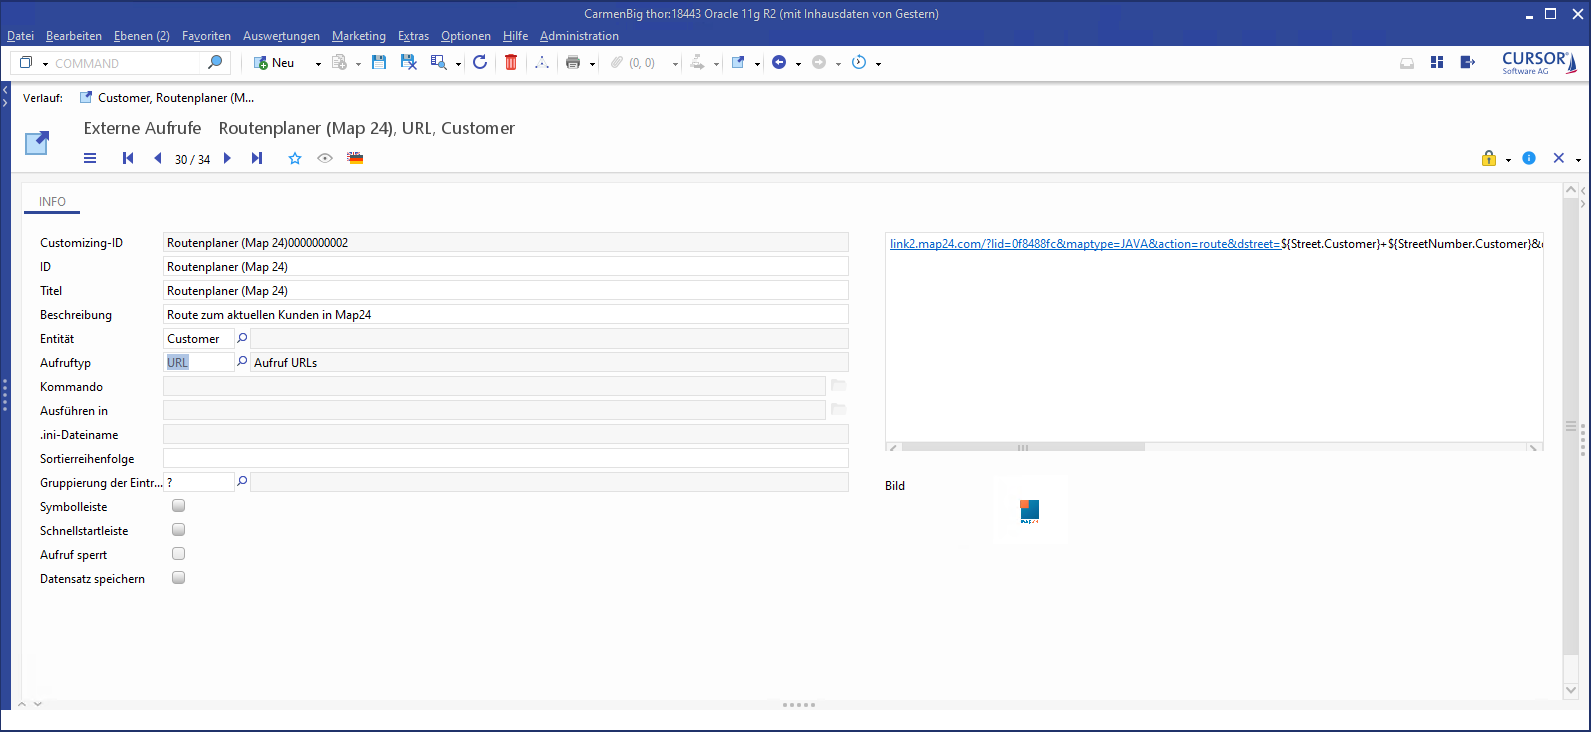
Figure: Mask of an external invocation
-
Name the new invocation in the field Title as it should later be displayed in the invocation menu.
-
Enter a tooltip in the field Description to be displayed later as a mouseover for the relevant button. It will be displayed in the invocation menu and in the button bar.
-
Select the entity for which the invocation should be available in the field Entity. The invocation will be displayed for all masks if this field remains empty (entry of an empty key), otherwise it will only appear for the selected mask. Please note that parameterized invocations are usually not suitable for all masks.
-
Enter the type of invocation (see above) in the field Call type.
-
Ad a script for the call configuration (see below) in the Memo field at the top right
-
Select an icon (GIF or JPG) for the field Image that will be displayed for the invocation.
-
The Command field is only accessible for the call type EXE. Here you enter the path and file name of the executable program.
-
The Execute in field is only accessible for the call type EXE. Here you can optionally specify another working directory for the invoked program.
-
Setting a check mark for the field Navigation bar allows you to specify, whether the call should also be available via the call bar or should only be displayed in the call menu.
-
Optional parameters to be transferred to the program an be entered in the field 'Parameter'. The syntax depends on the invoked software.
-
Toolbar and Button bar fields: External invocations that should neither be displayed in the toolbar nor in the quick start bar (both options deactivated) do not appear for the user in the application (only available in the mask script) and are therefore not offered in the proposal list (COMMAND).
The syntax for the transfer of parameters from within the application looks like this: ${Fieldname.Entityname}
The matching entries are looked up via the administration console in the section Customizing / Field attributes using a relevant column filter.
Grouping and sorting
The sequence in which buttons for external invocations are displayed in the drop-down menu can be influenced via the numerical field "Sort order". Please note when working on this field that the drop-down menu displays entity-specific, as well as entity-independent entries.
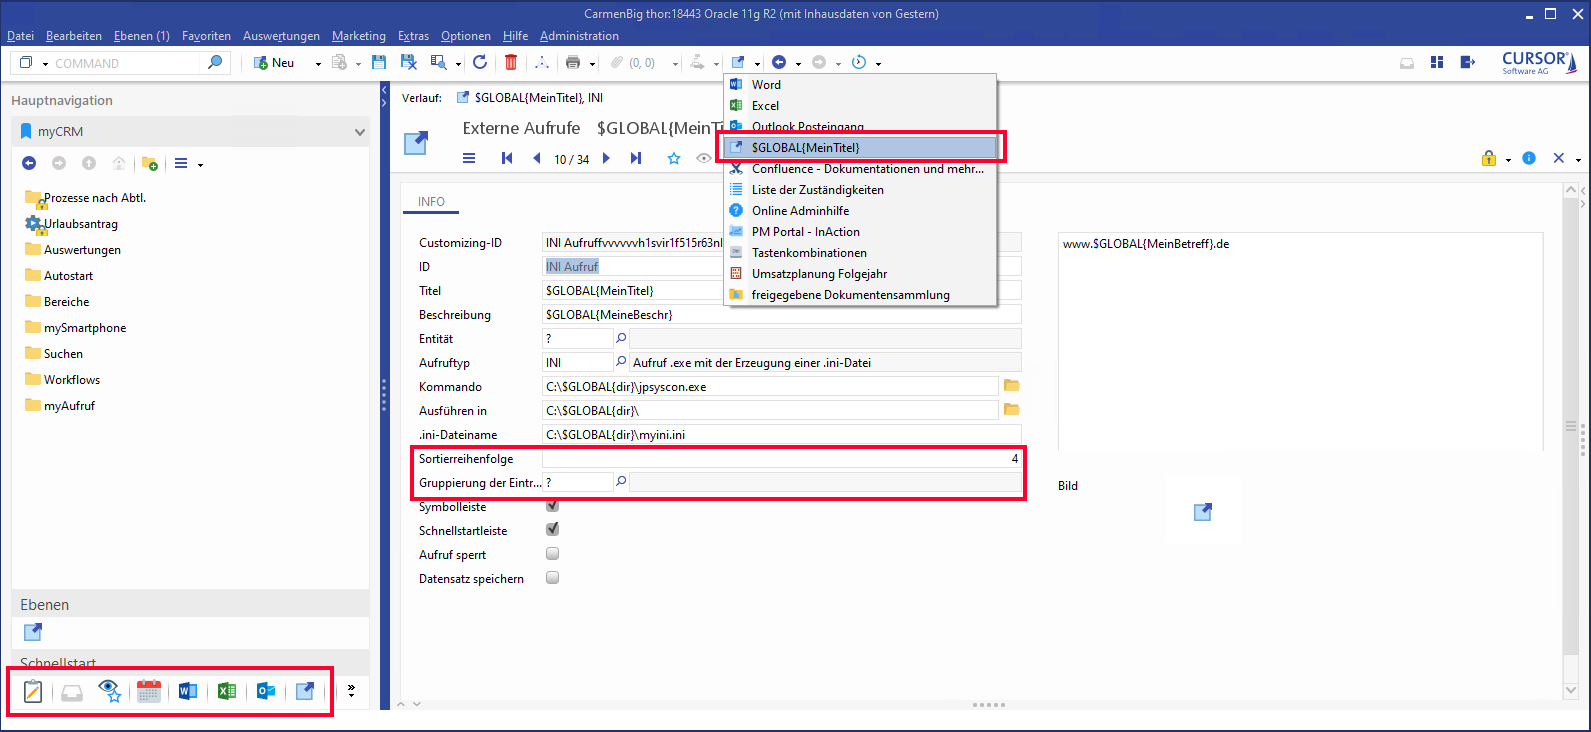
Figure: External invocation 'Excel' and effects for the pull-down menu
In addition to sorting entries (deciding the order in which they appear), you can also group invocations in submenus. You can specify possible groupings in the key field "Entry Grouping".
An existing grouping can be selected when processing an external invocation. This will then show the external call within that menu. The external call will appear at the top level if no grouping (empty key '?') is selected. Sorting within groupings is done just like ‘Sort order'.
The following sequence applies for the sorting of menus with all external invocations (top to bottom):
-
The groupings are initially displayed in alphabetically ascending order (A --> Z) of their internationalized names. Within each grouping, another sorting occurs in accordance with the value in the field Sort order.
-
After that follow the invocations without grouping. These are sorted according to the value in the field Sort order
This sorting applies notwithstanding whether an entry is entity-specific, i.e. all invocations available for the current window (general and entity-specific calls) are sorted according to the description above.
The external calls are also displayed in the button bar at the bottom left of the application (controlled by the administrator). This bar also complies with order and grouping. The buttons in the bar are added from left to right as described above. First are the groupings in ascending alphabetical order (A --> Z), within the grouping, sorting is done according to the Sort order. Then follow the invocations without grouping. A grouping is symbolized by a button with the relevant icon. Clicking the button will open a pop-up menu with all the entries of this grouping.
Internationalization
In external invocations, two rows are reserved for internationalization. The title and description are listed and marked in brackets.
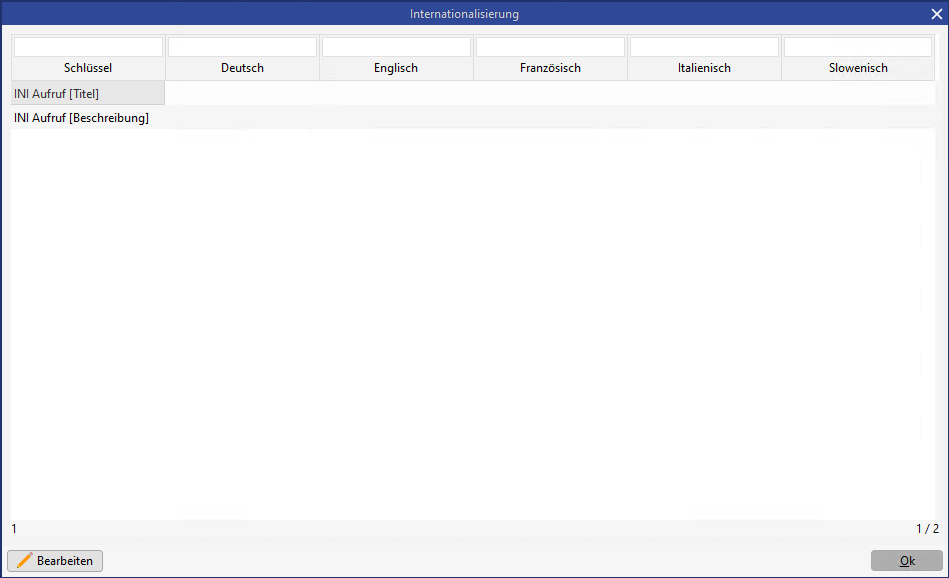
Only the current external invocation will be displayed in the I18n dialog (i.e. exactly two rows without a browse option within the I18n dialog) if the button I18n ![]()
The field 'Description' was included in the system search, which means that changed system searches will have to be adjusted after the update.
Scripting in the Memo field
The Script (Memo field at the top right) works exactly like a mask script. Only accessing the mask field is different:
Instead of Fieldname.value you will have to write ${Fieldname.EntityNname}.
Example: Matchcode.value becomes ${Matchcode.Customer}
System variables can also be used for external invocations.
Example
%TEMP%\Dateiname.ini
is replaced by
C:\Temp\Dateiname.ini
These are replaced with the following fields at runtime:
-
Memo field (Params.InvocationExt)
-
Command (Executeable.InvocationExt)
-
Execute in (WorkingDirectory.InvocationExt)
Type: EXCELTRANSFER
This invocation type opens an Excel template, which was saved in the system. The template is configured in the administration console under 'Template management'. The configuration of the external invocation must include the correct template name and the template entity.
The following fields are important:
-
Call type (EXCELTRANSFER)
-
Entity (must match the entity of the Excel template)
-
Memo field (name of the Excel template)
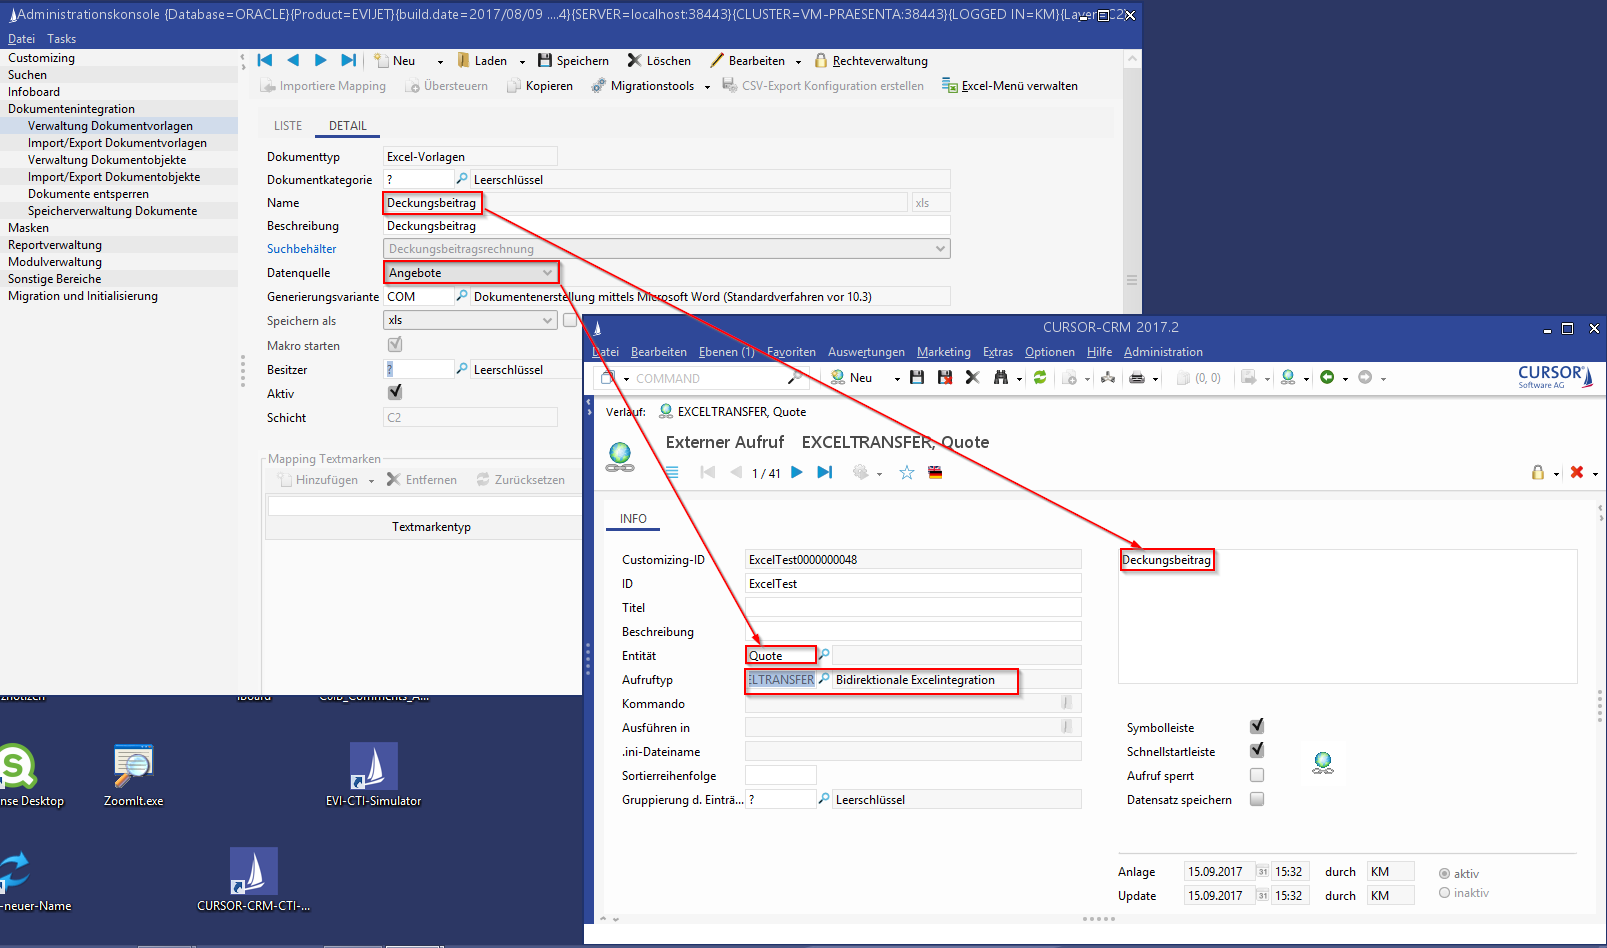
Figure: Relationship between a saved Excel template and the configuration of the external invocation
Type: URL
Example call Map24
In the following example we will configure an invocation of the website Map24. A direct route from the company headquarters to the business partner location is to be calculated.
The invocation is done like this:
-
Title: Map24
-
Description: Route to the current dataset in Map24
-
Entity: CUSTOMER (i.e. the current business partner)
-
Call Type: URL
-
Image: The Map24 icon
-
Navigation bar: Yes
-
Parameter field:
link2.map24.com/?lid=0f8488fc&maptype=JAVA&action=route&dstreet=
${Street.Customer}+${StreetNumber.Customer}&dzip=${ZIP.Customer}&dcity=${City.Customer}&dcountry=de&sstreet=
Friedrich-List-Strasse+31&szip=35398&scity=Giessen&scountry=de&sname=CURSOR+Software+AG&submit=+%3E%3E+
This is a mix of variable and fixed parameters, which is handed over to the Map24 portal.
Variable parameters are:
-
${Street.Customer}Street name of the business partner location -
${StreetNumber.Customer}House number -
${ZIP.Customer}ZIP code -
${City.Customer}City
The start address for the route will in this case be CURSOR Software AG in Gießen, which is stated in the bottom part of the parameter block.
In order to access the above parameters, their names must first be looked up via the administration console. In the range Customizing / Field attributes you would set the column filter in the entity column to Business partner for our example and you would then only see the database fields of the business partner.
Set the column filter for the column Field to *Street* to see the name in the field. You will now only be displayed fields that contain the string Street. You will have two result entries: the storage location of the street of the person and the storage location of the street of the actual business partner.
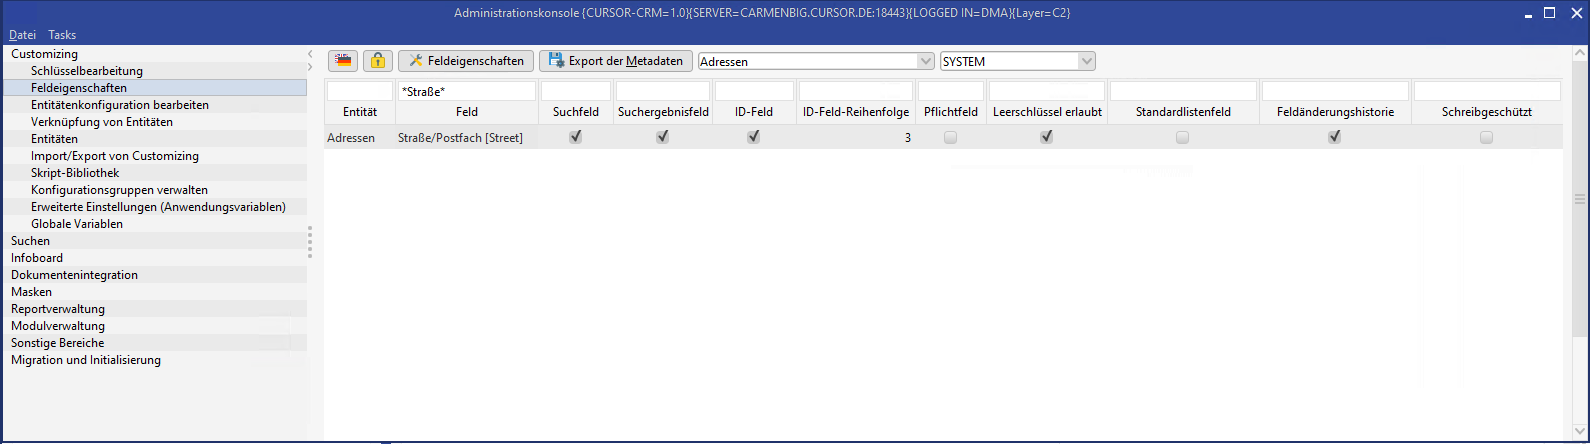
The various column filters allow you to quickly identify the parameters that have to be forwarded.
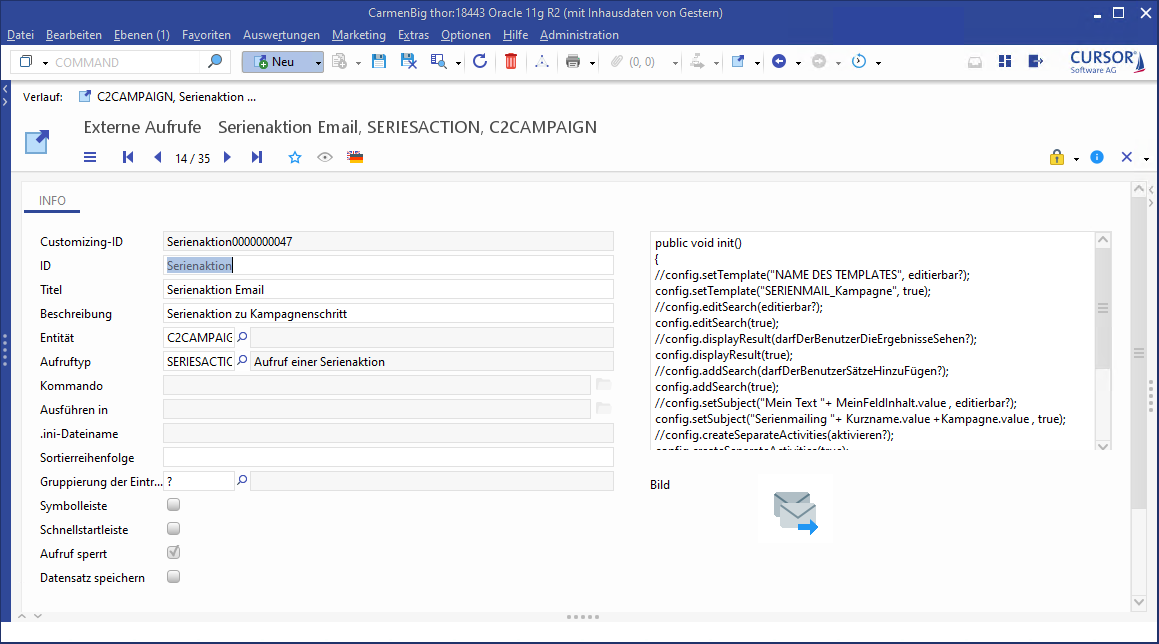
Type: SERIESACTION
Configuring the invocation
An entity must be selected and a script must be stored.
After execution, the wizard for sending a serial letter or a serial mail will be invoked and pre-filled, depending on the configuration.
Script
The script always has the following basic structure:
 public void init()
{
}
The following configuration options exist for the wizard:
Specifying a custom name for the wizard (the default name will otherwise be shown)
//setTitle(String title)                   ab 14.1
config.setTitle("Umschläge und Etikettendruck");
Pre-filling the wizard using a template and specifying, whether the user will have the right to select a different one. This parameter must exist and must be pre-filled with a template with a valid name.
//config.setTemplate("NAME DES TEMPLATES", editierbar?)
config.setTemplate("SERIENBRIEF BLANKO (Beispiel)", true);
Specifying, whether the user will have the right to view and edit the search.
//config.editSearch(editierbar?)
config.editSearch(true);
Specifying, whether the user will have the right to view the search results and remove datasets as needed.
//config.displayResult(darfDerBenutzerDieErgebnisseSehen?)
config.displayResult(true);
Specifying, whether the user will have the right to add datasets by loading a file.
//config.addSearch(darfDerBenutzerSuchergebnisseHinzuFügen?)
config.addSearch(true);
Specifying, whether he user will have the right to save the search result.
//config.saveSearch(speichern?)
config.saveSearch(true);
Pre-filling the title of the document dataset and specifying, whether the user will have the right to modify it. Field content can be used.
//config.setSubject("Mein Text "+ MeinFeldInhalt.value , editierbar?)
config.setSubject("Mein Text "+ MatchCode.value , false);
Adding a file as a pre-filled attachment to the wizard.
//config.addFile("Mein voll qualifizierter Pfad")
config.addFile("C:\\Meinordner\\MeineDatei.txt");
Specifying, whether the user has the right to add files as attachments.
//config.changeFiles(editierbar?)
config.changeFiles(false);
Specifying the default setting of the 'Protocol activity' checkbox and whether the user has the right to change the value.
Note: The 'createLogActivity' method was renamed 'createProtocolActivity' as of version 14.1. The old method name will continue to be supported.
//config.createProtocolActivity(aktivieren?[, editierbar? ])   ab 14.1
config.createProtocolActivity(false);    // identisch zu config.createLogActivity(false) - bis 13.2
//oder
config.createProtocolActivity(false, true);
Specifying the default setting of the 'Reminder activity' checkbox and whether the user has the right to change the value.
//config.createRemindingActivity(aktivieren?[, editierbar? (ab 14.1)])
config.createRemindingActivity(false);
//oder
config.createRemindingActivity(false, true);  // ab 14.1
Specifying the default setting of the 'Collector activity' checkbox and whether the user has the right to change the value.
//config.createSeparateActivities(aktivieren?[, editierbar? (ab 14.1)])
config.createSeparateActivities(true);
//oder
config.createSeparateActivities(true, true);  // ab 14.1
Specifying, whether the serial mail wizard or the serial letter wizard should be started.
//config.setType("Typ(LETTER oder MAIL)")
config.setType("LETTER");
If the type LETTER is selected: Specifying, how and in what format it should be created.
//config.setFormat("Option zum Wählen", editierbar?)
config.setFormat("Serialletter", true);
config.setFormat("Controlfile", true);

//config.setFormat("Option zum Wählen(Controlfile oder Serialletter)","Format(Excel oder CSV)", editierbar?)
config.setFormat("Controlfile","Excel", true);
config.setFormat("Controlfile","CSV", true);
config.setFormat("Serialletter", "Excel", true);
config.setFormat("Serialletter", "CSV", true);
If the type LETTER is selected: Specifying, whether the serial letter document should only be generated as a test.
//config.setTestMode(Test Modus?, editierbar?)
config.setTestMode(false, true);
If the type LETTER is selected: Specifying, whether the document dataset for the generated serial letter document should be opened.
Not to be confused with the serial letter document file.
//config.openWindowLevelForDocument(aktivieren?)    ab 14.1, Standard ist true
config.openWindowLevelForDocument(false);
If the type LETTER is selected: Specify, whether the generated serial letter document file should be opened. The default setting is for the document to open.
//config.openDocument(aktivieren?)             ab 14.1, Standard ist true
config.openDocument(false);
Presetting the protocol and reminder activity in the wizard
The protocol and reminder activity can basically be pre-configured in all document wizards via a PropertyMapping entry for each template type. The fields in the serial letter/serial mail wizard would therefore generally be pre-populated.
Within the scope of SERIESACTION, however, a custom configuration can be saved for this one invocation, which will overwrite the originally pre-filled data. Two objects are provided for the pre-filling of the protocol and reminder activity, which can be configures using the script. The configuration of the protocol activity is done via the object 'protocolConfigVO', and the reminder activity is configured via 'reminderConfigVO'. The following entry must be added to the script to pre-fill e.g. the title of the reminder activity:
reminderConfigVO.setSubject("Protokolleintrag Umschläge und Etiketten zur Infotagung", true);
-
In the following code examples, you can also use protocolConfigVO (for protocol activity) instead of reminderConfigVO (for reminder activity).
-
Lookup field characteristics
-
The key name is forwarded as the value, e.g. 'A' in the field 'Priority'
-
The use of the empty key '?' is supported
-
The value will not be written to the field if the lookup values are invalid.
-
-
Zero values are ignored. The existing field value remains intact
-
The 'Edit' property for the field is always set, even if no field value can be entered.
The following configuration options are available for the protocol and reminder activity:
Pre-filled value for the field 'Status'
// reminderConfigVO.setStatus("Schlüsselname des Aktivitätenstatus oder Leerschlüssel '?'", editierbar?)
reminderConfigVO.setStatus("E", false);
// oder
reminderConfigVO.setStatus("?", false);
Pre-filled value for the field 'Starts on'
// reminderConfigVO.setStartDate("Datumswert" , editierbar?)

// Heutiges Datum
reminderConfigVO.setStartDate("NOW", true);

// Fixes Datum
reminderConfigVO.setStartDate("15.08.2014 19:36:00", true);

// Heutiges Datum + 5 Tage
long reminderDays = 5l;
Date reminderTimeDate = new Date(System.currentTimeMillis() + reminderDays * 24 * 60 * 60 * 1000);
String reminderTimeString = java.text.DateFormat.getDateTimeInstance().format(reminderTimeDate);
reminderConfigVO.setStartDate(reminderTimeString, true);
Pre-filled value for the field 'Title'
// reminderConfigVO.setSubject("Betreff", editierbar?)
reminderConfigVO.setSubject("Protokolleintrag Umschläge und Etiketten zur Infotagung", true);
Pre-filled value for the field 'Description'
// reminderConfigVO.setDescription("Beschreibungstext", editierbar?)
reminderConfigVO.setDescription("Bitte erfassen Sie hier Ihren Text für die Erinnerungsaktivität", true);
Pre-filled value for the field 'Type'
// reminderConfigVO.setType("Schlüsselname der Aktivitätenart oder Leerschlüssel '?'", editierbar?)
reminderConfigVO.setType("SERIENBRIEF", false);
// oder bei Leerschlüssel
reminderConfigVO.setStatus("?", false);
Pre-filled value for the field 'Priority'
// reminderConfigVO.set("Schlüsselname der Priorität oder Leerschlüssel '?'", editierbar?)
reminderConfigVO.setPriority("A", false);
Pre-filled value for the field 'Reason'
// reminderConfigVO.setReason("Schlüsselname des Aktivitätenanlass oder Leerschlüssel '?'", editierbar?)
reminderConfigVO.setReason("PROJEKT", false);
Pre-filled value for the field 'Result'
// reminderConfigVO.setResult("Schlüsselname des Aktivitätenergebnisses oder Leerschlüssel '?'", editierbar?)
reminderConfigVO.setResult("MARKETING", false);
Pre-filled value for the field 'Employee assignment'
Specifying the 'Delegated by' employee
// reminderConfigVO.addDelegatedFrom("Kürzel des Mitarbeiters oder Variable", "Schlüsselname des Mitarbeiterbeziehungtyps");
reminderConfigVO.addDelegatedFrom("MAS", "EMPFÄNGER");
// oder aktueller Anwender per Variable
reminderConfigVO.addDelegatedFrom("USER", "BCC");
// oder Stellvertreter per Variable
reminderConfigVO.addDelegatedFrom("USER_DEPUTY", "BCC");
Specifying the 'Delegated to' employee
// reminderConfigVO.addDelegatedTo("Kürzel des Mitarbeiters oder Variable", "Schlüsselname des Mitarbeiterbeziehungtyps");
reminderConfigVO.addDelegatedTo("CHK", "EMPFÄNGER");
// oder Verwendung einer Variablen aus dem Mapping der Dokumentvorlage
reminderConfigVO.addDelegatedTo("SERIALEmployeeSales", "EMPFÄNGER");
Adding more employees
// reminderConfigVO.addEmployee("Kürzel des Mitarbeiters oder Variable", "Schlüsselname des Mitarbeiterbeziehungtyps");
reminderConfigVO.addEmployee("CHK", "EMPFÄNGER");
// oder Verwendung einer Variablen aus dem Mapping der Dokumentvorlage
reminderConfigVO.addDelegatedTo("SERIALEmployeeOffice", "EMPFÄNGER");
Adding employees
-
In order to add employees, the relevant activities page must have been activated via script beforehand, e.g.
config.createProtocolActivity(true);
-
The following values can be used
-
Token for the employee name, e.g. 'MAS'
-
Variable 'USER' - token of the currently logged in user
-
Variable 'USER_DEPUTY' - shortcut of the deputy
If user A logs in as a deputy of user B, the variable 'USER_DEPUTY' contains the shortcut of user B.
If user A logs in without deputy control, variable 'USER_DEPUTY' contains user A's shortcut. -
Variable from the mapping of the document template
Defined variable names can be used in the mapping of the document template to allow a dynamic assignment of users for the activity generation in the serial action. An employee field from the search will then be assigned to this variable, which will be allocated to the generated activity (see also Add and edit document templates#Creating and editing the serial letter template dataset.)
In order to use this variable, it is necessary that it exists in the mapping of the document template and that no multiple activity is created. The following variable names are supported:-
SERIALEmployeeOffice
-
SERIALEmployeeSales
-
SERIALEmployeeKey
-
SERIALEmployeeExtra1
-
SERIALEmployeeExtra2
-
-
-
Any number of employees can be added.
-
The original employee assignment is overwritten, once employees are added.
-
Only one 'Delegated to' and one 'Delegated from' can be added at a time. If the script command is sent multiple times, then the employee from the most recent script command will be the 'Delegated to/from' employee. The employees from the most recent previous script commands will remain in the list, but will no longer be the 'Delegated to/from' employees.
Complete example
public void init()
{
config.setTitle("Seriendruck Umschläge und Etiketten");
config.setType("LETTER");
config.setTemplate("SERIENBRIEF BLANKO (Beispiel)", true);
config.editSearch(true);
config.displayResult(true);
config.addSearch(false);
config.saveSearch(false);
config.setSubject("Text "+ MatchCode.value , false);
config.addFile("C:\\MeinPfad\\MeineDatei.txt");
config.setFormat("Controlfile","Excel", true);
config.setTestMode(false, true);
config.createProtocolActivity(true, false);
config.createRemindingActivity(true, false);
config.createSeparateActivities(true, true);
config.openWindowLevelForDocument(false);

// Vorbelegung der Felder in der Protokollaktivität
protocolConfigVO.setSubject("Protokolleintrag Umschläge und Etiketten zur Infotagung", true);

// Vorbelegung der Felder in der Erinnerungsaktivität
reminderConfigVO.setStatus("E", false);
reminderConfigVO.setStartDate("TODAY", true);
//reminderConfigVO.setStartDate("15.08.2014 19:36:00", false);
reminderConfigVO.setSubject("Protokolleintrag Umschläge und Etiketten zur Infotagung", true);
reminderConfigVO.setDescription("Bitte erfassen Sie hier Ihren individuellen Text für die generierte Erinnerungsaktivität", true);
reminderConfigVO.setPriority("B", false);
reminderConfigVO.setType("RECHNUNG", false);
reminderConfigVO.setReason("BESCH", false);
reminderConfigVO.setResult("INFO", false);

// Vorbelegung der Mitarbeiterzuordnung in der Erinnerungsaktivität
reminderConfigVO.addDelegatedFrom("USER", "EMPFÄNGER");
reminderConfigVO.addDelegatedTo("SERIALEmployeeSales", "EMPFÄNGER");
reminderConfigVO.addEmployee("TMR", "BCC");
reminderConfigVO.addEmployee("GV", "BCC");
reminderConfigVO.setEmployeeChangeable(false);
}
Visibility of wizard pages
The edit capabilities for the input can be configured for many of the methods mentioned above.
Special feature: A wizard page will no longer be displayed if all input options on that page have been deactivated. The pre-configured settings on that page will continue to be considered. You can therefore completely hide the wizard, so that the opened document will be displayed as a result directly.
What components will have to be set to non-editable to hide a wizard page?
-
Template selection:
-
setTemplate
-
-
Select addressees
-
editSearch
-
displayResult
-
addSearch
-
saveSearch
-
-
Serial letter - options
-
setFormat
-
setTestMode
-
-
Enter document description
-
setSubject
-
-
Add files
-
changeFiles
-
-
Create activities
-
createLogActivity
-
createRemindingActivity
-
createSeparateActivities
-
-
The activity pages for protocol activity (protocolConfig) and reminder activity (reminderConfig)
-
setStatus (field 'Status')
-
setStartDate (field 'Starts on')
-
setSubject (field 'Title)
-
setDescription (field 'Description')
-
setType (field 'Type')
-
setPriority (field 'Priority')
-
setReason (field 'Reason')
-
setResult (field 'Result')
-
setEmployeeChangeable (button 'Employee assignment')
-
Templates and searches
A matching document template, for the complex search of which the following applies must be saved for the external invocation:
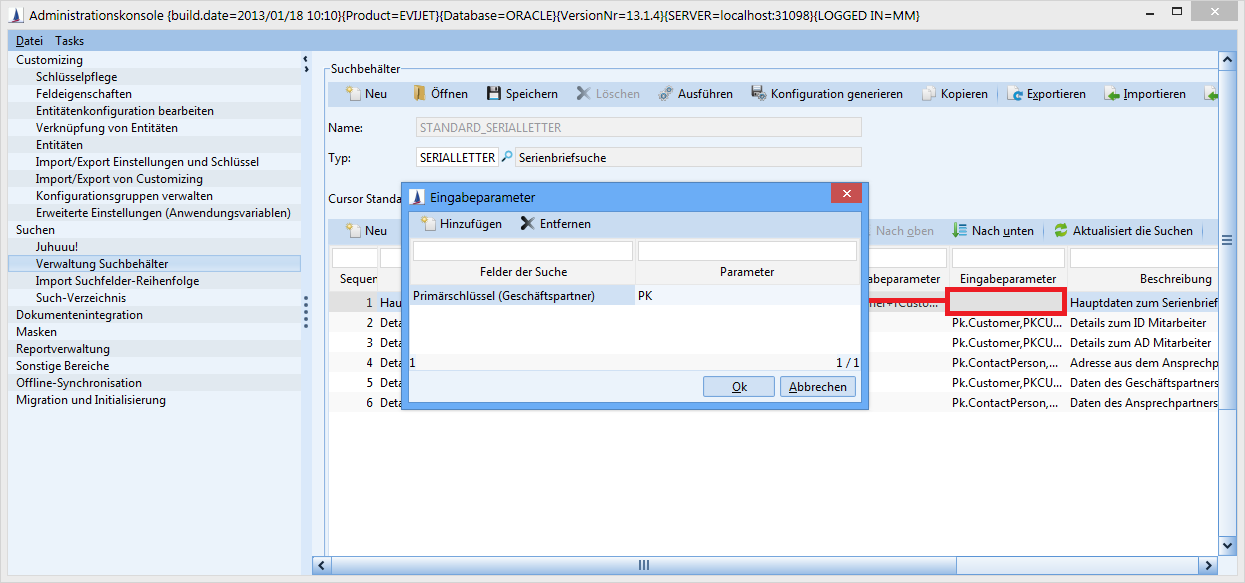
1. The primary key of the entity, from within which the external invocation originates, must be selected in the main search with the condition is one of and the template Placeholder(value to be set at runtime)
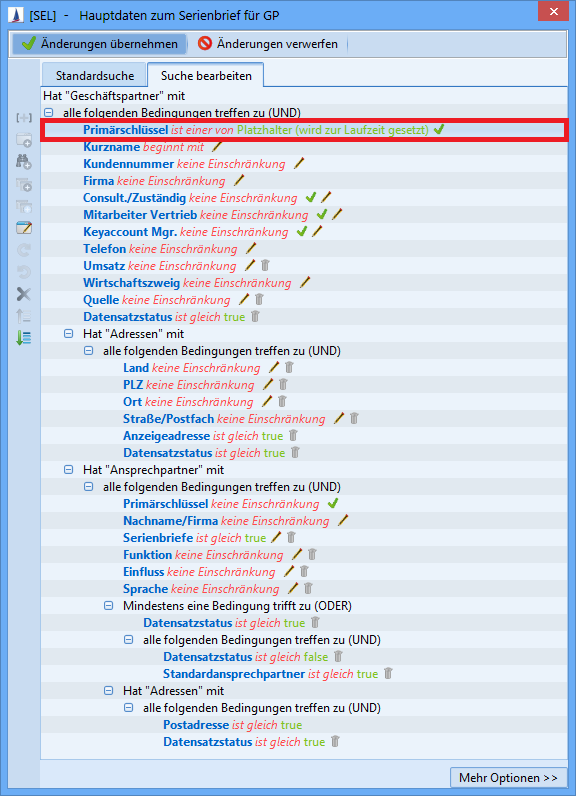
2. The primary key of the entity must be selected as the input parameter for the value "PK" in the main search.
-
The field 'Entity' should not be populated with the empty key. The invocation would not be executed.
-
It is possible to configure combinations, in which the user will be unable to continue in the wizard. For example, he could be forbidden to add new addressees and at the same time permit him to edit documents. If he does that, then the initially searched addressees will be deleted and he will be unable to add new ones. The user can only exit the wizard.
Type: SAP
The SAP interface allows any type of RFC invocations of CURSOR-CRM/EVI to SAP.
The technical implementation was done in the classes SAPInvocationExecutor, SAPInvoke and SAPCallConfigVO. The class SAPCallConfigVO simply serves as ValueObject, which is configured via scripting in the Call definition. All required information for establishing a connection and executing the RFC are drawn from this ValueObject.
Creating an SAP call
This is how you proceed:
-
Select the menu item Administration / External invocation.
-
Create an external invocation of call type SAP.
-
The configuration of the call is done in a script, which you save in the Memo field.
The syntax and the available commands are identical to the script-based customizing. You can use the methods 'public void init ()' and 'public void handleResults ()' for the SAP interface. The method 'public void init ()' must be available, as it is needed for the call configuration. The method 'public void handleResults ()' is invoked after the RFC execution and can be used for utilizing the call results (see: Return values). -
Save the invocation.
Configuration of a connection using JCo 2.X
The implicitly existing variable 'config' is used for the configuration of the invocation and the parameter transfer. The following properties can be set on this configuration object.
General parameters
These parameters can (or must) be provided in any case:
|
Code |
Description |
Information |
Available since version |
|---|---|---|---|
|
config.setRfcName("<Name des RFCs>") |
Configures the name of the RFC to be called. |
Required |
7.1.1 |
|
config.setClient("<Client>") |
SAP client. |
Required |
7.1.1 |
|
config.setUser("<User>") |
User name for log in; a login dialog will appear once per session, unless preset. |
Optional |
7.1.1 |
|
config.setPassword("<Password>") |
Password for login; interactive prompt, unless saved in the invocation definition. |
Optional |
7.1.1 |
|
config.setGwHost("<gwHost>") |
Gateway host for the connection to the SAP server. Obsolete. |
Optional |
7.1.1 |
|
config.setDoNotExecute(true) |
All settings are ignored, the invocation will not be executed. |
Optional |
March 10, 2001 |
Direct connection
The following parameters can (or must) be provided for a direct connection to an SAP server:
|
Code |
Description |
Information |
Available since version |
|---|---|---|---|
|
config.setSapServer("<Server>") |
DNS name (or IP address) of the SAP server. |
Required |
7.1.1 |
|
config.setSystemNumber("<System number>") |
System number for the connection to the SAP system. |
Required |
7.1.1 |
Connection to a server group (load balancing)
The following parameters can (or must) be used to utilize load balancing (as an alternative for a direct connection) at the start:
|
Code |
Description |
Information |
Available since version |
|---|---|---|---|
|
config.setConnectToGroup(<true/false>) |
(De)Activate SAP Load Balancing |
Optional, set to deactivated by default. |
8.4.18, 9.1.15, 9.2.02, 10.1.01 |
|
config.setMessageServerHost("<IP des Messageservers>") |
Specify where the message server will be available. |
Required (if no URL is specified) |
8.4.18, 9.1.15, 9.2.02, 10.1.01 |
|
config.setR3Name("<Certificate>") |
Configure the name of the SAP system. |
Required (if no URL is specified) |
8.4.18, 9.1.15, 9.2.02, 10.1.01 |
|
config.setGroup("<Name der Servergruppe>") |
Configure the name of the server group. |
Required (if no URL is specified) |
8.4.18, 9.1.15, 9.2.02, 10.1.01 |
|
config.setUrl("<Url zur Servergruppe>") |
Specify the URL of the server group. |
Required (if the other 3 are not set) |
8.4.18, 9.1.15, 9.2.02, 10.1.01 |
There are two options for accessing a server group instead of an individual server. In both cases, the information for the general parameters must be added as well.
public void init()
{
config.setConnectToGroup(true);
config.setUrl("<Url zur Servergruppe>");
}
Activate load balancing via setConnectToGroup and add the group URL.
public void init()
{
config.setConnectToGroup(true);
config.setMessageServerHost("<IP des Messageservers>");
config.setR3Name("<Name des SAP Systems>");
config.setGroup("<Name der Servergruppe>"));
}
Activate load balancing via setConnectToGroup and add the message server, SAP system name and the group name.
Configuration of a connection using JCo 3.X
The implicitly existing variable 'config' is used for the configuration of the invocation and the parameter transfer. The following properties can be set on this configuration object.
General parameters
These parameters can (or must) be provided in any case:
|
Code |
Description |
Information |
Available since version |
|---|---|---|---|
|
config.setRfcName("<Name des RFCs>") |
Configures the name of the RFC to be called. |
Required |
9.2.12, 10.1.01 |
|
config.setClient("<Client>") |
SAP client. |
Required |
9.2.12, 10.1.01 |
|
config.setUser("<User>") |
User name for log in; a login dialog will appear once per session, unless preset. |
Optional |
9.2.12, 10.1.01 |
|
config.setPassword("<Password>") |
Password for login; interactive prompt, unless saved in the invocation definition. |
Optional |
9.2.12, 10.1.01 |
|
config.setDoNotExecute(true) |
All settings are ignored, the invocation will not be executed. |
Optional |
9.2.12, 10.3.01 |
|
config.setSapRouter("<SAP router>") |
Add the address of the SAP router if the SAP system is located behind the router. |
Optional |
10.3.06, 11.1.01 |
Direct connection
The following parameters can (or must) be provided for a direct connection to an SAP server:
|
Code |
Description |
Information |
Available since version |
|---|---|---|---|
|
config.setSapServer("<Server>") |
DNS name (or IP address) of the SAP server. |
Required |
9.2.12, 10.1.01 |
|
config.setSystemNumber("<System number>") |
System number for the connection to the SAP system. |
Required |
9.2.12, 10.1.01 |
Connection to a server group (load balancing)
The following parameters can (or must) be used to utilize load balancing (as an alternative for a direct connection) at the start:
|
Code |
Description |
Information |
Available since version |
|---|---|---|---|
|
config.setConnectToGroup(<true/false>) |
(De)Activate SAP Load Balancing |
Optional, set to deactivated by default. |
9.2.12, 10.1.01 |
|
config.setGroup("<Name der Gruppe>") |
Set the name of the server group, to which a connection is to be established. |
Required |
10.3.06,11.1.01 |
|
config.setMsHost("<SAP Message Server>") |
Specify the SAP message server. |
Required |
10.3.06,11.1.01 |
|
config.setMsServ("<Port>") |
Specify the SAP message server port to be used instead of the default port. |
Optional |
10.3.06,11.1.01 |
|
config.setR3Name("<Certificate>") |
Specify the system ID of the SAP system. |
Required |
10.3.06,11.1.01 |
Experimental add-on parameters with JCo 3.X
The following parameters have been made additionally available but are still in the test phase. No guarantee can be given in terms of functionality.
These parameters can (or must) be provided in any case:
|
Code |
Description |
Information |
Available since version |
|---|---|---|---|
|
config.setAliasUser("<Alias>") |
Setting the alias user. This user can be utilized instead of the set user. |
Optional |
10.3.06,11.1.01 |
|
config.setGwHost("<gwHost>") |
Gateway host for the connection to the SAP server. |
Optional |
9.2.12, 10.1.01 |
-
Secure Network Connection (SNC) configuration
The following parameters allow the configuration of a secure connection:
|
Code |
Description |
Information |
Available since version |
|---|---|---|---|
|
config.setSncLibrary("<Library path>") |
Specifies the path of the library to be used for the SNC. |
Optional |
10.3.06,11.1.01 |
|
config.setSncMode("<0 or 1>") |
Activates (1) or deactivates (0) SNC mode. |
Required |
10.3.06,11.1.01 |
|
config.setSncMyName("<Name>") |
Overwrites the SNC name with the desired value. |
Optional |
10.3.06,11.1.01 |
|
config.setSncPartnername("<Partner>") |
Specifies the SNC partner. |
Optional |
10.3.06,11.1.01 |
|
config.setSncQOP("<1-9>") |
Specifies an SNC security level between 1 and 9. |
Optional |
10.3.06,11.1.01 |
|
config.setX509Cert("<Certificate>") |
Use the specified X509 certificate for login authentication. |
Optional |
10.3.06,11.1.01 |
-
Target configuration
The following parameters allow the configuration of the target:
|
Code |
Description |
Information |
Available since version |
|---|---|---|---|
|
config.setExpirationPeriod("<Time in ms>") |
The time span in milliseconds after which the system should check for expired connections. |
Optional |
10.3.06,11.1.01 |
|
config.setExpirationTime("<Time in ms>") |
The time span in milliseconds after which a connection expires. |
Optional |
10.3.06,11.1.01 |
|
config.setRepositoryDest("<Repository>") |
Specifies, which target should be used as repository. |
Optional |
10.3.06,11.1.01 |
|
config.setRepositoryPwd("<Password>") |
The password to be used for the repository user if a user is stated. |
Optional |
10.3.06,11.1.01 |
|
config.setRepositorySNC("<0>") |
SNC will be deactivated for repository invocations if SNC (Secure Network Connection) is activated and the parameter is set to '0'. |
Optional |
10.3.06,11.1.01 |
|
config.setRepositoryUser("<User>") |
If no repository target is set and a user is set now, then this user will be used for repository calls. |
Optional |
10.3.06,11.1.01 |
|
config.setMaxGetTime("<Time in ms>") |
Set the max. time span for waiting for a connection if the max. number of connections is reached. |
Optional |
10.3.06,11.1.01 |
|
config.setPoolSize("<Pool size>") |
Max. number of connections to fit into one pool. |
Optional |
9.2.12, 10.1.01 |
|
config.setPeakLimit("<Number of connections>") |
Specify the max. number of concurrently open connections. |
Optional |
9.2.12, 10.1.01 |
-
Additional Parameters
The following parameters are additionally available:
|
Code |
Description |
Information |
Available since version |
|---|---|---|---|
|
config.setCodepage("<Code page in SAP notation>") |
Specify the initial code page to use for converting login parameters. |
Optional |
10.3.06,11.1.01 |
|
config.setLanguage("DE / EN / ..") |
Language of the SAP system to be accessed. If no language is stated, the language of the computer will be used on which the client is running. |
Optional |
13.1.20, 13.2.6, 14.1 |
|
config.setCpicTrace("<-1, 0, 1, 2 or 3>") |
Activates/deactivates CPIC tracking(Common Programming Interface Communication). -1 applies the environment variable as configuration. 0 deactivates tracking. 1, 2 and 3 specify a relevant scope. |
Optional |
10.3.06,11.1.01 |
|
config.setGetSSO2("<0 or 1>") |
Specify, whether or not an SSO ticket (Single Sign-On) should be requested (1) after a successful login or not (0). |
Optional |
10.3.06,11.1.01 |
|
config.setLcheck("<0 or 1>") |
Specify, whether the login check should e activated (1) or deactivated (0). When activated, the login dialog will appear after the connection has been established. When deactivated, it will only appear at the first invocation. |
Optional |
10.3.06,11.1.01 |
|
config.setMySapSSO2("<Certificate>") |
Use the specified SAP cookie version 3 as login ticket for SSO-based logins. |
Optional |
10.3.06,11.1.01 |
|
config.setPcs("<1 or 2>") |
Specify the code type for the SAP system code page. 1 means not Unicode. 2 means Unicode. |
Optional |
10.3.06,11.1.01 |
|
config.setTrace("<0 or 1>") |
Activates (1) or deactivates (0) RFC tracking. |
Optional |
10.3.06,11.1.01 |
|
config.setType("<2, 3 or E>") |
Specifies the host type. 2 means R/2, 3 means R/3 and E means external. |
Optional |
10.3.06,11.1.01 |
Single Sign-On (SSO)
Client-side, via external invocations
Requirements
In addition to the general requirements above, SSO also requires:
-
SAPCRYPTOLIB must be downloaded from SAP Marketplace and the file sapcrypto.dll must be added to the custExt directory of the client.
-
The certificate for the current user must be available in the local MicrosoftStore (on client side) at runtime.
Configuration
The configuration of the invocation must
-
activate SNC mode.
-
Integrating the library for encryption
-
Setting own name (the new constant USER can be utilized here to read the current user name)
-
Setting the name of the connection partner
-
Reading and setting the certificate
Configuration
config.setSystemNumber("03");
config.setSapServer("104.3.6.52");
config.setClient("003");
config.setSncMode("1"); //SNC aktivieren
config.setSncLibrary("c:\\My\\Library\\Path\\sapcrypto.dll"); //Bibliothek zum Verschlüsseln auf dem Client, alternativ weglassen, dann greift die Umgebungsvariable SNC_LIB.
config.setSncMyName("p:CN=" + SessionConstants.USER + ", O=Cursor, L=Gießen, C=DE"); //eigener Name
config.setSncPartnername("p:CN=User CA Cursor, O=Cursor, L=Gießen, C=DE"); //Namen des Partners
config.setSncQOP("9"); //optional
config.setX509Cert(SAPUtils.readCertificate()); //Lokal installiertes Zertifikat lesen

config.setConnectToGroup(false);
config.setRfcName("Z_TEST");
Via BPM processes on server side
Requirements
In addition to the general requirements above, SSO also requires:
-
SAPCRYPTOLIB must be downloaded from SAP Marketplace and the file sapcrypto.dll must be added to the standalone\lib\dll directory of the server.
-
The certificate for the current user must be available in the local MicrosoftStore (on client side) at runtime.
Configuration
The configuration is basically the same as for the client variant:
Configuration
Object config = SAPUtils.createConfig();
config.setSystemNumber("03");
config.setSapServer("104.3.6.52");
config.setClient("003");
config.setSncMode("1"); //SNC aktivieren
config.setSncLibrary("c:\\My\\Library\\Path\\sapcrypto.dll"); //Bibliothek zum Verschlüsseln auf dem Server
config.setSncMyName("p:CN=" + USER + ", O=Cursor, L=Gießen, C=DE"); //eigener Name
config.setSncQOP("9"); //optional

config.setConnectToGroup(false);
config.setRfcName("Z_TEST");
The two parameters 'setX509Cert' and 'setSncMyName', however, require a different procedure.
For 'setSncMyName', SessionConstants.USER must be used instead of USER:
Configuration
config.setSncMyName("p:CN=" + SessionConstants.USER + ", O=Cursor, L=Gießen, C=DE"); //eigener Name
The certificate must be read on the client computer. That will require a user action. The certificate must be forwarded to the following script action.
-
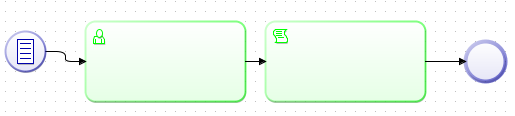
This is what the entire process looks like:
-
The certificate is read from the script of the user action and will then be written to the variable "sapcert". This name is freely selectable.

This variable is read again in the following script action and set in the configuration object:
Configuration
Object config = SAPUtils.createConfig();
//..

config.setX509Cert(ProcessUtils.getVariable("sapcert"));
Cross-server workflows on the server side
SSO cannot be used in server-side workflows, because there will be no client interaction.
Parameter transfer
Simple parameters can be set via an invocation of config.setSimpleParam("<Parameter name>", <Value>). The parameter name must match the name expected by the RFC module. The value (2nd parameter) can be assigned permanently or can be read from a field value in the currently open window via the notation ${Fieldname.Entity}. If the value is not numerical, then ${Feldname.Entity} must be enclosed in quotation marks.
SAP supports so-called structures as parameters. Structures are mainly a grouping of various simple fields under one name. In the init method, a structure parameter can be filled with the method setStructureParam(String structure, String field, Object value). The first parameter is the name of the structure (as defined by the RFC specification), the second value identifies the field within the structure and the last parameter represents the actual value.
Table parameters are another option for parameter transfers. Table parameters are an ordered list of structures. In addition to the parameters mentioned above, one further parameter for the row number is added for the configuration of a structure: setTableParamMapping(String tableName, int row, String field, Object value). The first parameter will once again state the name of the table parameter as expected by the RFC module. the second parameter states the row number (the first row has the number 0!). The third parameter identifies the field within a row, which is finally filled with the last parameter.
Return values
SAP supports return values in the form of structures and tables. These are made available after the invocation under a name in the context of the call definition. After a successful invocation, the variables String[] tableParams and String[] exportParams will contain the names of the relevantly returned parameters.
The variables String[] tableParams and String[] exportParams can also be Zero.
The following code displays the names of all returned table parameters in a dialog:
 public void handleResults()
{
for(int i = 0 ; tableParams != null && i < tableParams.length ; i++)
{
alert(tableParams[i]);
}
}
All structures and tables have names. The individual parameters are also made available under these names.
Examples
Example 1: Jump to SAP from within a business partner
public void init()
{
config.setClient("001");
config.setUser("user");
config.setPassword("userpw");
config.setSystemNumber("00");
config.setSapServer("172.16.0.22");
config.setRfcName("ZE_CURSOR_RFC_OBJECT_DISPLAY");
config.setSimpleParam("OBJECTTYPE", "01");
config.setSimpleParam("OBJECTKEY", "${CustomerNo1.Customer}");
}
The first lines are for the connection configuration. Then the RFC to be called is specified via config.setRfcName("ZE_CURSOR_RFC_OBJECT_DISPLAY") and two simple parameters are transferred. The first mapping OBJECTTYPE is fixed, the mapping for the parameter OBJECTKEY will then be read from the value in the field CustomerNo1 of the currently open business partner.
Example 2: Reading the table KNA1:
public void init()
{
config.setClient("001");
config.setUser("user");
config.setPassword("userpw");
config.setSystemNumber("00");
config.setSapServer("172.16.0.22");
config.setRfcName("RFC_READ_TABLE");
config.setSimpleParam("QUERY_TABLE", "KNA1");
config.setSimpleParam("DELIMITER", ";");
config.setSimpleParam("ROWCOUNT", 10);
config.setTableParamMapping("FIELDS", 0, "FIELDNAME", "NAME1");
config.setTableParamMapping("FIELDS", 1, "FIELDNAME", "NAME2");
config.setTableParamMapping("FIELDS", 2, "FIELDNAME", "MANDT");
}

public void handleResults()
{
TAB512.writeHTML("c:/temp/sap/TAB512.html");
alert("Ausgabewerte wurden als HTML-Datei gespeichert!");
}
The connection configuration is the same as in the first example. Then some simple parameters are used. The last three lines of the init method fill a table parameter. The names of the columns to be read are defined.
The method handleResults() is used for saving the result of the invocation (including a table with the name TAB512) alongside the invocation of the method writeHTML. This is an example of how return values can be handled in SAP invocations. The second row alert("...") is simply the invocation of a pre-defined method, the same way that it can be used in any script.
Example 3: Invocation of an RFC with a structure parameter:
public void init()
{
config.setClient("001");
config.setUser("user");
config.setPassword("userpw");
config.setSystemNumber("00");
config.setSapServer("172.16.0.22");
config.setRfcName("Z_FBO_TESTPARAM_01");
config.setStructureParam("VTR", "MANDT", "001");
config.setStructureParam("VTR", "VERTRAG", "${InstallationNo.Installation}");
}
The example demonstrates the configuration of a structure parameter. In the last two cells, the field MANDT in the structure 'VTR' is set to 001 and the field VERTRAG in the same structure is set to the value in the field InstallationNo.Installation. The placeholder is replaced during runtime in line with any call definition.
Changes to the version, interfaces and limitations of the target software may result in the SAP invocation not working for some versions, which would mean additional integration costs for CURSOR Software AG.
Integration of SAP JavaConnector 3.x
JavaConnector 3.x (instead of previously 2.x) will now be used if SAPGUI 7.1 or higher is installed by the customer. It contains new classes, which means certain changes in its use.
JCo 2.x
-
Save
librfc32.dlltowindows\system32. -
Save
sapjco.jarandsapjcorfc.dllto the folderCustExt.
JCo 3.x
-
Save
librfc32.dllandlibrfc32u.dlltowindows\system32. -
Save
sapjco3.jarandsapjco3.dllto the folderCustExt.
Script changes
There was a conscious attempt to not make any changes to existing scripts. That was not entirely feasible, as SAP made changes to the classes. The method "getField(..)" in a structure no longer exists. Instead, “getString(...)" (or "getInt(..)", etc.) must now be used.
Example:
public void handleResults()
{
String text = "";

RET.firstRow();
for (int i = 0 ; i < RET.getNumRows(); i++)
{
text += RET.getField("COUNTER").Value + " ";
Name2.Value = RET.getField("COUNTER").Value;
text += RET.getField("LINE").Value + "\n";
Name3.Value = RET.getField("LINE").Value;
RET.nextRow() ;
}
}
becomes
public void handleResults()
{
String text = "";

RET.firstRow() ;
for (int i = 0 ; i < RET.getNumRows(); i++)
{
text += RET.getString("COUNTER") + " ";
Name2.Value = RET.getString("COUNTER");
text += RET.getString("LINE") + "\n";
Name3.Value = RET.getString("LINE");
RET.nextRow() ;
}
}
Type: WEBSERVICE
See →Outgoing web services.