General
The behavior of input fields in the application is controlled via the field attributes.
There are two different options for changing field attributes:
-
Indirect change of field attributes via the administration console
-
direct change of the field attributes via the context menu of a field (right mouse click).
In the administration console, the graphic interface for the field attributes where settings can be made is located in the Customizing node. You will see a list with all fields for all entities. The number of listed fields can be controlled via the filter function in the header. When editing the properties, it makes sense to filter the respective entity and to undertake further restrictions to improve the overview.
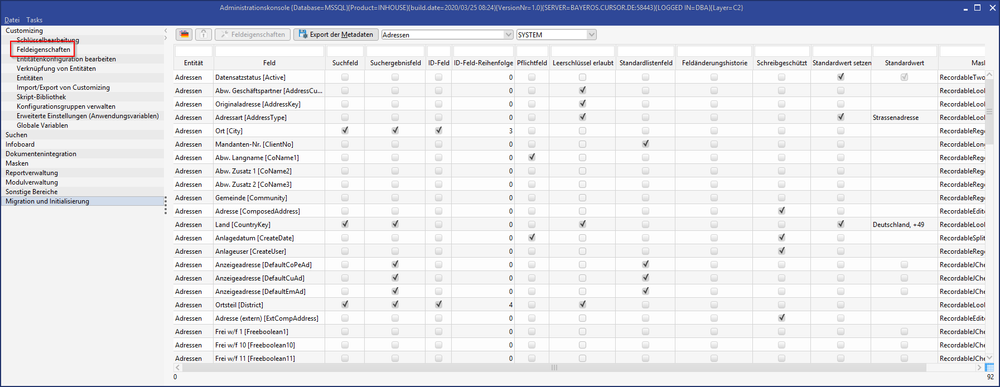
Figure: Field attributes
The name of the entity and the field is currently realized based on the internal table description.
If a field attribute was changed specific to the group, the row will be marked in orange (see mask configuration). Since only the default configuration group is loaded in the list view, the row will only be marked if changes are made to this default group.
Columns
In this view, you only see the first 7 columns (entity, field, search field, search result field, ID field, ID field order, mask field). The remaining fields can be called up via the context menu.
Toolbar

(Labeling) |
![I18nfields[1].png](/__attachments/a_1f754f26e354f4c3c36fd17e3136b3b6b9f211cdea8f2e95479aa089b6bb48d4/I18nfields%5B1%5D.png?cb=f48c88d83d6757770756ce0737d8d3e6)
The labels can be internationalized. |
|---|---|

(Rights) |
Opens a dialog for Rights manager. |

Field attributes |
Directly opens the editing mask to change field attributes. |

Export of metadata |
By clicking on the button, the meta data from the data model is exported to an Excel file and directly opened on the client computer. An explanation of the individual fields is additionally included in the Excel file as the “Key” spreadsheet. The old export directory (System Preferences) will no longer be needed 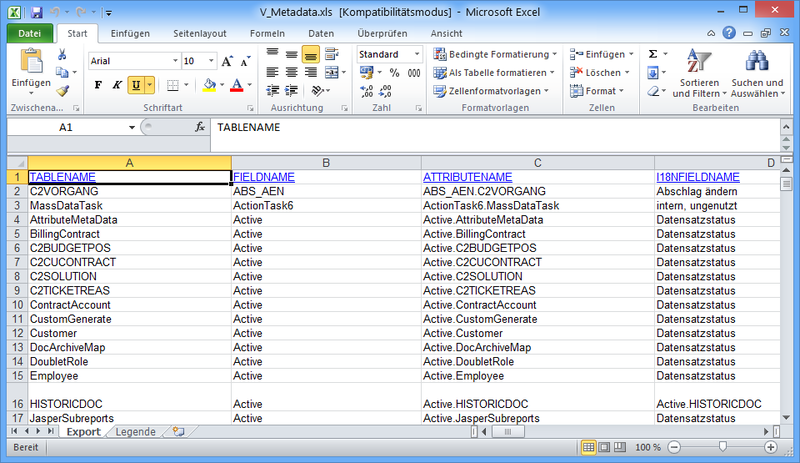
Figure: Exported metadata in an Excel file |
|
<Filter entity>, <filter group> |
At this point, you can filter according to entities and configuration groups. |
Change field attributes via the context menu
The properties of a field can be changed directly in each mask. You have to have the cursor in the corresponding field and right click.
The context menu will appear:
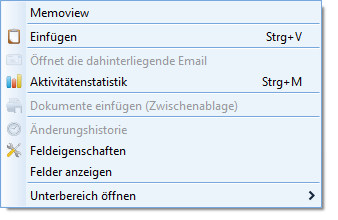
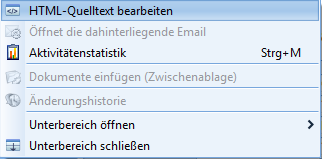
Figure: Context menu for mask field
The content of the memo field in the activity can be displayed by default via the context menu as HTML source code. Thus, the user can directly add the HTML code from a different application or add any tags that are not supported by the HTML editor.
There are a few restrictions for the editor when displaying HTML tags. Even though the HTML code is correct, not all content will be shown by the editor (for example, JavaScripts or Flash).
Through the Field attributes menu, you can go directly to the editing mask to change the field attributes. The properties of the field can be changed here.
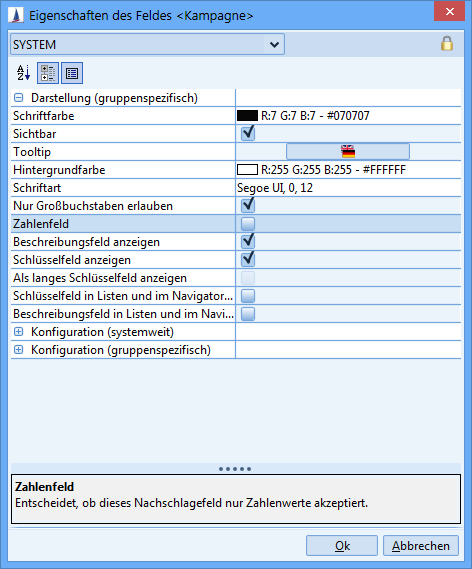
Figure: Set field attributes
The fields are divided into 3 groups:
-
Visualization (group-specific)
-
Configuration (system-wide)
-
Configuration (group-specific)
You can also:
-
with

to sort fields alphabetically
-
with

to show fields by group affiliation
-
with

to show or hide the description for the field
|
Font type, size and format |
The font can only be changed in the cluster. The font size must be set to the default size of 12 so that the font size from the user preferences can be considered. Italic, bold and bold italic can be selected as the font format. All system font types are available as font types. Even though the list only shows set font sizes, individual values can be entered as well. The font setting can be removed using the X in the field attribute dialog, so that the default is restored. |
|---|---|
|
Unit |
The respective unit can then be entered under Layout. After the settings for the field properties have been exited, the unit in the desired field is highlighted in gray. |
|
Background color |
The background is only available for normal text, number, date and suggestion fields, whereby only the key is stored in color here. This option is not available for the memo fields and checkboxes. If a field is invalid and declared as a required field, the standard color red will be displayed. The background color can be removed via the X in the field attribute dialog, so that the default color is restored. This field attribute is not available for labels. |
|
Upper case |
The configuration groups specific settings for lookup fields were also activated for text fields (RecordableRegexFormattedTextField). This option is deactivated by default (activated for lookup fields). The option has a direct effect on field values so that the text is saved in the database in upper case letters. If the field should explicitly show upper case letters (match code with RecordableUpperCaseRegexFormattedTextField), the option will not be shown, because it has no effect. |
|
Border thickness |
The thickness of the field frame can be selected from 0 pixels (no frame) to 5 pixels in a drop-down list. The default value is 1 pixel. |
|
Number Field |
If this option is activated, this lookup field will only accept number values. Hint Configure the number fields for the input of up to 15 numbers. |
|
Show lookup description field |
With this button the description part of the lookup field can be displayed or hidden. |
|
Show lookup key field |
The display of the key field can be controlled via the checkbox. This procedure is similar to the existing functionality for hiding the description field. The application ensures that at least the key or the description field is always visible, i.e. both fields cannot be simultaneously hidden. This is achieved by the check being automatically placed by Show lookup description field when deactivating the Show lookup key field checkbox (and vice versa). If the key field is hidden, the button to open the lookup browser becomes focused, this means when changing the focus using the ↔ Tab, this also stops on the button. This ensures that the application can always be operated via the keyboard. |
|
show as large key field |
When activated, the “Key part” takes over all available space. |
|
Show key field in tabular view and navigator view |
If checked the key is shown in the tabular view and in the navigator view. Prerequisite: the “Show in list” field (groups configuration) is activated. |
|
Show description field in lists and in the navigator (tree) |
If checked the description is shown in the tabular view and in the navigator view. Prerequisite: the “Show in list” field (groups configuration) is activated. |
|
Show icon |
In the detail view, the symbols of keys are displayed.
|
|
Show icon in list view |
In the list view, the symbols of keys are displayed.
|
|
Visible |
Decides on the visibility of the field. |
|
Tooltip |
You can reach the internationalization dialog via the button next to it. In this dialog, the tooltip text can be entered for multiple languages for the currently selected field or text. The new “tooltip” field attribute including the internationalization will be considered during the import/export of the customizing.
|
|
Text alignment |
The horizontal alignment of the content can be changed for normal text and number fields. The standard alignment for text fields is align left and align right for number fields. You can choose between left, right and centered. The empty line can be selected in the drop down list for the default value. |
|
Display time field |
Toggle the visibility of the time component |
|
Group configuration |
|
|
Search field |
If this field is marked, the search field will be filled in default searches for the entity and can be used to restrict the search. To fill the standard search dialog from an independently created entity with fields, the corresponding fields must have the search field attribute. When processing a search, all fields from the search can be added as a condition independent of whether or not this field is marked. |
|
Search result field |
The fields that are marked as search result fields each represent a column in the table from the search mask that contains the search results quantity. |
|
ID field |
When this field is selected, the field content to identify datasets will appear in the tree layout or in the Levels menu. |
|
ID order |
This field specifies in which order the field content is listed in the tree layout or in the menu point levels. If several values are specified, these are illustrated separately with commas. |
|
Read-only |
This can be used to block the field for the user independent of the concrete conditions of a dataset. If the option is deactivated, the “normal” rights concept applies; if it is activated, the field will be shown read-only. |
|
Write once |
Specifies that the value can only be written when creating a new dataset. |
|
Readable |
Specifies, whether the field is readable. |
|
Quick entry field |
The corresponding field is displayed in a quick entry mask, provided that such a mask exists (for example, for business partners and contact persons) |
|
Set default value |
If this field is checked, the field will be assigned a default value from the configuration when creating a new dataset. |
|
Default Value |
The default value can be entered for a new creation of a dataset here. The behavior:
Deactivating the “Set default value” flag does not result in the automatic emptying of the “default value” field. Using the dialog for configuring the default values, the problem with a limited number of font properties in a field can be bypassed. Example: if a maximum of 10 font properties is allowed for a field, you can use a pattern that exceeds 10 characters. Formal: A pattern is the string 'Pattern' and not the whole expression. In that case:
The 15 font properties in the code refer to the "key", which is referred to here as the pattern. 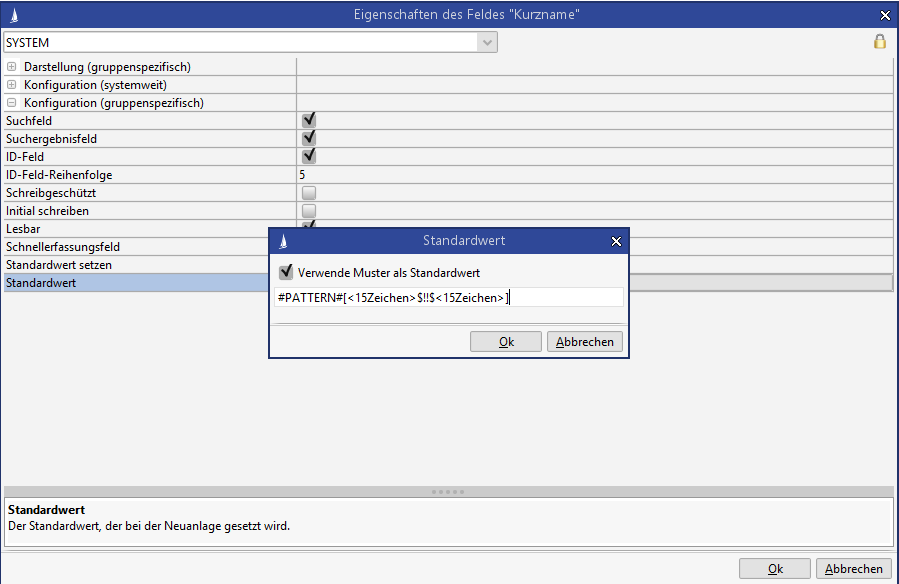
Pattern Patterns only work for string fields.
Syntax: |
|
Configuration |
|
|
Maximum Input Length |
Informative specification: Indicates the size of the table column in the database. This value cannot be modified. |
|
Required Field |
An entry in this field makes the field mandatory for the user so that a valid value must be entered. This setting is global, because such an entry is required for all users for data consistency. |
|
Relevant for data quality |
Important technical fields that are not declared as mandatory fields because they should be filled in, but cannot always be filled in. A percentage fill level of this important information is calculated from the filled information, which can be evaluated. further information about →Data quality If this field property is set or removed, the Lucene index of the affected entity must be rebuilt so that the data quality display is updated for all datasets in the affected area. |
|
Input Mask |
A regular expression that describes the valid input values for the field can be entered in the input mask field. For a complete description of regular expressions, we refer to the Oracle documentation. Furthermore, a defined string can be entered that implies a certain field behavior. |
|
Input mask error message |
Customized descriptions that should correlate with the input mask and the input example (see input example) can be included in the error message for the field. |
|
Input mask example |
The input mask usage example is intended as a message text in the event of incorrect entries. In connection with an error message, the form Error, field format, valid example is used. |
|
Fill during creation |
Specifies, whether this lookup field should automatically be filled from a superordinate sentence during a new creation (for example, an activity below a project). |
|
Layout for Excel export |
The selected fields are exported to Excel instead of the lookup field. If no field is selected, the lookup field will be illustrated as in the list view. |
|
Lookup Key Field |
Optionally indicates the lookup key field. The user selects the field from all search input fields in the lookup search. If no field is selected, the first field of the lookup search is used. |
|
Lookup tooltip fields |
Defines the fields from the lookup search to be displayed in the tooltip. Hereby the order of the fields can also be defined. |
|
Lookup description fields |
Defines the fields from the lookup search to be displayed in the description text of the lookup field. The configuration applies equally to the detail view and the list view. Hereby the order of the fields can also be defined. |
|
Not Persistent Lookup Field |
Specifies, whether this is a not persistent lookup field. Values of these fields are only determined by searching. The field content itself is not stored in the database table. |
|
Picklist field |
Indicates, whether this is a picklist field. Here the user can make free inputs, e.g. for the street name. The property is defined when a lookup field is created. Only the key is displayed in picklist fields. This applies if the "Key only", "Description only" and "Key + Description" options have been selected for the "Field content in detail masks" system setting. |
|
Lookup entity |
Indicates the entity that is being looked up. |
|
Lookup Preselection Fields |
Configuration of the search restrictions used for preselection and the proposal list. Each configuration is stored in a new row. 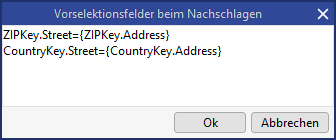
In a syntax with In the example a function is specified optionally, with which the given value is checked. If no function is specified, NONE is used. The standard function is then automatically used when looking up or validating (user preferences). The following functions are possible:
The |
|
Lookup search |
Here the lookup search is configured, which is used when looking up and validating lookup fields. The default search follows the naming convention "LookupEntity<entity name>". The following rules must be observed for lookup searches:
|
|
Validate input |
Specifies, whether the input should be validated. No validation will be done if the field attribute is deactivated. There is no suggestion list (except for 'apply') and the field value is applied directly when the field is left with the ↹ TAB or ENTER ↵ key. |
|
Validation Preselection Fields |
Configuration of the search restrictions used for preselection and the proposal list. See "Lookup preselection fields" for more details. |
|
Numeric Lookup Field |
Indicates, whether this is a numeric lookup field. |
|
Ignore case sensitivity |
Set whether the search will be case sensitive. |
|
Default List Key Field |
This property decides if the field is already obtained during the initial loading of a dataset or first in the second step. Changes to this property should only be individual cases and on agreement. |
|
Mask field |
Since different masks can be selected for input on the fields, the Java object that performs the filter function can be determined here. If, for example, a text field should be converted into a lookup field, there does not have to be an implementation, but rather merely an adjustment to the mask field. |
|
Juhuuu! indexed |
Specifies, whether this field should be included in the Juhuuu index. |
|
Calculated Field |
A “calculated field” is read-only in the client. The field value is read during an update to the dataset and not again from the database. The value can be calculated e.g. via a database function in a selection. A value that is displayed in a field that is not marked as a “calculated field” via the database function will no longer be visible when changing to the detail view, because the value at this time is read from the database. |
|
Workflow ID field |
Displays the field in the Workflow Creator |
|
History of Field Changes |
Changes to fields can be logged. All changes (per field) are saved in the “ChangeHistory” table with a comment. The history of field changes can be enabled as a CURSOR module. If the history of field changes is active, you can store a commentary field for the update. The comment field itself is not logged, but rather only contains the additional information when the actual field is changed. A small corner in the top right is shown in the field if history is active. It can only be viewed with the function right show.change.history.permission. Only the administrator may do this by default. The dialog to view the history can be opened via the field’s context menu (also in list view). As the values (new value and old value) are saved in the database as BLOB and the data type of a field may change, no meaningful sorting and filtering can be done in the table. The display is only manipulated in each row so that valid values are displayed. |
|
Change History Comment Field |
The field is saved here (if active) and acts as a comment field. |
|
Unique Field |
Previously, it was possible to copy (duplicate) a dataset (activity, project, request, offer, contract) via the button. As a result, the user received a 1:1 duplicated dataset with the same fields. If the Unique Field attribute is activated, the field will be emptied in the copy. In the C2 layer, a double value in a field whose default value is set via pattern can be prevented during copying. |
|
Unique Field Warning |
This setting determines if a message will be displayed with duplicate field values. |
|
Confidential Field |
Defines whether a field contains confidential information. |
|
Read-only app |
You have to deactivate the option to make a field writable for the app. |
|
Make anonymous |
Determines whether a field is made anonymous. By default, all fields are made anonymous. Assumed are fields like Primary key, Create user/date or Update user/date. Also, lookup fields are not anonymized because a primary key is stored in the database. The property cannot be set on these fields. |
*Pattern
|
Pattern |
Description |
|
NUMBERx #NO#x |
Creates an x-digit number for the current entity. #NO# can also be used instead of the NUMBER pattern |
|
NUMBERKEY(key)x #NO#KEY(key)x |
Creates an x-digit number for the current entity and the key. |
|
#SER#x |
Creates an x-digit sequential, gapless number for the current entity. Using these variants may lead to wait states or errors when requesting the number on other clients, because this is determined within a transaction and is also rolled back again when the transaction fails. |
|
#SER#KEY(key)x |
Creates an x-digit sequential, gapless number for the current entity and the key. Using these variants may lead to wait states or errors when requesting the number on other clients, because this is determined within a transaction and is also rolled back again when the transaction fails. |
|
#SYSTEMNO#x |
Creates an system-wide x-digit number. The client assignment of the user is ignored.
|
|
#SYSTEMNO#KEY(key)x |
Creates an system-wide x-digit number for the key. The client assignment of the user is ignored.
|
|
#SYSTEMSER#x |
Creates a system-wide, continuous, x-digit number. The client assignment of the user is ignored.
|
|
#SYSTEMSER#KEY(key)x |
Creates a system-wide, continuous, x-digit number for the key. The client assignment of the user is ignored.
|
|
DATE |
Date in the format dd.MM.yyyy |
|
{YYYY} |
Year four digits |
|
{YY} |
Year double digit |
|
{MM} |
Month double digit |
|
{M} |
Month |
|
{DD} |
Day double digits |
|
{D} |
Day |
|
VALUE–<Field name>[(x,y) | #<Field name>] |
The value of a text field or lookup field from the same entity. It may not be calculated. The internal field name must be specified without entity. Parts of the field value can be cut out via the numerical values x and y. The numbers must be in single digits. The java.lang.String.substring() logic is used here.
|
|
PK |
Creates a unique primary key. If the dataset already has a Pk, this is used, otherwise a new one is generated. The primary key is converted to uppercase if the field allows only capital letters. |
|
LAYER |
The current layer. Values: C0, C1 or C2. |
|
PARTNERID |
The partner ID for customizings in the C1 layer, e.g. C11. Otherwise empty. |
Examples
|
000001 |
|
000001 |
(only with activated client module) |
000001 |
|
0001 |
(only with activated client module) |
0001 |
|
Number: 000002 |
|
Number: 000003 on 07.08.2007 |
|
Number: 000004 2.Number 001 |
|
Number: 000005 Your inquiry... |
|
Number: 000006 CP SHORT NAME |
|
creates a 6-digit number for the value in Freetext1. The name of the entity is added to the beginning of the value. |
Permissions
By clicking on the icon 🔒 Permissions, you can access the rights management. You can find details in the Rights Concept chapter.
Validity rules
To avoid false configurations, validity rules (InputMask field attribute) can only be defined for data types where such rules are sensible. As the administrative user, you cannot enter anything if the rules are “hard coded”.
Validity rules can be entered via the field attributes dialog. The “Configuration” sub group contains the following three fields:
-
Input Mask
-
Exception
-
Input mask example
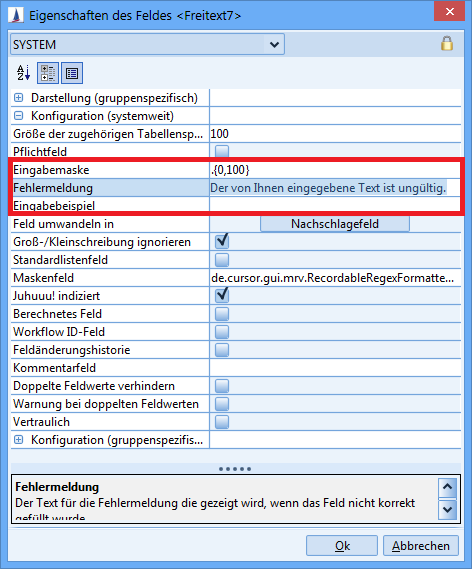
Figure: Change to validity rules allowed
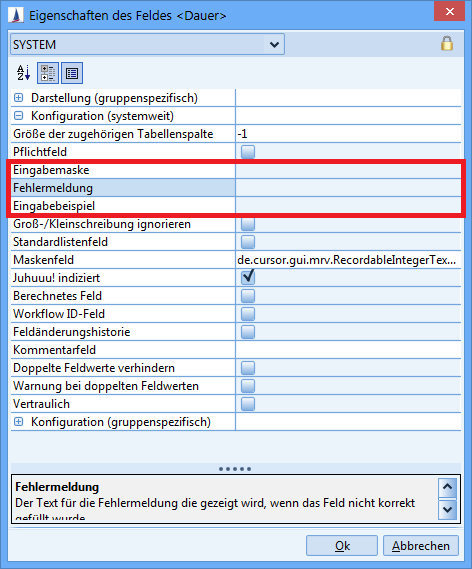
Figure: Change to validity rules not allowed
The input of validity rules is restricted to the following fields (classes):
-
Email field (RecordableMailField)
-
URL field (RecordableUrlField)
-
Text field (RecordableRegexFormattedTextField)
-
Text field with uppercase letters (RecordableUpperCaseRegexFormattedTextField)
-
Text field with freely definable tooltip (RecordableRegexFormattedTextFieldWithoutTooltipUpdater)
Special fields
Freefields
-
Per permissions the new creation and modification of fields of the
FreefieldDeftable is deactivated (analogous to Person)
Documents
-
IsHistoric.Documentmay not be writable, because this is done exclusively on the code side,
Images
Settings in the field attributes
The format (height/width) and the maximum permissible size (in kB) may be entered for each field.
This is done via the field attributes dialog.

Insert an image
An image can be added via drag and drop or by clicking on the field. If the image exceeds the maximum permissible format or the file size, the user will be informed of this in a dialog.
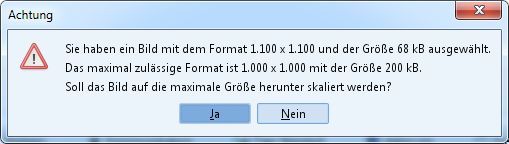
The image is scaled by clicking on Yes so that the format and file size are not exceeded. The image is not inserted with a click on No.
Persons
Changing the person type of a person has data-technical consequences that are described below.
The fields marked with red are particularly important.
Explanation of individual fields
-
PersonTypeField = The field in which the person type is selected.
-
JuristicI18nKeyExtension = Used for internationalization.
-
NaturalI18nKeyExtension = Used for internationalization.
-
LabelNames = The names of the labels that are changed based on the set PersonType.
-
JuristicDisabledFields = Fies that should be deactivated for juristic persons.
-
JuristicEnabledFields = Fies that should be activated for juristic persons.
-
FieldsToClear = Fields that are emptied when changing the PersonType.
-
DateOfOriginField = Date of origin/birth
-
DefaultIsJuristic = Determines if the juristic person is set as the default.
Contact person
-
PersonTypeField = Sex.ContactPerson
-
JuristicI18nKeyExtension = _jur
-
NaturalI18nKeyExtension = _nat
-
LabelNames = LastName.ContactPerson, FirstName.ContactPerson, Name3.ContactPerson, DateOfBirth.ContactPerson
-
JuristicDisabledFields = AcademicTitle.ContactPerson
-
JuristicEnabledFields = Name3.ContactPerson
-
FieldsToClear = DateOfBirth.ContactPerson, AcademicTitle.ContactPerson
-
DateOfOriginField = DateOfBirth.ContactPerson
-
DefaultIsJuristic = Boolean.FALSE
Business partner
-
PersonTypeField = PersontypeKey.Customer
-
JuristicI18nKeyExtension = _jar
-
NaturalI18nKeyExtension = _nat
-
LabelNames = CapitalStock.Customer, DateOfOrigin.Customer, EmployeeCount.Customer, Name1.Customer, Name2.Customer, Name3.Customer, TurnoverVolume.Customer, State.Customer, StateCapStock.Customer, StateTurnover.Customer
-
JuristicDisabledFields = None
-
JuristicEnabledFields = TurnoverCategoryKey.Customer, GroupKey.Customer
-
FieldsToClear = CapitalStock.Customer, DateOfOrigin.Customer, EmployeeCount.Customer, TurnoverVolume.Customer, TurnoverCategoryKey.Customer, GroupKey.Customer, TradeKey.Customer, State.Customer, StateCapStock.Customer, StateTurnover.Customer
-
DateOfOriginField = DateOfOrigin.Customer
-
DefaultIsJuristic = Not set (default is TRUE)
Person
-
PersonTypeField = PersontypeKey.Person
-
JuristicI18nKeyExtension = _jar
-
NaturalI18nKeyExtension = _nat
-
LabelNames = TurnoverVolume.Person, CapitalStock.Person, ComposedPhone.Person, ComposedFax.Person, DateOfOrigin.Person, Email.Person, EmployeeCount.Person, Name1.Person, Name2.Person, Wagetaxno.Person, State.Person, StateCapStock.Person, StateTurnover.Person
-
JuristicDisabledFields = AcademicTitle.Person
-
JuristicEnabledFields = TurnoverCategoryKey.Person, GroupKey.Person, Management.Person, BusinessOrgForm.Person, BranchOfficeCount.Person, TradeRegister.Person
-
FieldsToClear = CapitalStock.Person, DateOfOrigin.Person, EmployeeCount.Person, Wagetaxno.Person, AcademicTitle.Person, TurnoverCategoryKey.Person, TurnoverVolume.Person, GroupKey.Person, Management.Person, BusinessOrgForm.Person, BranchOfficeCount.Person, TradeKey.Person, TradeRegister.Person, State.Person, StateCapStock.Person, StateTurnover.Person
-
DateOfOriginField = DateOfOrigin.Person
-
DefaultIsJuristic = Not set (default is TRUE)
System-relevant fields
CURSOR Software AG recommends using the following fields from the TableTail only for the predefined information:
-
Active
-
ClientNo
-
CreateDate
-
CreateUser
-
MassData
-
RightPk
-
Status
-
UpdateDate
-
UpdateUser
SAP
-
ACTIVITY.ISUCONTACT
The field is designated for the SAP contact number, provided activities between the CRM and ISU are synchronized (online interface via BAPI invocations).