General
The email account access is configured via this menu item in order to allow the execution of the workflow for the automatic import/export or activity synchronization.
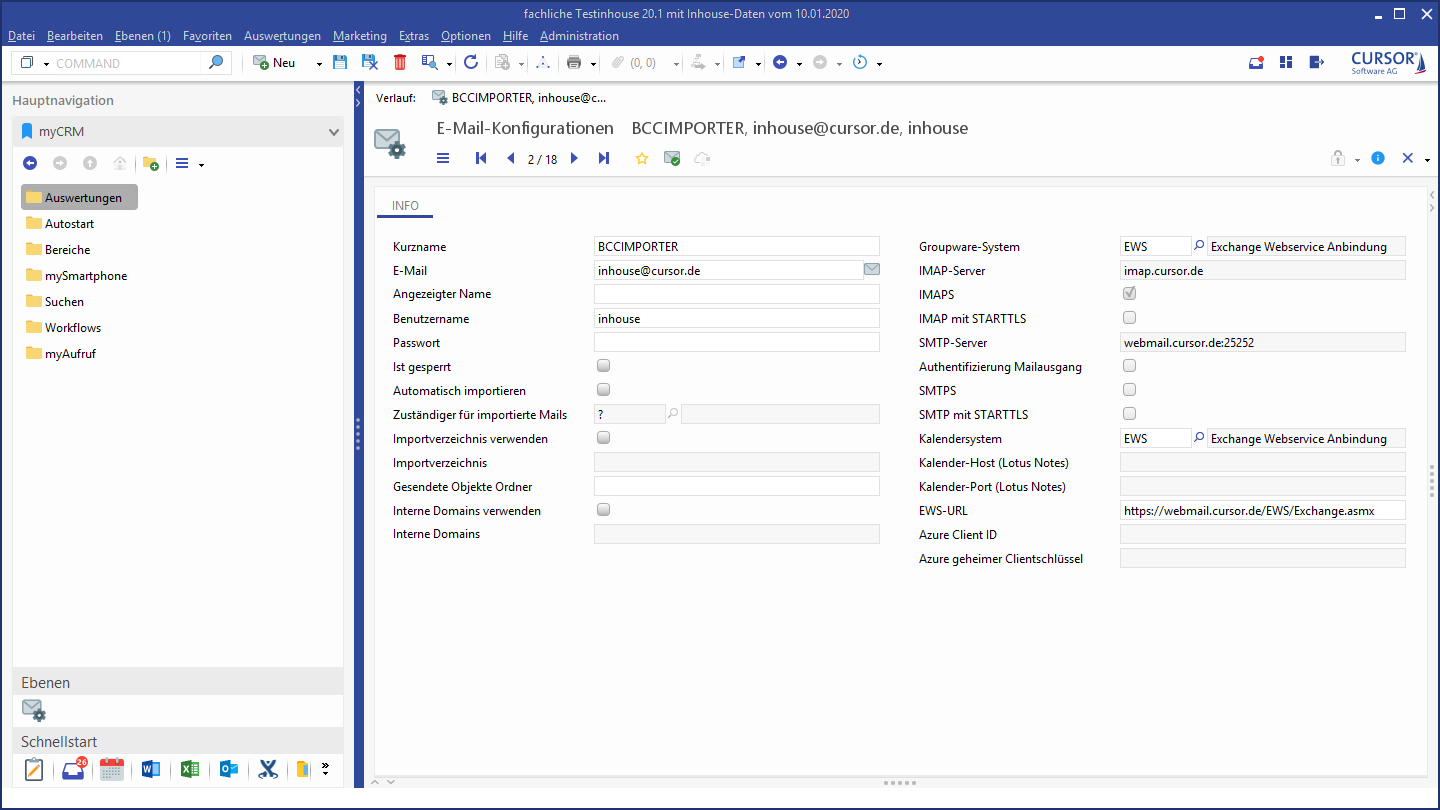
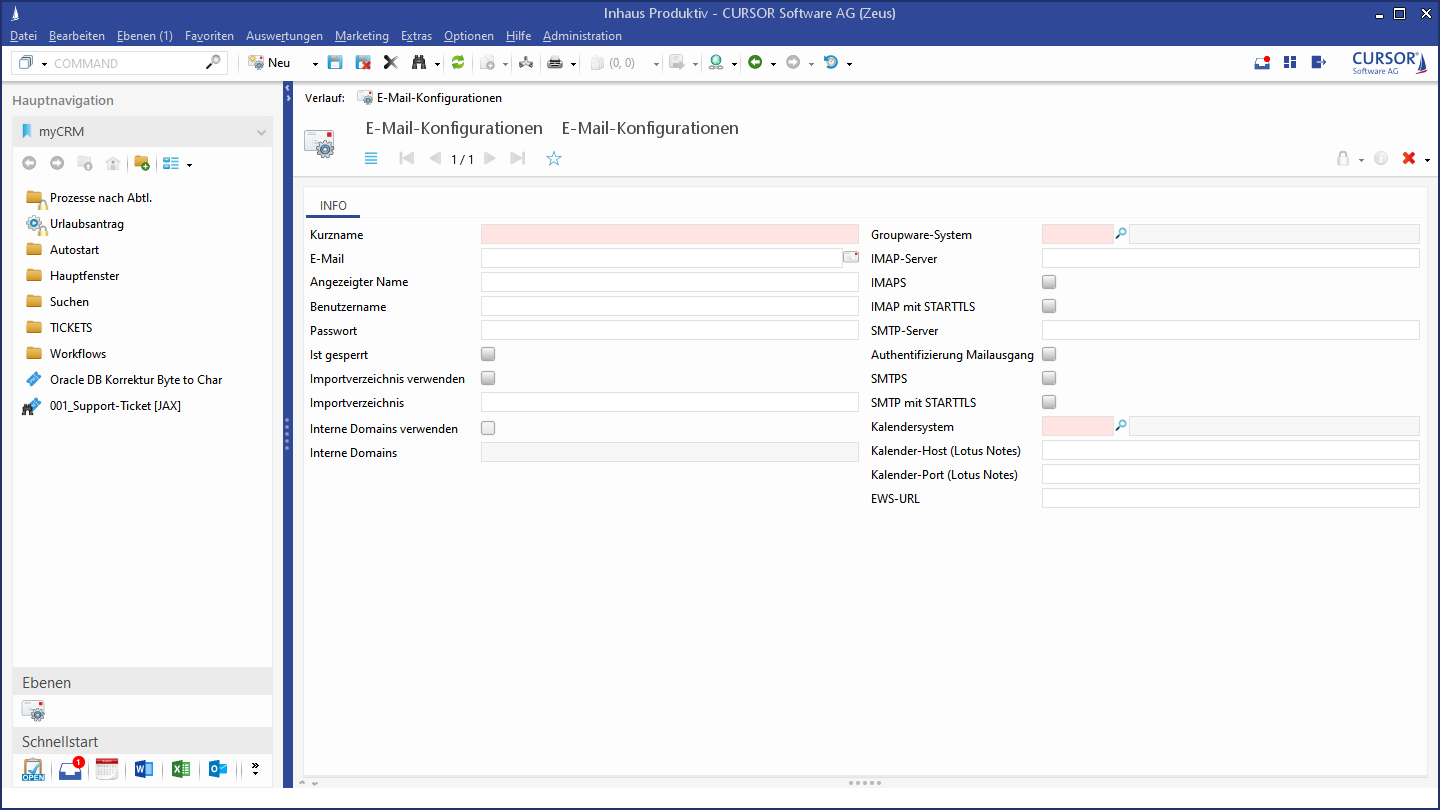
Figure: Email configuration in CURSOR-CRM
IMAPS and SMTPS protocol
Basics
The IMAPS and SMTPS protocol with SSL and TLS is supported for the server-side mail interface.
Background
-
The unsecured IMAP SMTP interface without SSL and TLS is often not provided to ensure that no mails can be sent or received in the Web Client or BPM. The automatic mail synchronization and the BCC-Importer are similarly unavailable.
-
The support of IMAPS and SMTPS ensures that all functions of the server-side mail interface are available.
-
The port for the outgoing or incoming mail server can be set via the email configuration in the System Settings or in the mail configuration (server name: Port). The SMTPS and IMAPS protocol is activated via the TLS and SSL settings.
-
Default port IMAP and IMAP TLS: 143
-
Default port IMAPS: 993
-
Default port SMTP, SMTPS: 25
-
SSL certificates for unsupported CAs
You have two options if the Java certificate used in the exchange server is not supported:
-
Adding CA certificates to the JBoss server
or -
Replacing an Exchange Server Certificate.
SSL certificates for unsupported CAs
The certificate used in the CURSOR exchange server is not Java-supported, because the CA is unknown.
Procedure:
-
Adding CA certificates to the JBoss server
or -
Replacing an Exchange Server Certificate.
Importing the CA SSL certificate
Linux|Windows
"{InstallPath}/server/JBoss/jdk-11.0.3+7/bin/keytool" -importcert -file "<Root Zertifikat der Zertifizierungsstelle>.pem" -keystore "{InstallPath}/server/Jboss/standalone/configuration/truststore_customer.p12" -storepass "<Truststore Passwort>"
Exchange server
Application area of the exchange server
Contacts and contact persons are synchronized via the Exchange server. The direct connection of the Exchange server replaces the client-side connection via Microsoft Outlook with the CRM system. This allows data to be exchanged between the two systems even if their clients have not been started. The "classic" client-side Outlook synchronization is replaced by the server-side synchronization. This solution is particularly important for the Web Client, where appointments and contact data can be exchanged with the Groupware system without MS Outlook. The data is exchange bi-directionally between the Exchange server and the CRM system (JBoss).
In the description we assume: CRM is the leading system.
Technical requirements
Software version
General conditions for conversion to the Exchange server connection:
-
MS Exchange Server 2010
-
CRM at least in version 2015.1
Interface Overview
EWS - Exchange Web Service
The methods for accessing contacts in the EWSNewsSystemManager have been implemented. If the EWSNewsSystemManager is used, all contacts are created via the EWS API. Synchronization can take a few minutes, as this is controlled by the Exchange server.
Configuration
The configuration measures are carried out in 3 steps:
-
Configuration of the system preferences (Groupware section)
-
Mail Configuration
-
Configuration of access data in the user profile
System preferences configuration
Under Administration / Data flow / Mail configuration, you configure the Exchange server parameters on the mask. Four options are available as calendar system:
-
Outlook ("classic" client-side connection to Outlook)
-
Server-side Groupware (developed for connection to MS Exchange Groupware server)
-
Noop (no connection)
-
Exchange web service
For the server-side connection of the Exchange server, select the Exchange Web Service option. You should also enter the IP address and port of the server. Furthermore, the Exchange version and the path of the web service must be defined.
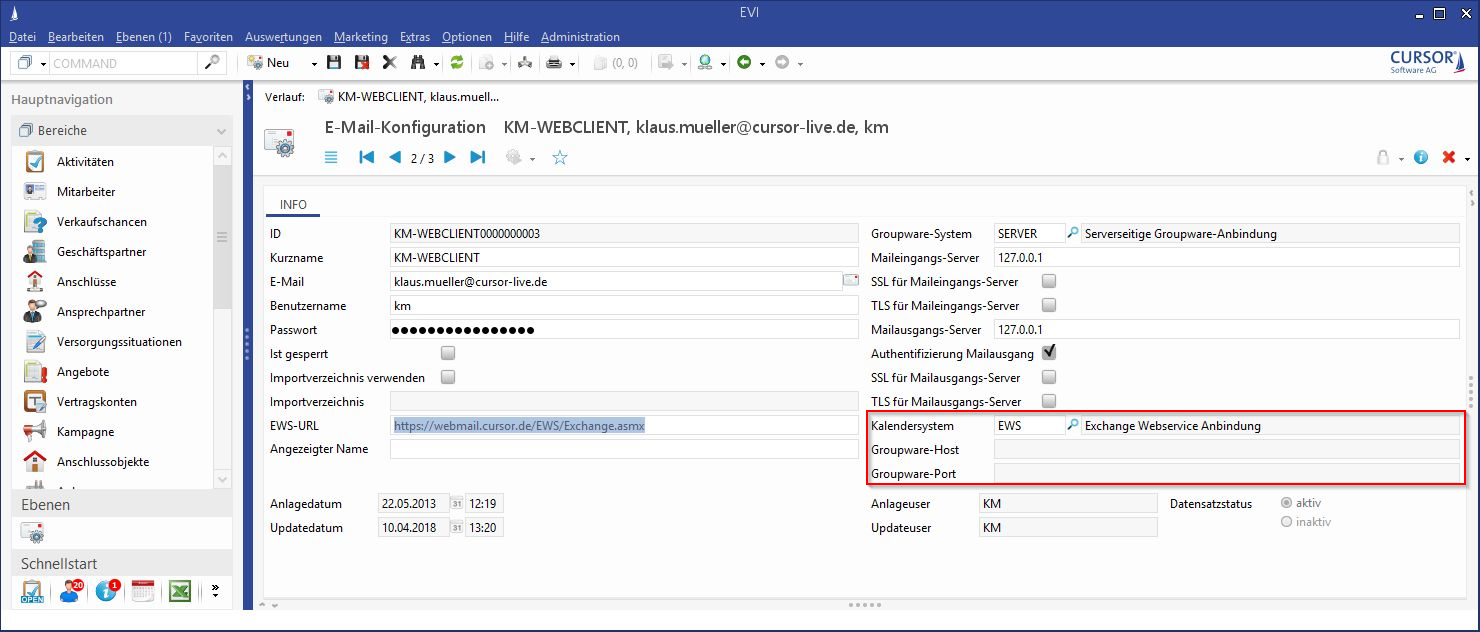
Figure: System preferences for the EWS interface
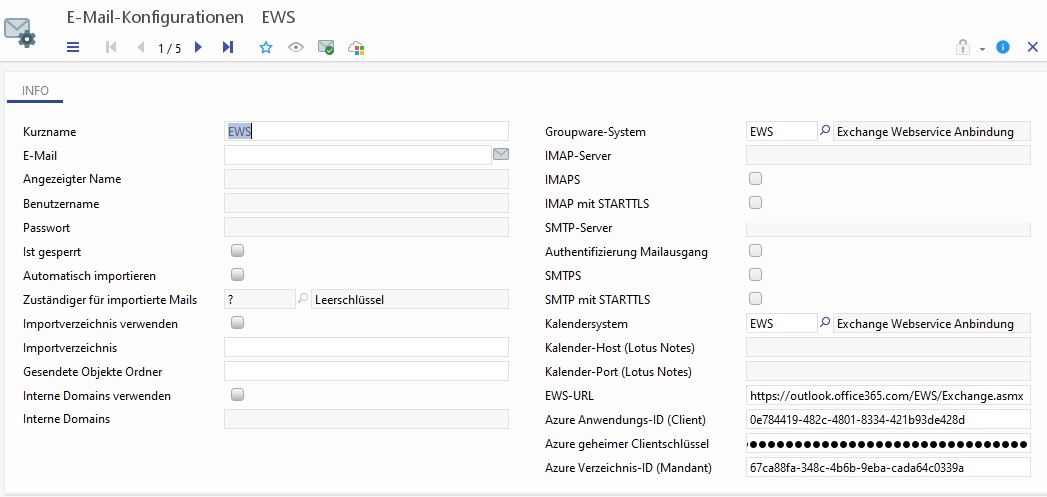
Mail configuration for the Exchange server
The connection settings of the Exchange server are stored in the Mail Configuration mask. The following is an example of how to send an escalation email for business partner changes.
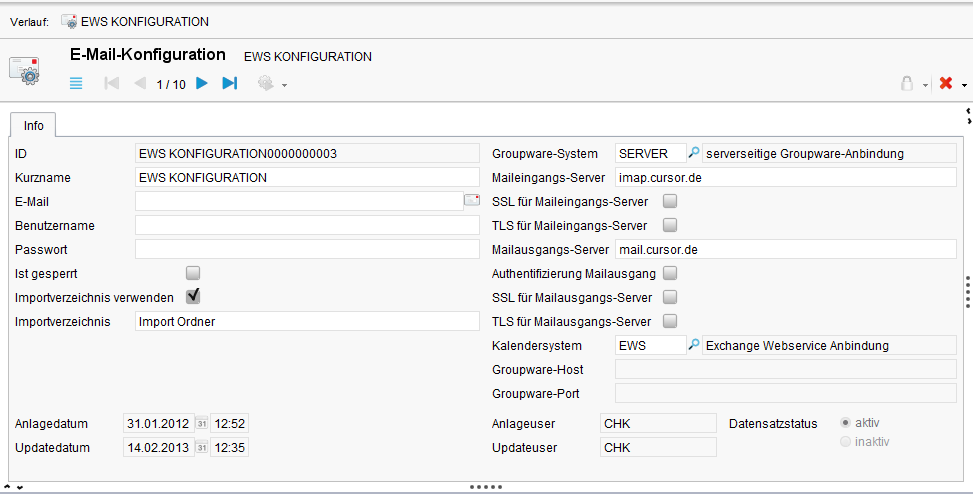
Figure: Mail configuration mask
It is not possible to transfer the displayed name when sending emails using EWS. Only when using SMTP the display name can be taken from the mail configuration.
For contact synchronization, the fields must be populated as follows:
|
Field |
internal |
Value |
Note |
|---|---|---|---|
|
ID |
|
|
Generated |
|
Match Code |
MatchCode.MailConfig |
EWS CONFIGURATION |
|
|
|
|
|
Remains empty, used from the respective employee dataset |
|
User name |
|
|
Remains empty, used from the respective employee dataset |
|
Password |
|
|
Remains empty, used from the respective employee dataset |
|
Groupware System |
GroupwareSystem.MailConfig |
SERVER |
|
|
Incoming Mail Server |
|
<Serverdomain> |
Example for the in-house solution of CURSOR Software AG |
|
Outgoing Mail Server |
|
<Serverdomain> |
Example for the in-house solution of CURSOR Software AG |
|
News System |
NewsSystem.MailConfig |
EWS |
|
Configuration of user access
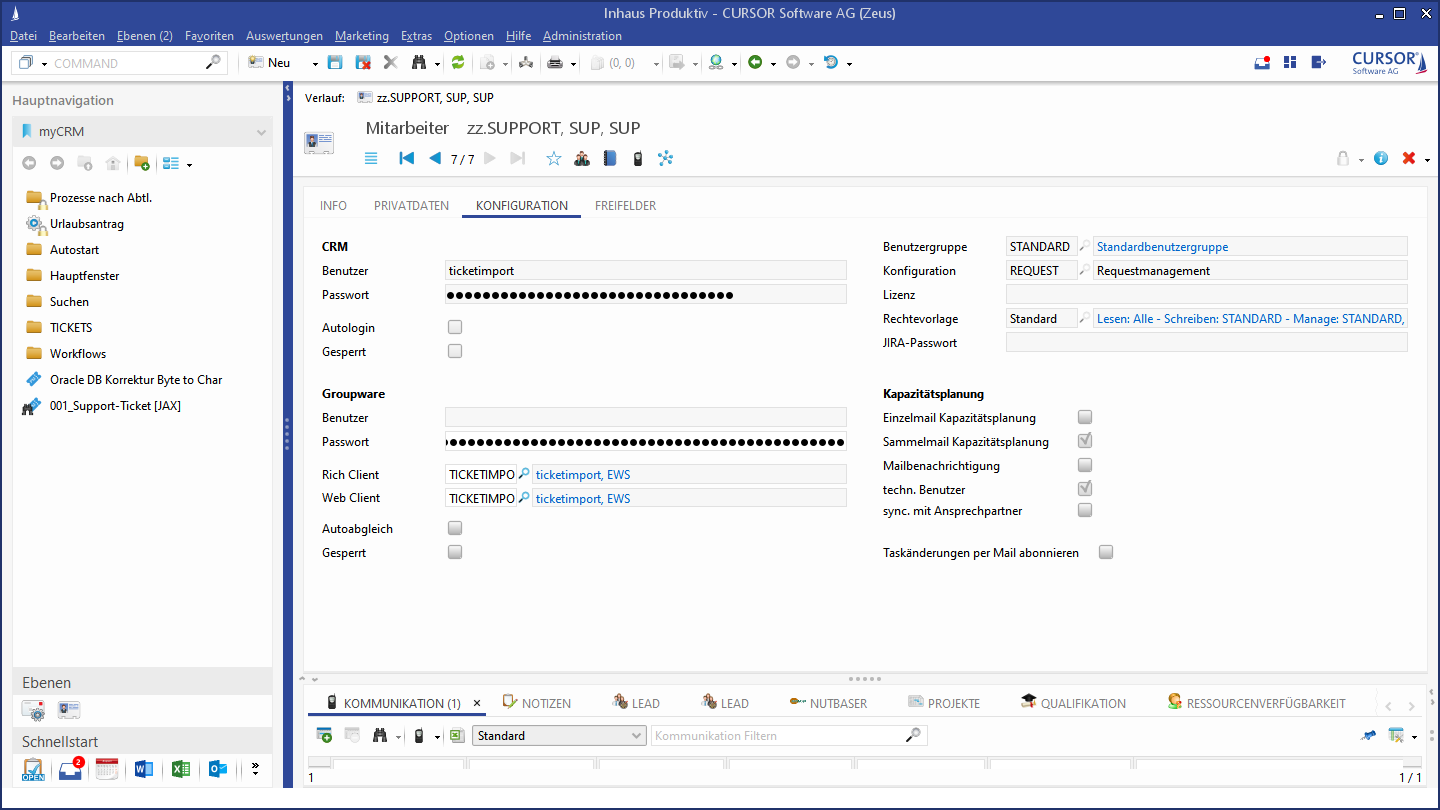
The connection between the user profile of the CRM and the Exchange server profile of the user must be configured once in the Employee / Configuration tab. If the Exchange password is changed, this must always be added. The login takes place with the groupware user, password and configuration stored in the employee. The job then logs on to the Exchange server with the respective user one after the other and synchronizes the contacts.
The configuration must be defined for the respective client (Rich Client and Web Client).
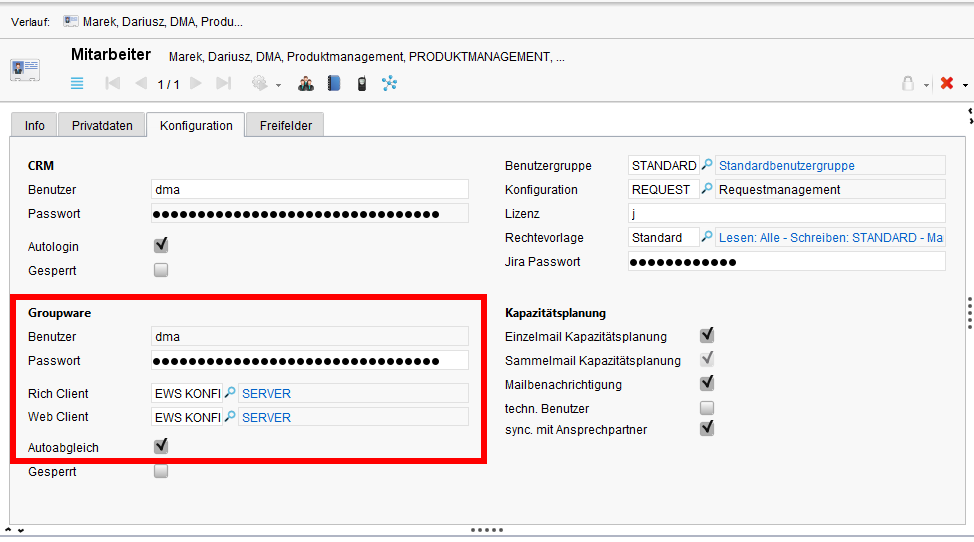
Figure: 'Employees' mask
The employee's email address configured on the 'Info' tab must be a primary SMTP address on the Exchange server.
Microsoft Graph API and Office 365 with EWS
To access Office 365, Microsoft has provided the new Microsoft Graph API. This replaces the existing EWS interface. Alternatively, Office 365 can also be accessed via EWS. For this purpose, the OAuth procedure is used, which is also used with Microsoft Graph API.
The Microsoft Graph API provides rest web services to access emails, appointments, tasks or contacts. The Microsoft Graph API cannot be used for local Exchange Server installations. Here the hybrid solution of the Exchange Server must be used, because access is only possible via the Microsoft Azure Cloud (https://docs.microsoft.com/de-de/exchange/exchange-hybrid).
Multi-factor authentication is not provided for Microsoft interfaces (EWS/MS Graph to Exchange).
The OAuth procedure is used as Modern Authentication for the registration. CURSOR-CRM stores the access tokens in the database. The storage of Windows passwords in CURSOR-CRM is therefore no longer necessary. To access the Azure Cloud from CURSOR-CRM, a registration is required.
When using the Microsoft Graph API, the functional restrictions listed below must be observed.
Known restriction when using the Microsoft Graph API
-
Filtering and sending to private emails and contacts is not possible. Here a feature request was made to Microsoft.
-
In Contacts, the following data cannot be accessed at the moment:
-
Fax (business)
-
Fax (private)
-
Car telephone
-
Assistant telephone number
-
Anniversary
-
Postal address
-
Private labeling
-
-
There is no possibility to access the messageClass for emails. This makes it impossible to detect whether the emails are archived and should not be imported. A feature request has been submitted to Microsoft.
-
The matching of tasks is not supported.
Registration CURSOR CRM in the Microsoft Azure Cloud
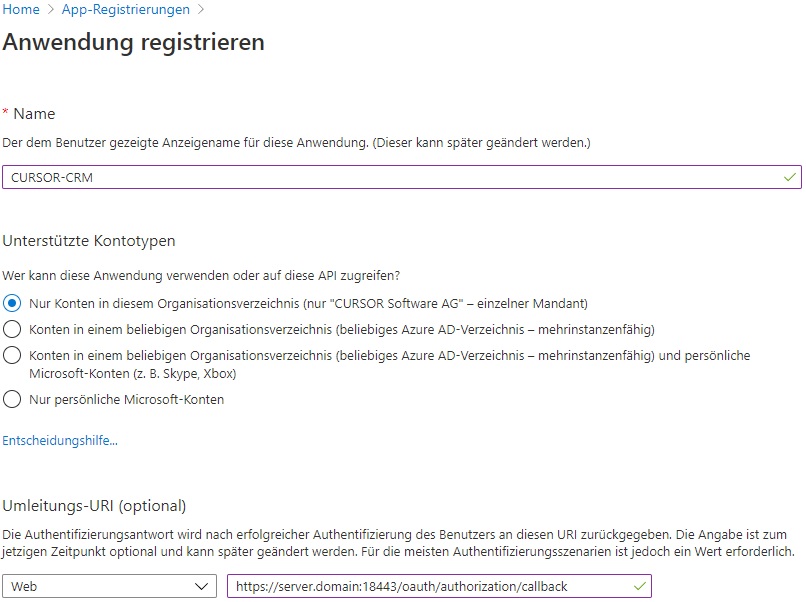
Any JBoss server that wants to have access to the Microsoft Graph API/Office 365 with EWS must be registered in the Azure Cloud. It is sufficient to create an app registration and then register all servers with the redirection URI. Further information on this topic can be found in the official documentation (https://docs.microsoft.com/de-de/graph/auth-register-app-v2).
-
Log in to the Microsoft Azure Portal with the administrator for your organization. Select the item App registrations.
-
Add a new registration here. Select the 1st account type.
-
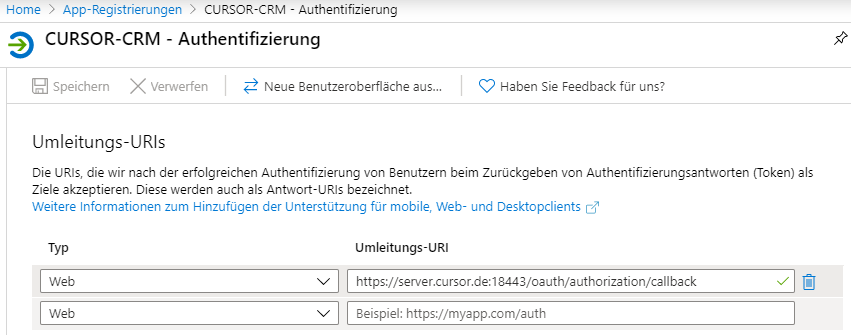
Now register one or more CURSOR-CRM JBoss servers with your redirection URI. The URL is https://server.domain:x8443/oauth/authorization/callback.
-
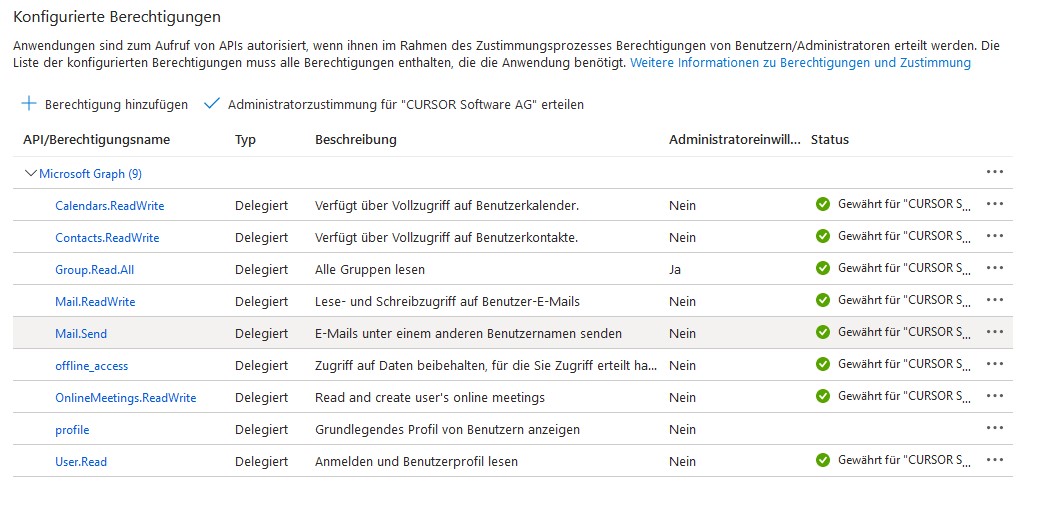
To enable access to mails, the calendar and contacts, the following permissions must be approved:
Permissions for Microsoft Graph API
Detailed description of the individual permissions and what they are required for in CURSOR-CRMAPI/Permission name
Description
Usage in CURSOR-CRM
Calendars.ReadWrite
Read/write calendar data (appointments, meetings)
Activities Handling with appointments, meetings
Contacts.ReadWrite
Read/write contact details
For the transfer of contact persons to Outlook. Import of contacts into CRM
Group.Read.All
Read out distribution list
Provides the mail distribution list in the mail dialog
Mail.ReadWrite
Read/write mails
To read the data from the mail and save it as an activity. Transfer data from the activities to the mail so that it can be sent.
Mail.Send
Send mails
To send mails from the CRM (from an activity, via a process...)
offline_access
Access without user login
Is required if the automatic synchronization of appointments, tasks, mails, contacts is active and running in the background
OnlineMeetings.ReadWrite
Required to generate a MS Teams link
When creating a meeting from the Web Client, the MS Teams link can be inserted
profile
Required for login
User.Read
Required for login
Permissions for Office 365 with EWS
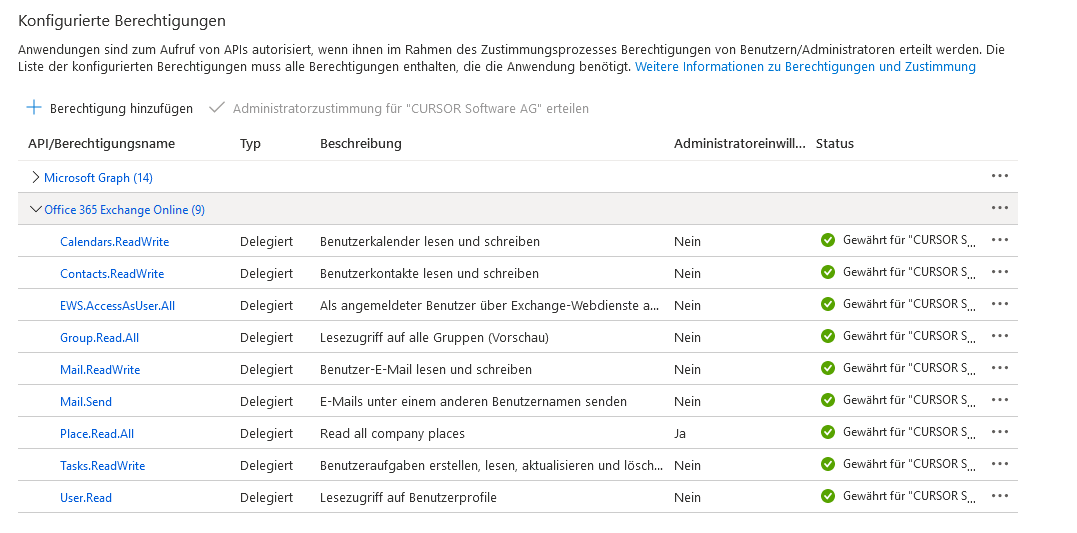
Detailed description of the individual permissions and what they are required for in CURSOR-CRM
-
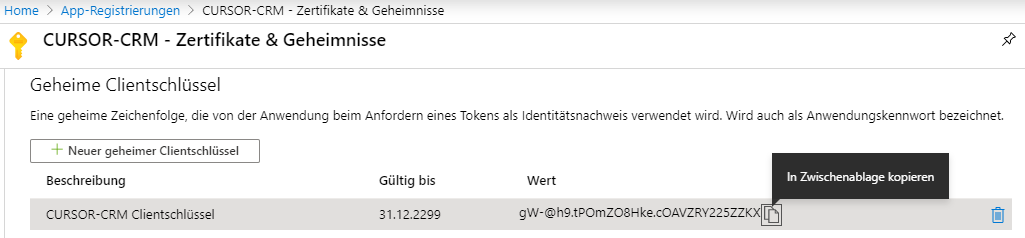
A secret client key must be generated for access.
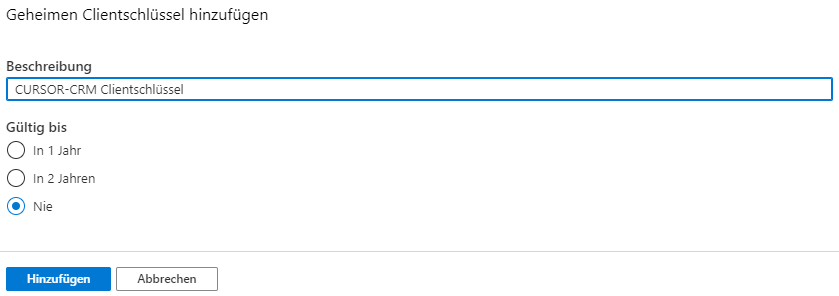
Because the client key can only be viewed within the installation, it must be saved separately or stored directly in CURSOR-CRM.
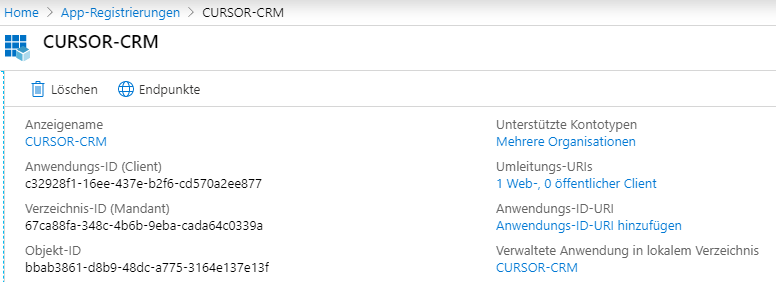
-
The information can then be viewed in the overview page. The application ID (client) and directory ID (client) are required for the following setup of the email configuration in CURSOR-CRM.
Configuration of the Microsoft Graph API/Office 365 with EWS
To use the Microsoft Graph API, an email configuration must be created. For this, the application ID (client), the directory ID (client) and the secret client key for the registered application from the Azure Cloud are required.
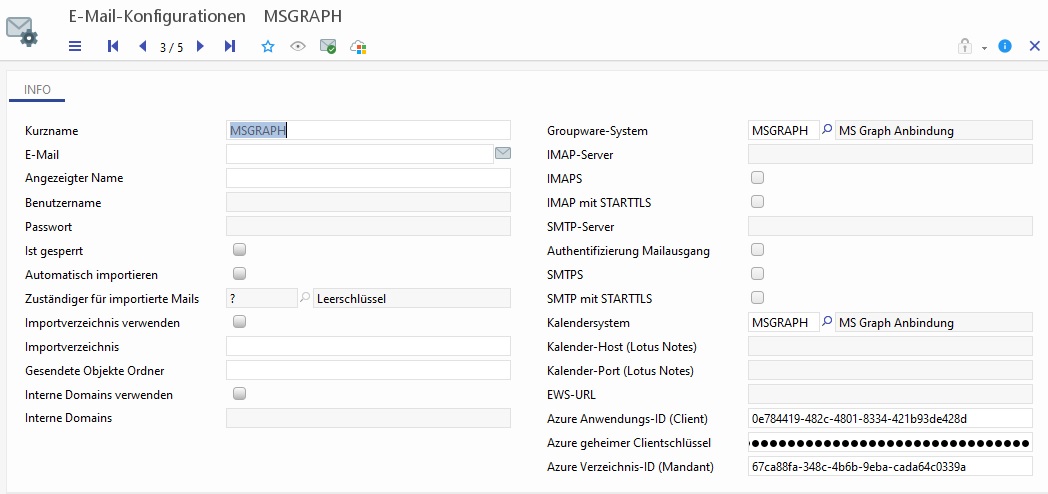
In the following you can see the configuration for Office 365 with EWS
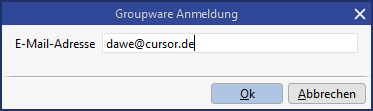
Login to the Microsoft Graph API/Office 365 with EWS
After the email configuration has been created, the authentication must be carried out. Therefore the following buttons are available in the toolbar.

You can create and save a login token by clicking the "Create and save Office 365 login" button
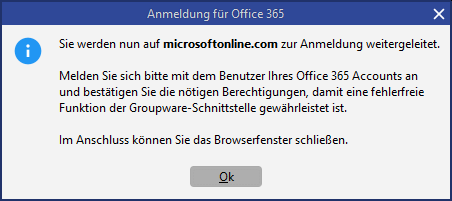
Each CURSOR-CRM user must log in separately. For this purpose, the button "Microsoft Graph API login/Office 365 login" is available in the toolbar of the own employee. For global P.O. Boxes, the login information can be stored in the email configuration. The login information in the email configuration is the leading one.
-
Then log in with your Azure account.
-
Accept the requested permissions (Microsoft Graph API only).

-
If successful, your access token was saved.
-
Then they can check the access to the Microsoft Graph API via the test button.
Write protection for appointments and meetings
Mail activities and meetings cannot be edited in retrospect to retrace the correct mail dialog
Mail activities can no longer be edited to retrace the correct mail dialog in the CRM system. Otherwise it would be possible to view mail traffic in the CRM system that never actually occurred in that form.
The Groupware systems prevent any retroactive changes to sent or received mails for the same reason.
Changes to meetings in retrospect are prevented as well. Meetings can be initiated in CRM, but they are governed by the groupware afterwards.
The above limitations only apply for data fields of CRM activities that are exchanged via the Groupware system. All other activity fields (e.g. Project, Campaign or Delegation) can still be edited in the CRM system.
Objective: The new logic replaces the template MeetingRequest in its entirety. All control is done via the field GroupwareLock. Dataset rights are taken into account.
Requirements: The field GroupwareLock must exist as a key list. The activity will be read-only if that is not the case.
Write protection for mails
-
The read-only flag is set for the sending of an external mail activity (from within CRM).
-
The read-only flag is set for the import of external mails into the CRM system.
-
The system setting "Internal domains" differentiates between external and internal mails by way of the system setting Internal domains.
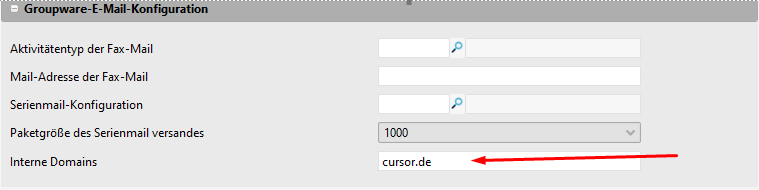
Figure: System settings configuration
-
Internal mails are not flagged as read-only
-
The read-only flag is removed when external or internal mails are copied.
-
All fields that are exchanged with the Groupware system will be read-only for activities with a read-only flag.
The following fields will be read-only:-
Locked fields: STARTDATE, ENDDATE, SENDER, LOCATION, TEXT, ACTTYPEKEY, PRIORITY
-
The read-only flag for locked external mails can be removed as needed. (See statements: disable lock mail)
Write protection for meetings
-
The read-only flag is set for the sending of a meeting request (from within CRM).
-
The read-only flag is set for the import of meeting requests into the CRM system.
-
The read-only flag is removed when meetings are copied.
-
The following fields will be read-only:
-
SUBJECT, STARTDATE, ENDDATE, REMINDDATE, SENDER, LOCATION, TEXT, ACTTYPEKEY, GLOBALID, PRIORITY, ACTSTATUSKEY, DELEGATEDTO, DELEGATEDBY
-
-
All fields that are exchanged with the Groupware system will be read-only for activities with a read-only flag.
The read-only flag for locked meetings can be removed as needed. (See statements: disable lock meeting request)
PropertyMapper statements for disabling GroupwareLocks
ORACLE
-- disable lock mail
insert into propertymapper
(Pk, id, propertyvalue, propertytype, property, principal, active, createdate, createuser, updatedate, updateuser, custlayer)
values
('GroupwareLockPrefMail',
'/de/cursor/jevi/common/activity/GroupwareLockPreferences$!!$lockMail','false', 'SYSTEM', '', '', 1, sysdate, 'admin', sysdate, 'admin', 'CN')

-- disable lock meeting request
insert into propertymapper
(Pk, id, propertyvalue, propertytype, property, principal, active, createdate, createuser, updatedate, updateuser, custlayer)
values
('GroupwareLockPrefMeetRequest',
'/de/cursor/jevi/common/activity/GroupwareLockPreferences$!!$lockMeetingRequest','false', 'SYSTEM', '', '', 1, sysdate, 'admin', sysdate, 'admin', 'CN')
MSSQL
-- disable lock mail
insert into propertymapper
(Pk, id, propertyvalue, propertytype, property, principal, active, createdate, createuser, updatedate, updateuser, custlayer)
values
('GroupwareLockPrefMail',
'/de/cursor/jevi/common/activity/GroupwareLockPreferences$!!$lockMail','false', 'SYSTEM', '', '', 1, getdate(), 'admin', getdate(), 'admin', 'CN')

-- disable lock meeting request
insert into propertymapper
(Pk, id, propertyvalue, propertytype, property, principal, active, createdate, createuser, updatedate, updateuser, custlayer)
values
('GroupwareLockPrefMeetRequest',
'/de/cursor/jevi/common/activity/GroupwareLockPreferences$!!$lockMeetingRequest','false', 'SYSTEM', '', '', 1, getdate(), 'admin', getdate(), 'admin', 'CN')
Send email to fax server
General
Sending faxes is frequently executed via a defined email address. The email address from the fax server and the activity type where such an email is created can be set.
The generated email contains all documents from the activity. Only the recipient is filled, all other participants (therefore CC, BCC) are not transferred to the email. The text is also empty. The subject of the activity is used as the subject.
Settings
An activity type and an email address must be entered in the configuration to generate a fax mail.
![Mail-an-Faxserver-Systemeinstellungen[1].jpg](/__attachments/a_085e7e6d52ba953cbdfe3a3b4794ba50c4d52f7bbcdd43098669371b88af6960/Mail-an-Faxserver-Systemeinstellungen%5B1%5D.jpg?cb=d9c0afb35598c5b03ef15496863f152c)
Figure: Configuration of the fax server
The activity type can be selected as desired. The placeholder ${fax} must be included in the email address for the fax mail. This is then replaced by the fax number.
If the placeholder is not included in the mail address, the following message will appear when closing the dialog and the change to the mail address will not be saved.
![Mail-an-Faxserver-falscher-Platzhalter[1].jpg](/__attachments/a_d8e2247f4aa124c15d54a0e82d8248aa90244de248996f026018652d7671417f/Mail-an-Faxserver-falscher-Platzhalter%5B1%5D.jpg?cb=68260c17d2cb9c6d308dbd60bd7b9399)
Procedure
If a mail is generated from an activity and the activity type is set in the activity for the fax mail, the following occurs:
A mail is generated in which the fax mail address is entered as the recipient. The CC and BCC are empty. The activity text is not included in the mail. All documents from the activity are attached to the mail, the subject is taken from the activity.
The fax number is taken from the contact that is entered in Activity with. If the number is not filled there, the business partner’s fax number will be used.
If no fax number can be determined via the contact/business partner, the following message will appear:
![Mail-an-Faxserver-keine-Faxnummer[1].jpg](/__attachments/a_aec6d89e259818c258b83e29b825fdce93288e82b079bdf0c06f6d7ef17b00af/Mail-an-Faxserver-keine-Faxnummer%5B1%5D.jpg?cb=5a3fcaca37229fe12e822723a6f3373a)
The user still has the option to replace the placeholder {fax} with a valid fax number.
![Mail-an-Faxserver-Faxnummer-eintragen[1].jpg](/__attachments/a_ed4d10997609128b15be0330c6b58e508be339464ad4d8d1d43ca7e75c5413a2/Mail-an-Faxserver-Faxnummer-eintragen%5B1%5D.jpg?cb=bff017a2e55e4873d313694507c1b4cb)
Automatic adjustment
Start scenarios for Outlook synchronization
A contact created in CRM is synchronized on the server side directly to Outlook on a rotational basis if Auto Synchronization is active.
A major advantage of server-side synchronization (EWS) is that it can be performed in the background at any time, even if Outlook and/or the client of the CRM system are not open. The general rules for data flow apply here. The job is started via a timer in the JBoss and runs every 10 minutes. This cycle can be adjusted up or down after collecting empirical values depending on utilization and performance.
The job works bidirectionally, since changes can also occur in the CRM system if the client is not started. For example, the CRM to Outlook route would become relevant if data enrichment was reactivated and the contacts were changed (enriched) without any intervention by the owner. The job only synchronizes existing contacts between Outlook and CRM and does not import any new contacts or create any new contacts in the CRM. However, contacts created in CRM are transferred to Outlook.
If a synchronization fails, the changes are made during the next regular synchronization. The synchronization always takes into account all contacts for which the change date (updated date) is after the start date of the previous successful synchronization (reference date) and before the start of the current synchronization (current date). After successful synchronization, the reference date is set to the new start date.
Example:
-
Start run n: 12:00
-
Start run n+1: 12:10
-
End run n+1: 12:15
-
Start run n+2: 12:20
-
Selection period n+1: 12:00 to 12:10
-
Selection period n+2: 12:10 to 12:20
If the Exchange account cannot be reached, the Locked flag (AutoImpPwEx.Employee) is set. The job excludes the user from the synchronization. This prevents an Exchange account from being blocked due to too frequent incorrect authentication. The login mask is displayed the next time you log in. Once the user data has been entered, the flag is removed again.
The regular synchronization or the job is executed under the CRM user CRM_SERVICE. This then logs on to the Exchange server with the respective user.
The Outlook synchronization (EWS) is triggered not only by the timer-controlled synchronization but also if one of the mapped fields in the CRM contact has changed.
This applies to the following actions:
-
Creating a new contact person or business partner in the CRM system
-
New creation of an activity of the type MEETING or APPOINTMENT in the CRM system
-
Creating new appointments in the Outlook calendar
-
Import of emails from Outlook if they are stored in predefined directories
-
Change existing data in the CRM system or in Outlook
The mapped fields and their configuration can be controlled via the administration console (contact assignment)
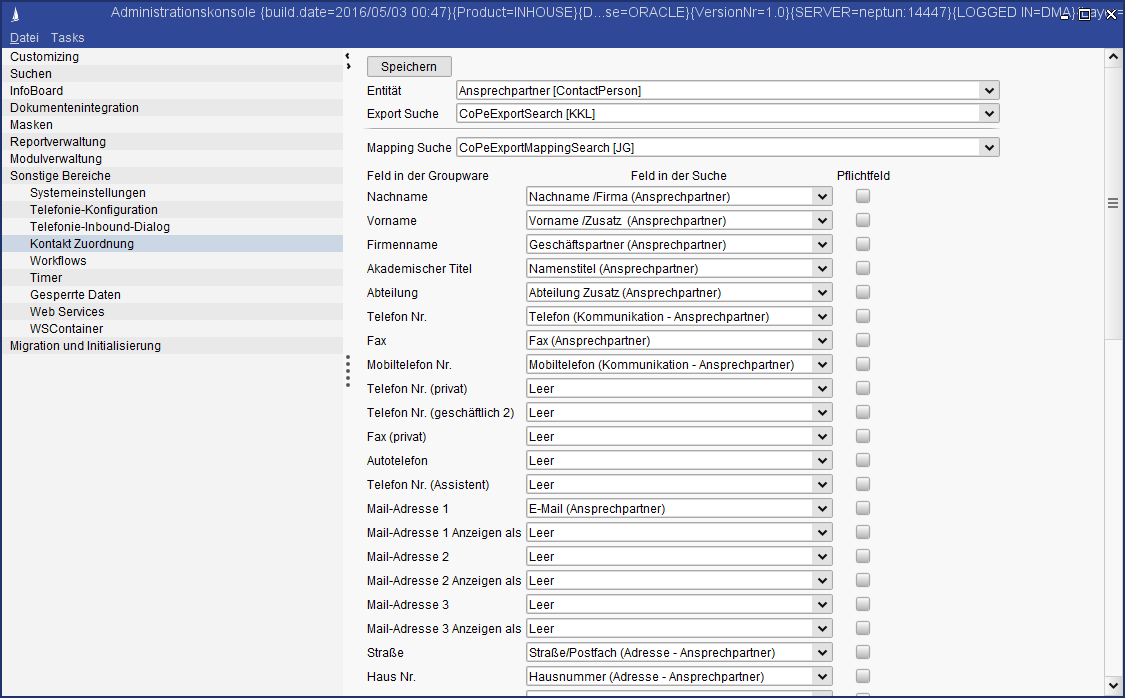
Figure: Configuration of contact assignment
Conflict handling
As mentioned at the beginning, we assume that the CRM is the leading system. This means that contacts that only exist in Outlook are not automatically transferred to the CRM, since a contact person in the CRM must be assigned to a business partner. To do this, the user must start a manual import, where he can select the assignment manually. If there is a contact person in both systems, the data is now automatically synchronized. In the default case, the Contact person synchronization option remains empty. Thus the latest status - regardless in which system - will win. Alternatively, you have a choice: Update the contact (CRM always wins) or Decide for every dataset which will be updated where you can decide individually for every dataset.
Further import options can be activated as required, if later changes are also made in the Outlook calendar, so that these are transferred to the CRM.
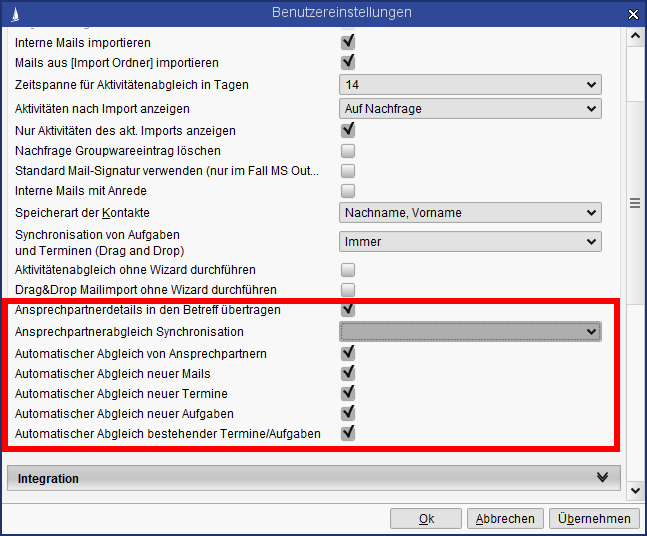
Figure: Configuration of the synchronization settings of a user
Automatic import
The following describes how to set up an automatic import for emails using a server workflow.
From version 2019.2 and higher, automatic import can be set up via email configurations without the need to create a server workflow.
For details, see the section Email import configuration without server-side workflow.
Automatic import
The workflow action ImportMailsAction imports emails from the inbox. The objective of this functionality is to automatically delegate emails from the "Collector Accounts" (e.g. info@your-company.com, support@your-company.com) to a specific employee in the department.
-
The configuration is done via an entry in the entity Mail Configuration (Administration/Mail Configuration). The MatchCode of the email configuration is entered into the workflow description.
-
The workflow is set up as a timer (Administrator Console/Miscellaneous/Timer) and can then be invoked e.g. every 5 minutes.
Procedure
-
The action aborts if more than one mail configuration is found for the specified MailConfigMatchCode
-
The action is complete (successful) if no further new mails are found.
-
All unread mails are imported from the inbox; there is no differentiation between internal/external mails.
-
The imported mails are automatically moved from the inbox (e.g. to CURSOR-CRM/EVI activities).
-
A WorkSpace (with the name ImportResults) containing the imported data is returned. The imported data can then be processed further.
WorkSpace must be closed again (see example).
Example workflow
<?xml version="1.0" encoding="ISO-8859-1"?>
<!DOCTYPE WorkFlowMapping PUBLIC "workflow" "..\..\..\common\workflow\workflow.dtd">
<WorkFlowMapping WorkFlowID="ImportMails" Description="Import mails" ExecutionType="100" >
<InternalDescription>Importiert mails.</InternalDescription>
<Step No="1">
<Event Name="TimerWFEvent">
<EventToContextMap/>
</Event>
<Actions>
<Action Name="ImportMailsAction">
<ContextToActionMap>
<ValueMapping Name="SessionId">
<Parameter Name="SessionId" DataType="java.lang.String" Value=""/>
</ValueMapping>
<ValueMapping Name="MailConfigMatchCode">
<Parameter Name="MailConfigMatchCode" DataType="java.lang.String" Value="123"/>
</ValueMapping>
</ContextToActionMap>
</Action>
</Actions>
<FollowingSteps>
<No>2</No>
</FollowingSteps>
</Step>
<Step No="2">
<Event Name="ImportMailsAction">
<EventToContextMap/>
</Event>
<Conditions>
<Condition Name="WFConditionIsNotNull">
<ContextToConditionMap>
<SimpleMapping FromName="ImportResult" ToName="WFConditionNull.IN_VALUE"/>
</ContextToConditionMap>
<CheckValuesMap/>
</Condition>
</Conditions>
<Actions>
<Action Name="CloseWorkSpaceAction">
<ContextToActionMap>
<ValueMapping Name="SessionId">
<Parameter Name="SessionId" DataType="java.lang.String" Value=""/>
</ValueMapping>
<ValueMapping Name="ImportResult">
<Parameter Name="WorkSpace" DataType="de.cursor.jevi.server.system.WorkSpace" Value=""/>
</ValueMapping>
</ContextToActionMap>
</Action>
</Actions>
</Step>
</WorkFlowMapping>
Procedure for the setup of the automatic mail import
1. Create mail configuration
-
Field MatchCode:
Enter a unique MatchCode for the workflow. It is important that the same token will also be used later in the workflow description. (Example: "123") -
Field User name (mail account):
Enter the user name of the mail account. The user name of the email account should be entered here. For the account support@your-company.com, the user name would be "support" (in this case: "inhouse"). -
Field Password (mail account):
Enter the password for the mail account. -
Field Groupware System:
Select the key 'SERVER' (if you use a server-side mail connection). -
Field IMAP Server:
Enter the incoming mail server -
Field SMTP Server:
Enter the outgoing mail server -
Checkbox Authenticate Outgoing Email
Activate this option if the client should be authenticated at the outgoing server. -
Save the dataset
Activate the checkbox "Is Locked" if you don't plan to use the email configuration short-term. The configuration data will remain intact
2. Create a workflow under the menu item "Workflows" in the administration console
-
Add the workflow (important here is that the token used in "Mail Configuration" will also be specified in the workflow description.)
3. Create a timer under the menu item "Timer" in the administration console
-
Create a new task in the Timer for executing actions.
-
Field Type: Select "WORKFLOW".
-
Field Run as: select the relevant user (here: MM).
-
Field Name: Enter the WorkFlowID (="ImportMails").
-
Create the timetable for the task on the tab Timetable.
Result and remarks
The result will be that there will be a visible activity in the system.
-
The user specified in the field Run as is the one to whom the activity will be delegated.
-
The currently logged in user (with relevant rights), who created the task, does not necessarily have to be the same user defined in the task field Run as.
Email import configuration without server-side workflow
As an alternative to the previously described setup of the automatic import by using server-side workflows, the automatic synchronization can also be achieved by using the "Automatic mail import of email configurations" timer. This imports all emails for email configurations in which the "Import automatically" flag is set. The timer starts automatically every 10 minutes by default. If necessary, a different timer period can be set in the Admin Console in the "Time period" column.
The mentioned flag "Import automatically" is located in the email configuration mask. If the flag is active, you also have the option to store the user to whom the activities arising during the import should be delegated in the "Person responsible for imported mails" field. If the import logic cannot determine a delegate to/from employee, the fields are filled with the employee who executes the timer.

Figure: Timer for an email import configuration without server-side workflow
Storing an additional Groupware configuration
As administrator, you can store an additional Groupware configuration to allow users to utilize a client-side and server-side Groupware implementation in parallel.
The mail configuration was extended to include the fields 'Groupware Host' (GroupwareServer.MailConfig) and 'Groupware Port' (Port.MailConfig). Here you can configure the server for the synchronization of tasks and appointments.
During a login into the Groupware system via the server-side mail interface, the employee field CRM User is not used, but the field Groupware User. This enables a login to the groupware system independent of the Windows user name. The Groupware login information from the employee entity will then be loaded and used automatically if there is no user name or password set in the mail configuration.
P.O. Box manager
Basics
If it is not possible to work with the system directly (for example, during a business trip), certain routines can be started automatically without the user doing anything. Here it is an import mechanism, which starts when a mail with a BCC address is sent to a collection mail address.
As administrator, you can define various rules via workflows. Some examples:
-
Forward mails from a specific sender to a specific employee or distribution list and create a new activity
-
Reply to mails from a specific sender via the server, using a pre-configured text
-
Create an email as an activity with the status INBOX and import attached documents
-
Link an email to a support ticket number and a ticket in the CRM system
You can optimally adapt the rule definition to your existing CRM system (process workflows, entities).
Benefits:
-
If it is not possible to work with the system directly (for example, during a business trip), certain routines can be started automatically without the user doing anything. (for example, in connection with the use of CURSOR.crm mobile on a smartphone)
-
Reduction of work when creating activities and documents
-
individual adjustment to your processes
-
Flexible design of customer relationships (representation, change of responsibilities) without the customer explicitly being informed about the change to the contact and their telecommunication data.
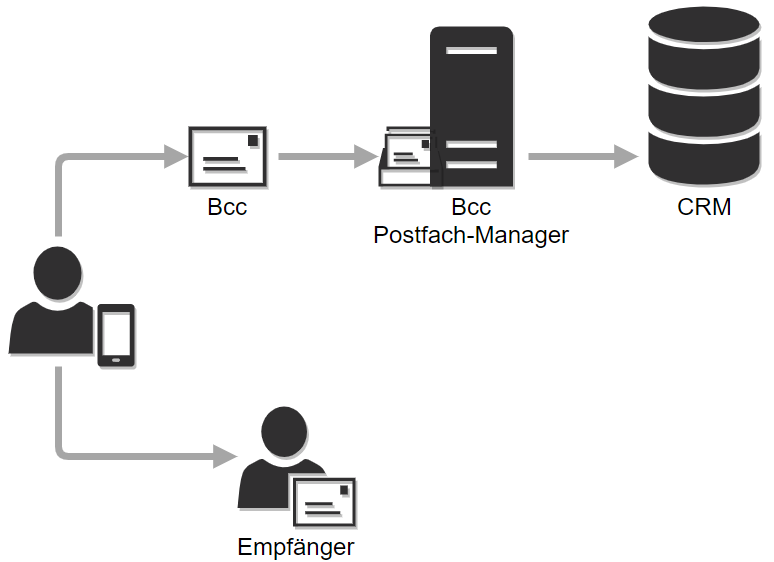
Figure: The new creation of activities and document import via the mailbox manager
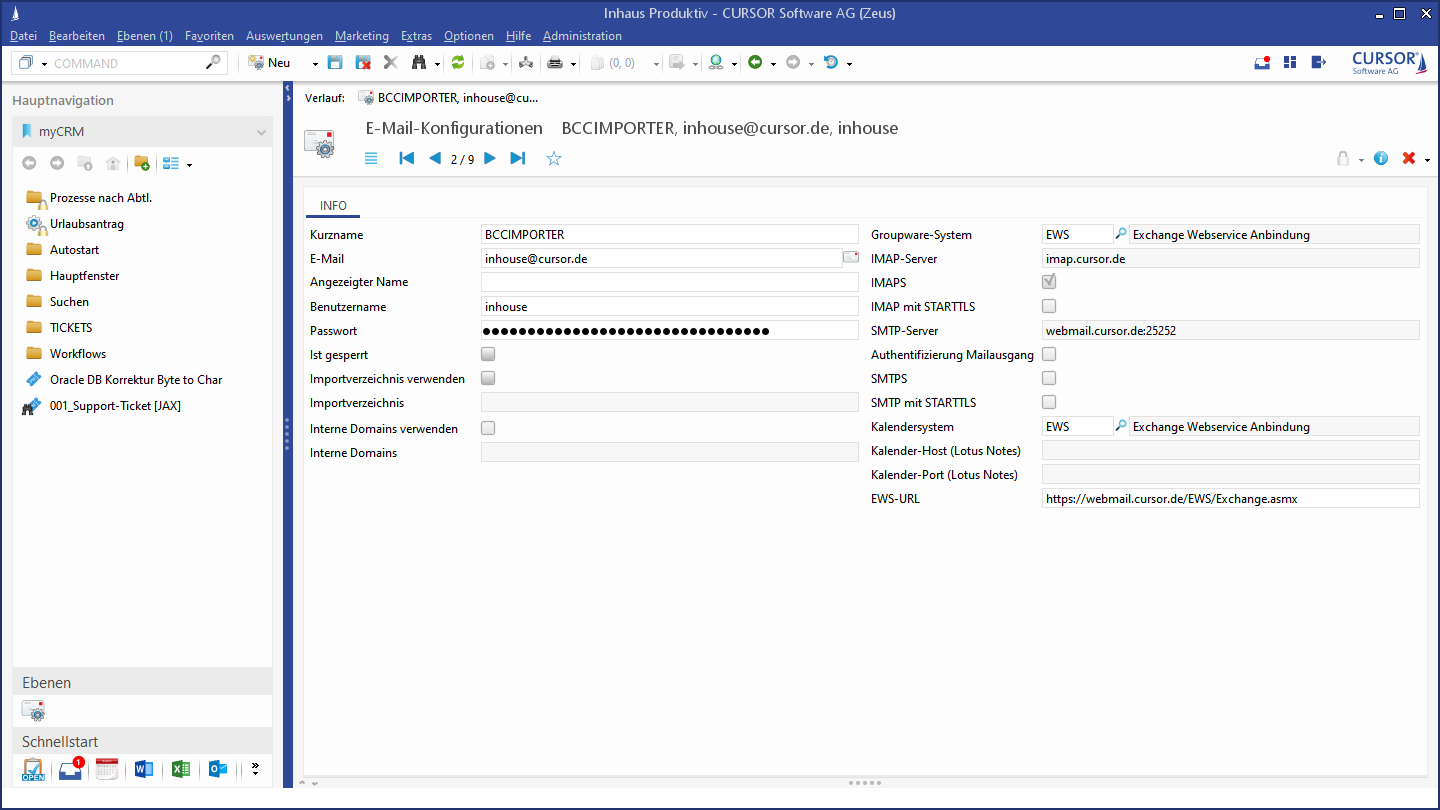
The new creation of a mail configuration is carried out via the menu Administration / Mail Configuration.
Mail configuration
The email address that receives and imports the emails must be saved as a mail configuration in the CURSOR-CRM/EVI. The match code for the mail configuration must be BCCIMPORTER, because the workflow searches for this mail configuration.
The email account is accessed via the IMAP protocol. Thus, all standard-compliant IMAP-capable email or groupware servers can be used.
With MS Exchange Server, the user name must be entered in the form <user>@<domain> (for example, mailimporter@cursor.de), whereby the user name must have an active user account in the active directory. Alternatively, a device inbox may also be created in MS Exchanger. The user account affiliated with the device inbox is deactivated automatically here. This measure increases the security, because no registration on the domain is possible if the user account is deactivated.
In the “Groupware Host” (GroupwareServer.MailConfig) and “Groupware Port” (Port.MailConfig) fields, the server can be configured to match tasks and dates.
On the “Employee”mask, a Groupware user can be defined via the “Groupware User Name” (GroupwareLogin.Employee) field. This field is filled with the content of the AutologinName.Employee field during the update.
With the registration on the Groupware System via the server-side mail interface, the “Login Name” employee field will no longer be used, but rather the “Groupware User Name” field. This makes it possible to log in to a Groupware System deviating from the Windows user name.
The Groupware login information from the employee entity will then be loaded and used automatically if there is no user name or password set in the mail configuration.
![PA100127mailkonfig[1].jpg](/__attachments/a_82431a1e09106dd6d6f0c3647b38d28e968d01bc7159a5ef638bff18ff05e3c5/PA100127mailkonfig%5B1%5D.jpg?cb=b3c4b50b8bd93cdf6bac2072a9178509)
Configuring the timer
The timer must be set up in the Admin console. It must be considered that the settings are used for the mail import of the “Execution as” user (for example, import internal mails/use ImportFolder).
The WKF_ImportMailsByBCC system workflow is entered as an action. A “technical” user should be created for this, because the activity is also generated under this. After this, the start and end time as well as the frequency of the task query must be set in the “Timetable” tab.
![PA100127taskliste[1].jpg](/__attachments/a_b194c38633c5259f33932be4afbc61df86fe263c3f3706e827dc28d00e242cf5/PA100127taskliste%5B1%5D.jpg?cb=2d3425b4ced643033b50b87f6adc765d)
Configuration variations
The WKF_ImportMailsByBCC system workflow delivered in the standard scope does not just set the required links, but rather also the activity type to “MAILOUT” (for outgoing mail) as well as activity status to “E” (for complete). If a different status is desired here, this system workflow must be duplicated as follows via the Admin console and the standard system workflow simultaneously deactivated:
-
Export workflow as XML file.
-
Enter desired changes in the XML file, for example, activity status from “E” to “O” (for open): Change the string ‘S_ACTSTATUS-E’ to ‘S_ACTSTATUS-O'.
-
Import the adjusted XML file as a new workflow via the “Add” button.
The “CURSOR Standard” flag may not be set for release capability.
-
Deactivate the standard system workflow “WKF_ImportMailsByBCC”.
-
Enter the new workflow name (”WorkflowID”) in the timer configuration shown above.
Proceed analog to this to control open and completed activities via separate email addresses. In this case, the following actions are required:
-
Provision of two inboxes on the groupware server (respectively one for open and completed activities)
-
Set up of two mail configurations with references to the respective inbox
-
Provision of two workflows that were derived from the standard system workflow “WKF_ImportMailsByBCC”. Within these workflows, in addition to the different activity statuses, different WorkflowIDs (with all descriptions) must be assigned and the respectively fitting mail configuration (”MailConfigMatchCode”) referenced.
The mail configuration “BCCIMPORTER” is stored as a default value in the standard system workflow.
-
Configuration of two timer entries, which each reference the previously-named workflows as an action.
Advanced rules for inbox manager/automated mail import
Another test was installed before creating the activity via the inbox manager.
<ValueMapping Name="SearchPk">
<Parameter Name="SearchPk" DataType="java.lang.String" Value="31m47d216nrsh550ExtendedSearch" />
</ValueMapping>
Application example
The inbox manager is used in the standard. Two different business partner roles are now illustrated in the CRM system; customer and vendor. It may be the case that a customer is also a vendor at the same time, which is then illustrated with two roles. A contact with the same email address is then illustrated for the customer and vendor.
Now you would like to create an individual inbox for the vendors. When importing via the inbox manager, you should check if the contact is linked with the “supplier” business relationship and the activity is only assigned to the contact instead of for both contacts with the identical email address.
Actual import
Enter the configured email address as BCC to import a mail. Then a mail that was delivered while on the go (for example, with a cell phone) is directly imported after CURSOR-CRM/EVI.
Configuration of the database index
Starting with version 15.2, the possibility exists to define multiple import folders. When using this function, we recommend creating a database index on the ImportFolder field from the Activity table. The index, for example, is created as follows in the event of Oracle:
create index si_act_impord on activity (lower(importordner))