Of course, you cannot learn your CRM in 15 minutes. The program offers too many functionalities for this. Also, the handling very much depends on your internal processes which are described in your procedure guideline. In trainings, which are very detailed and adapted to your demands, you get all the know-how and know-why you require.
For all those of you who cannot wait any longer, we have summarized the most important functionalities and operating processes of CURSOR-CRM on this page. But also everyone else will benefit from reading this page in 15 minutes as it contains some useful information.
Someone new interested - what's next?
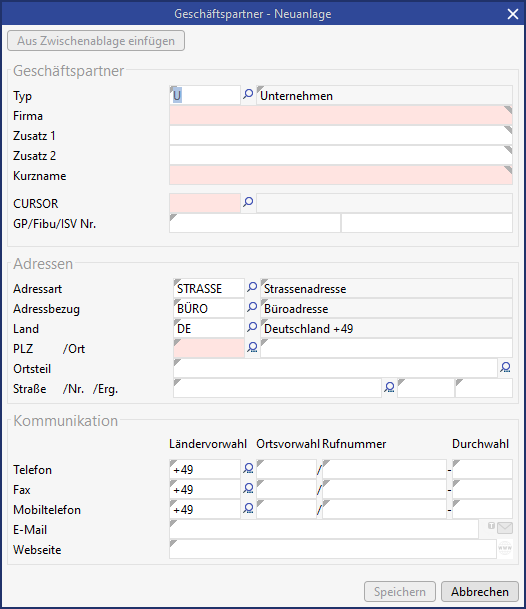
Once someone new is interested, you always create a business partner and a contact person. The business partner is the company or private person that wants to start a business relationship with you. The contact person is the natural person you have contact with. With a company, this is the employee. With a private person, it usually is the person itself. The contact person is required for activities, letters and e-mails and gets the corresponding specifications.
-
Click the triangle on the button New. Select the menu item

-
Enter the sales employee's shortcut (mandatory field highlighted in red: Employee Sales). The field Business relationship is a lookup field. Here you can only use an entry which is listed in the corresponding key table. Click on the icon

A click on the field description fades in the input fields for address, phone, fax and mobile phone, if this has not happened automatically. You can also edit these data in the corresponding main windows 'Address' and 'Telecommunication'. -
Once you have entered all known information, save the new dataset with the button Save.
-
Now create the new contact person. Click in the sub view of the flap 'Contact person' the button

-
Enter the data to the contact person. The fields Last name, Department, Function and Influence are required fields and therefore marked red.
The fields to phone, fax, cell phone, e-mail and internet are already pre-allocated by the data from the business partner. Here you only have to make some completions (like the dial-though number, for example). -
Close the entry mask by clicking Save.
Activities, activities, activities...
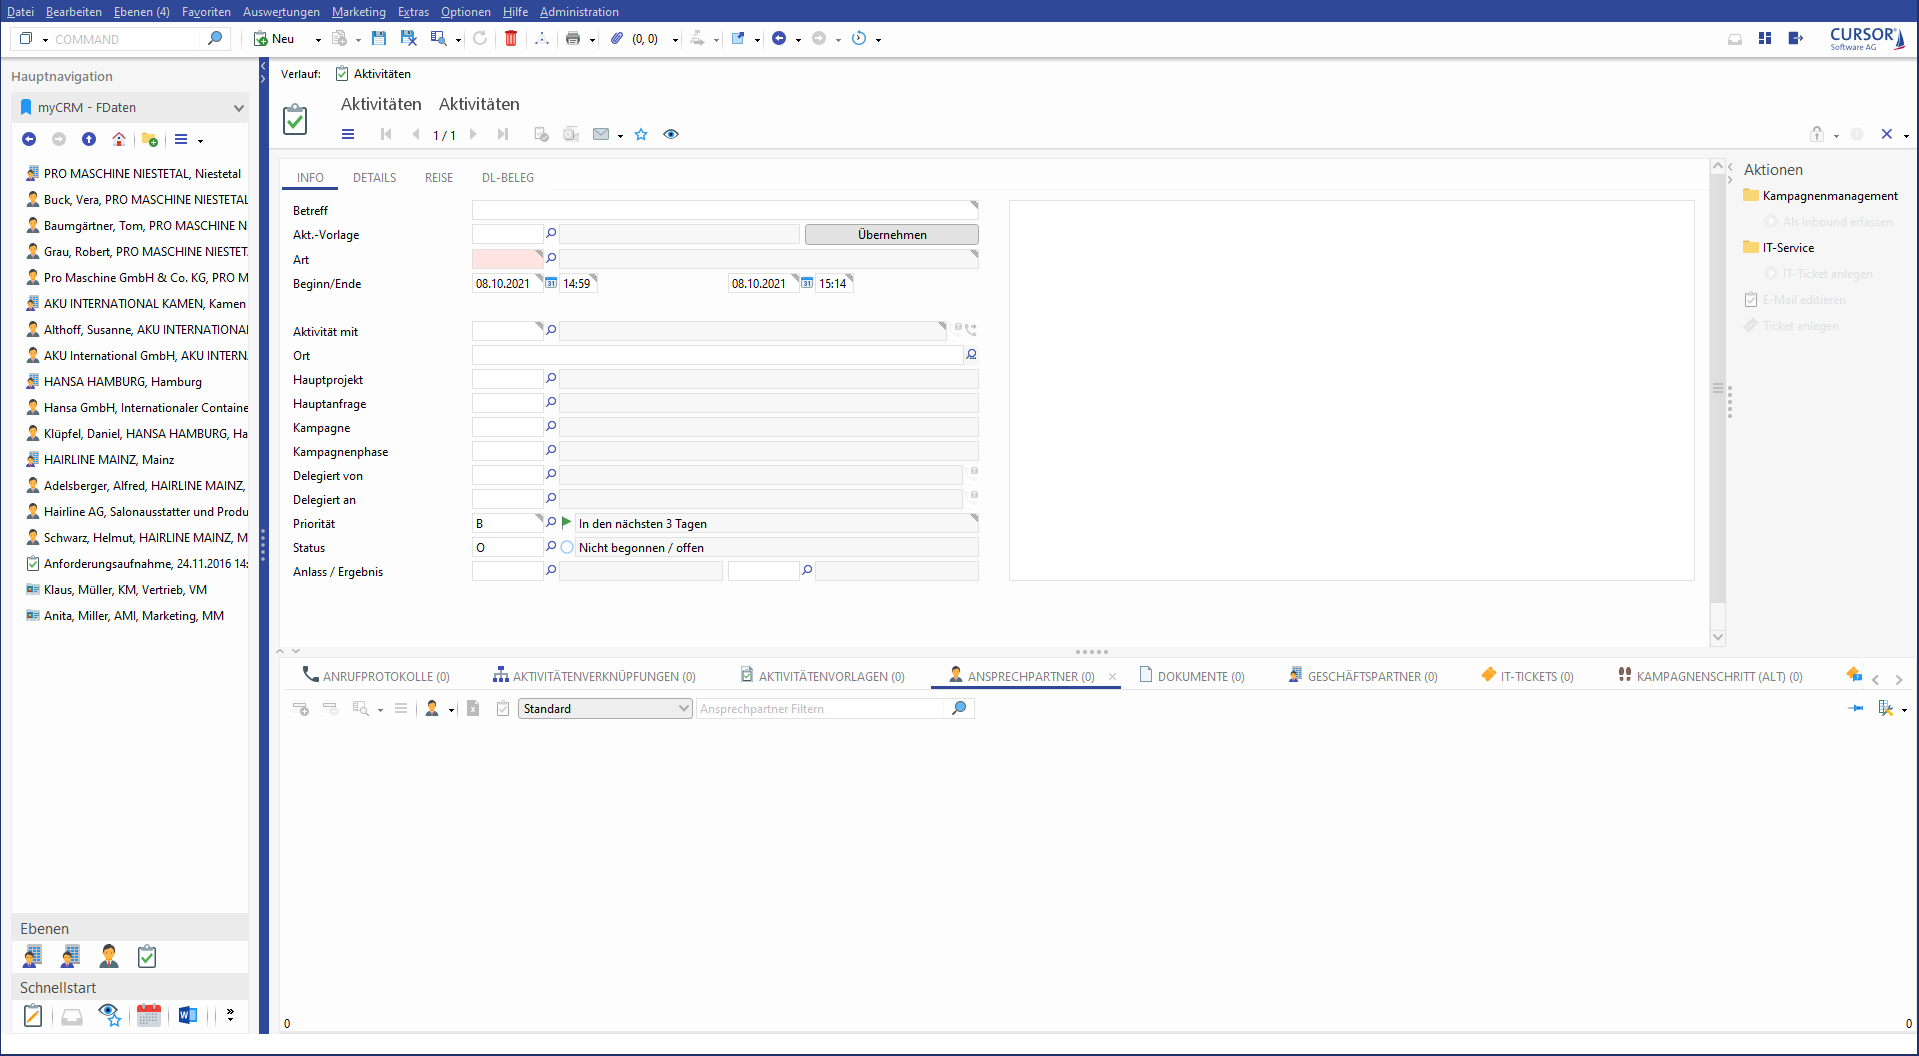
In the next step you turn towards activities. These support you in appointments and contacts.
In the sub view of the main window Business partner, the activities to the business partner are shown. You can see that eight activities already exist. The first three have already been generated automatically with the creation of the new business partner and are assigned to those employees you have assigned to the new business partner in the fields 'Sales manager', 'Employee sales' and 'Key account manager'. The activities are reminders and are there to inform the employees about a the new business partner respectively interested person. If required, you can complete the activity texts with additional news or information.
In some way, someone has shown interest in your house. Independent from the fact, whether this is caused by a personal conversation or a letter, you should record this process as activity.
-
For creating a new activity, click the button

-
In the fields Subject and Description enter a text - just like you can see on the image. With just a few words, the subject should reflect the content which will make the activity easier to find. In this example, the description reflects the main content and the result of the conversation.
If you are not creating the activity on the same day, change the date in the fields Starts on and Ends on. Click the calendar-icon and select the desired date. You can also mark the day and month if desired and enter the number directly.
In the time fields Starts on and Ends on you enter the time of the phone conversation.
For Type select 'TELIN' for incoming phone call because you were called by the contact person. You can already set the status 'Done' (button
The fields Delegated to and Delegated by your matchcode has already been entered. For Activity with you enter the contact person.
Occasion and Result are important to reports. With our example one could evaluate activities by analyzing how many inquiries have come to reactions and how successful they have been. -
Save the activity by clicking

You have arranged a meeting with your contact person. Create an activity in your calendar for that. For synchronization with the message system, this meeting is also entered into the calendar of the message system. -
You are still in the main window 'Activities'. Click on
-
Enter the reason of your meeting into 'Subject'. In Description you write down the points you would like to talk about with your contact person or which you have to think about for this meeting. In Starts on and Ends on you enter the date of the meeting. In the time field Starts on you enter the time of your date and in Ends on its expected end. For 'Type' select "MEETING". With that, the calendar entry is marked as "booked" in the message system. The status is "open". Now this activity can be viewed in the activity overview as upcoming date. Fill out the remaining fields like shown in the image.
-
Save the activity by clicking
The easy way to create a letter
With CURSOR-CRM the correspondence becomes even easier to operate:
-
Start of CURSOR-CRM
-
Transfer of data from CURSOR-CRM into the document template.
-
Management of the documents.
A letter is a contact. Therefore, each letter is created from an activity and saved to it. This again simplifies the finding process of the letter.
Assume that the meeting has taken place and that you would like to submit a few more documents to your contact person. You have now edited the activity to the meeting and you are still in the main window 'Activities'.
-
Click on
-
Enter in Subject the text you want to have in the subject line of the letter. For Type select "MAILOUT".
A contact person has to be assigned to the activity in order to be able to create a single letter. Therefore, enter your contact person in Activity with -
Click the button

If a document already exists to that activity you can see that via the
-
As document template choose BLANK and confirm with OK. The document template is a Word template file (.dot<x>), which contains the formattings for the letter format and placeholder for the data from CURSOR-CRM.
-
The single letter is saved as document in CURSOR-CRM. For the document dataset a Subject is queried. This is pre-assigned with the subject from the activity. You can change it. This subject will not be used in the letter. Confirm with OK.
-
Word is initiated and the single letter is created. Addressee, sender, addressed as and salutation are automatically generated. You only have to enter the text. Now this is your letter!
-
Before you exit Word, print the letter.
-
When closing the document you are asked whether you want to save the changes. As you can see in the headline of Word, CURSOR-CRM has already assigned a name.

The document has directly been saved upon creation. Therefore, your entries are changes to the document. Confirm to save the changes. -
In the tree and on the button
In the following dialog window the single letter is listed and already marked. Click
When you want to edit or read the single letter later on, select in the menu to the switch ![]()
When you open the single letter with 'Edit', the dataset is always copied to have a change history available. If you only want to read the single letter then you should only open it with 'Read'. This will not create a copy of the dataset, which is not required.