Basics
The Excel templates are integrated directly into the application like the Word templates (saved to the CRM database). Management is therefore done entirely in the admin console. That has the following benefits:
-
Rights manager by template
-
Maintenance and internationalization of the menu structure
-
Internationalization of Excel templates and menu structure
-
Distribution via customizing transport
There are two variants for the generation of Excel files:
-
COM (The execution is done via the Windows client using Microsoft Excel)
-
NATIVE (the Excel template is populated on server side with CRM data and then forwarded to the client for macro execution)
The NATIVE variant offers the following benefits:
-
The Excel template is available on the Web Client
-
High-performance filling of large data volumes into the Excel template
-
no client lock-out
-
Support of the new OOXML formats (no limitation to 65000 rows in the generated Excel file)
-
Asynchronous execution on the mass data server - same procedure as the serial letter with single documents
-
Microsoft Excel installation
A Microsoft Excel installation on the relevant client for the execution of VBA macros is still required for both variants (COM and NATIVE). A server-side execution of the macros is not supported. -
Module license
The module license "Customizing" must be available. -
Selection quantities
The action right "Maximum varying search result limit" (admin.search.topcount.permission) is required to select data quantities > 10000
Key characteristics of bidirectional Excel integration
-
All configuration in Excel integration occurs in the Excel template.
-
Selecting the data source in CRM
-
Fields in the current main mask of the open entity or
-
result quantity of a search
-
-
Writing data from Excel back into the dataset of the currently open entity
-
Optional save of the generated Excel document as an application file directly to CRM
-
Using Excel as a "pocket calculator" for the calculation of complex expressions in the background – the result is written to the dataset of the currently open entity (only available for variant COM)
-
Various configuration options for the output of field content
Differentiation of entity-specific and generally available templates
Generally available Excel templates can always be called up in the application, e.g. also from within the home screen. The back transfer of data is therefore not available for generally available templates, because the source entity (reference entity) can always be different. A search container must be used in the Excel template to select data, since no unique reference entity is available.
Entity-specific templates can only ever be initiated from within their assigned entity. Example: An entity-specific Excel template for 'Contact person' can only be initiated from within the dataset Contact person. This template will not be available in the home screen or in another open entity.
Advantage: Data can be exchanged in both direction between the open home screen and the Excel template.
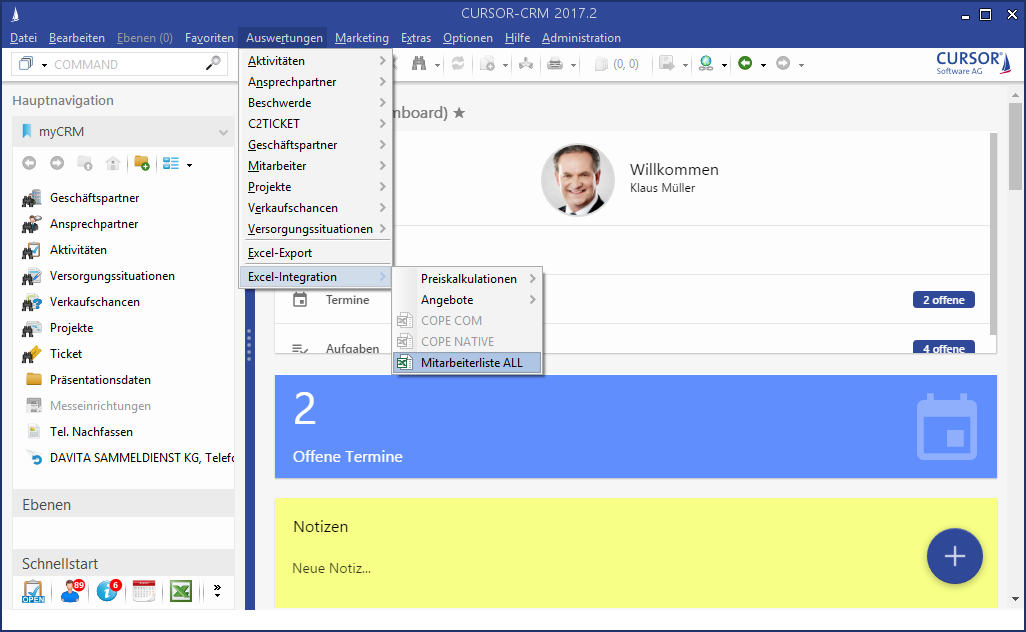
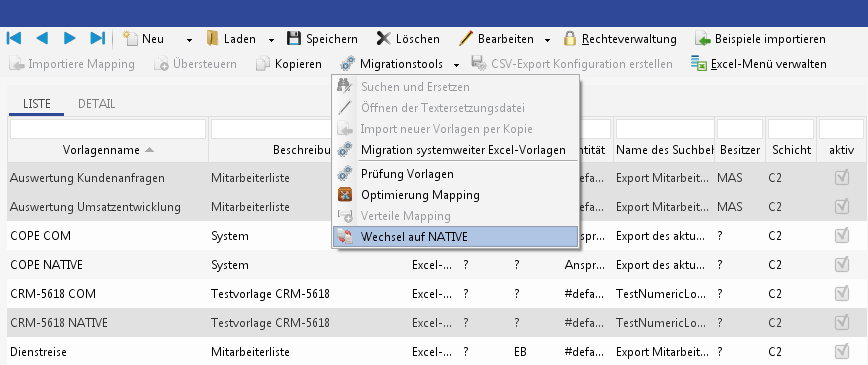
Figure: Menu with inactive entity-specific Excel templates (contact person = COPE)
Using Excel templates in the application
Invoking the Excel template
The following options are available for invoking Excel templates:
-
Menu reports/Excel integration
-
Menu reports (mixed with Jasper reports)
-
Entry in myCRM
(via Drag&Drop from the reports menu) -
External invocation of type EXCELTRANSFER (→ External Invocation)
Note regarding the availability of Excel templates
An Excel template is not available if
-
multiple entries are selected in a list
-
it is an entity-specific template and its entity does not match the currently open entity
Procedure overlook of the use of Excel templates
Procedure for entity-specific templates
COM variant
-
Open an entity in the main mask (e.g. 'Contact person')
-
Select an Excel template via the menu path Reports / Excel integration
-
Copy the Excel template to the local CRM document directory
-
The data from CRM will be transferred to the Excel file copy.
-
A previously configured macro will now be executed.
-
Data transfer from Excel to CRM - immediately or whenever the Excel file is saved.
-
Users can make changes and save. (see previous step with regards to saving)
-
Close the Excel file.
-
Where configured, the Excel file will be saved as a document to CRM and linked to the current entity in the main mask. A wizard for the input of the document subject will open. Canceling the wizard allows the user to prevent saving as a document in retrospect.
-
A save prompt will appear as usual when exiting the dataset in CRM, provided data was written back to CRM. Alternatively, the current dataset can be saved automatically as part of the data transfer to CRM to prevent this prompt.
NATIVE variant
-
Open an entity in the main mask (e.g. 'Contact person')
-
Select an Excel template via the menu path Reports / Excel integration
-
The data from the CRM is transferred to the Excel file on the server.
-
The populated Excel file is made available in the task list on the server via "Open system jobs".
-
Clicking the task list entry will open the wizard - here the Excel file can be accessed
-
Where configured, a macro will now be executed on the client.
-
Close the Excel file
-
The user can decide in the wizard, whether the Excel file should be filed as a document in CRM. On subsequent pages, the contact person and business partner can be additionally linked.
-
The user exits the wizard
-
Follow-up actions will now be executed depending on the configuration
-
Save as document with link
-
Write-back of the data to the reference dataset in CRM
-
Workflow for generally available templates
COM variant
-
Select an Excel template via the menu path Reports / Excel integration
-
Copy the Excel template to the local CRM document directory
-
The data in CRM is selected via the saved search and then transferred to the copied Excel file.
-
A previously configured macro will now be executed.
-
The user can make changes and save.
-
Close the Excel file.
-
Where configured, the Excel file will be saved as an application file in CRM.
-
The generated Excel file will be linked to a currently open entity where possible. Where that is not possible (e.g. no entity is open or the entity doesn't support documents), then the Excel file will be saved as an individual document in CRM and opens in its own level.
NATIVE variant
-
Select an Excel template via the menu path Reports / Excel integration
-
The data from the CRM is transferred to the Excel file on the server.
-
The populated Excel file is made available in the task list on the server via "Open system jobs".
-
Clicking the task list entry will open the wizard - here the Excel file can be accessed
-
Where configured, a macro will now be executed on the client.
-
Close the Excel file
-
The user can decide in the wizard, whether the Excel file should be filed as a document in CRM. On subsequent pages, the contact person and business partner can be additionally linked.
-
The user exits the wizard
-
The Excel file will now be saved and linked (where possible) as a document in CRM
Advantage: Everywhere availability. Disadvantage: No transfer back to CRM.
Detailed workflow for the use of a native Excel template
The wizard opens and displays the wizard home page for executing the selection, once the Excel template is invoked via one of the call points mentioned above.
A direct execution of the search and an Excel file generation will also be possible, depending on configuration. In that case, the first page displayed would be the follow-up page "Export file".
Wizard page "Select data"
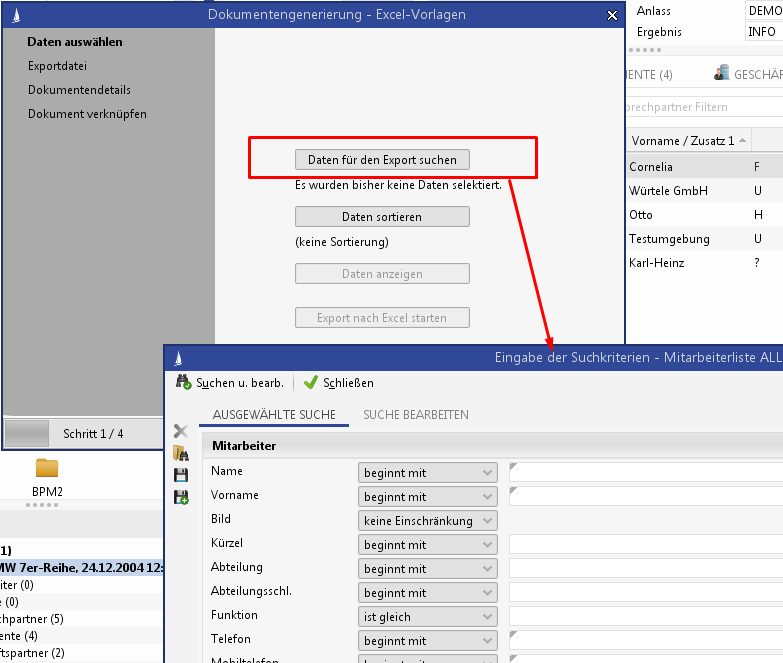
Figure: Excel template wizard - inputing the selection criteria
-
Button Search data for export
The search dialog for inputting the search criteria opens. The execution of the search action closes the wizard and the search is executed on the server. A message regarding the server-side search execution appears (similar to 'Serial letter with separate documents').
The search is executed on the Windows client via the 'Search' button in the search mask. In the Web Client, that is done via a separate button on the wizard page.
The selection result will land in the list of open system jobs after a short delay. Here, the wizard can be restarted via the action "Continue wizard" or ended altogether via the action "Cancel wizard".
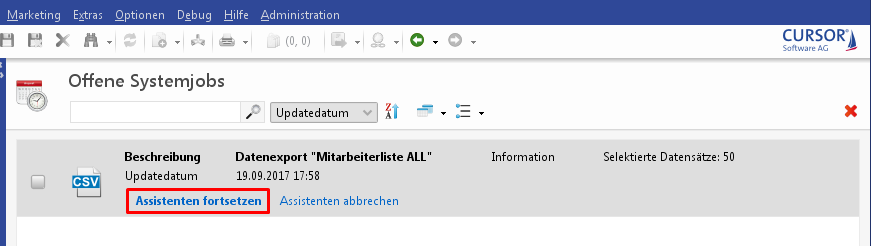
Figure: Excel template wizard - result of the execution in the open system jobs
The selection results can now be viewed and edited.
-
Sort data button
As with a serial letter with separate documents, the selection result set can be sorted by individual fields in ascending/descending order.
Below the button, the sort fields are output as text.
-
Show data button
The selected data is displayed in the selection browser for manual rework. The user can remove individual datasets from the selection results. In the Windows client, a declinable message regarding the automatic save of the changed selection results will be displayed.
-
Start export to Excel button
The export execution will close the wizard. The Excel template will now be populated on the server.
A message appears beforehand indicating the server-side execution of the export action (based on 'Start search')
After the export action has been executed, the task returns to the list of completed system jobs and can be continued there.
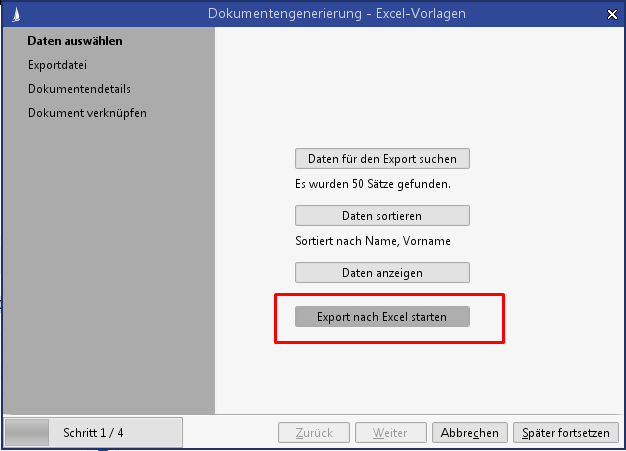
Figure: Excel template wizard - Export start to Excel
Wizard page "Export file"
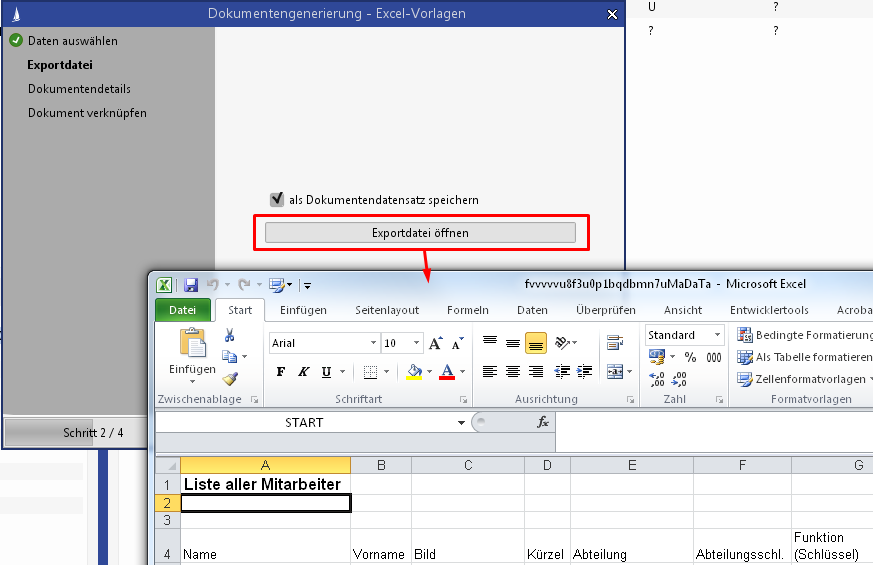
Figure: Excel template wizard - Open the populated Excel file
-
Checkbox Save as document dataset. (The selection field is only offered in the assistant if documents can be assigned to the reference dataset and the user has the action right to create new documents.)
No other wizard pages will be offered if the checkbox is not selected.
Up to two more wizard pages for saving and linking the Excel file in CRM will be offered to the user if the checkbox is selected (like in the document import wizard). The Excel file will then be assigned to the reference dataset
Reference dataset = the dataset open in the application at the time of the Excel invocation).
-
Open export file button
The generated Excel file opens. The customer-specific macro will be run when the Excel file is opened for the first time. The macro execution may take some time for larger data volumes or complex VBA logics.
Web Client behavior
In the case of "Use the extended file handling feature", clicking the button changes the label from 'Edit export file' to 'Return export file'
If the user does not use the "Use the extended file handling feature", the label is 'Download export file'. A copy of the export file will be downloaded and returning the file will in this case not be possible.
Wizard page "Document details"
The display of this wizard page depends on the user setting 'Import of documents'. It will only be displayed if the option 'Execute using full wizard' is selected, otherwise the page will be populated automatically and will not be displayed

Figure: Excel template wizard - Entering document details
Wizard page "Link document"
It is only possible to link to the business partner if business partners are assigned to the reference dataset.
Otherwise, the option 'with all business partners' is not offered.
It is only possible to link to the contact person if contact persons are assigned to the reference dataset.
Otherwise the option 'with all contact persons' is not offered.
Please note that the display of this wizard page depends on the user setting for 'Import of documents'. The page is displayed if the option 'Execute using full wizard' or 'with partial wizard for BP and CP linking' is selected, otherwise the page will not be displayed.
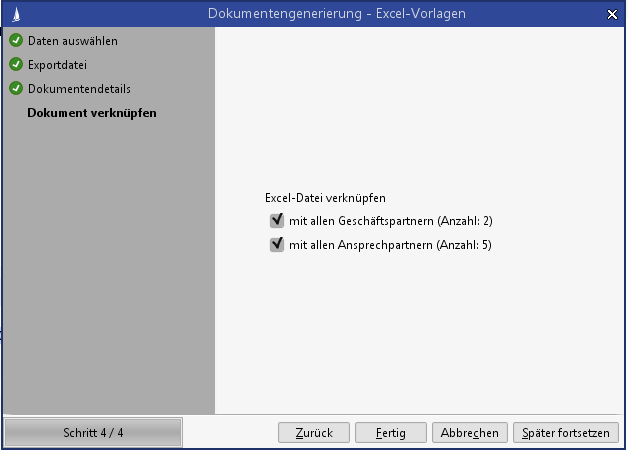
Figure: Excel template wizard - Linking the Excel document
Follow-up activities will be executed when the wizard is done
-
Save as document with link
-
Write-back of the data to the reference dataset in CRM (where configured)
Exiting the wizard in the Windows Client
The system will check if the generated Excel file is still open before the wizard closes. The user will be prompted to close the Excel file if that is the case. Message:
“The wizard cannot close because the export file 'xyz.xlsm' is still open in the background. Please close the export file to continue."
The automatic opening of generated Excel documents
The automatic opening of generated Excel documents is also available in the Excel generation wizard and can be used in the corresponding constellation.
Condition: The wizard is opened directly with the "Export file" wizard page.
In the following scenarios, the wizard is opened directly with the "Export file" wizard page:
-
In the BPM process, one of the following two server actions is selected in the Excel mass data task
-
"Execute all chosen actions and open wizard" or
-
"Execute all chosen actions without wizard" (in combination with a macro-based Excel template)
-
-
Open a cached Excel wizard with the last opened wizard page "Export file"
Configuration of Excel templates
Excel templates are maintained in the "Template management" section of the admin console. The Excel template management mask is based on the mask for Word templates.
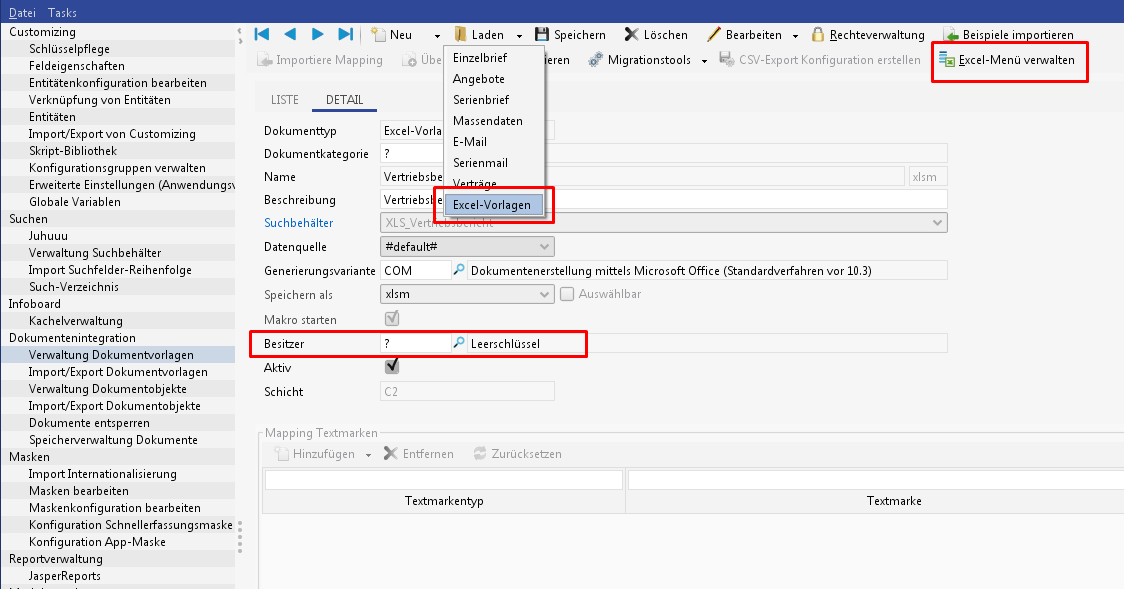
Figure: Administration console - Document template management
The following special features are available for Excel templates:
-
New document type "Excel templates"
Available for the creation and loading of document templates -
The following attributes continue to be maintained in the Excel template and will only be displayed in the admin console (no changes can be made via the admin console)
-
Search container
-
Start macro
-
-
Data source
-
'#default#
Signifies a generally available Excel template without links to any entity -
Name of the entity
Indicates an entity-specific Excel template. This template can only be accessed while a dataset of this entity is open.
-
-
Generation variant
-
COM
The Excel file will continue to be generated via COM connection. Consequently, this Excel template is not available in the WebClient.
The output format in this case is limited to "xls" - maximum number of lines = 65000. -
NATIVE
The Excel file is generated on server side. No Excel instance will be required on the server.
The output formats "xls", "xlsm" and "xlsb" can be selected. The output format "xlsm" or "xlsb" must be selected if more than 65000 datasets are expected.
-
-
Owner
-
Empty key
The Excel template is available to all users across the system. Availability can be further restricted by rights management.
(These are the Excel templates from the former system-wide Excel template directory) -
User token
The Excel template is available to the selected user only. Other users cannot see this template.
(These are the Excel templates from the former user-specific Excel template directory)
-
-
'Edit' button
Open and edit the Excel template file
Excel menu administration
The reporting menu in the application is managed via the button of the same name in the toolbar. The structure of the reporting menu and the internationalization of its folders and Excel templates can be adjusted here.
Menu structure
Select the System option to manage the system-wide Excel templates. Here you can create folder structures and add system-wide Excel templates as needed. Each Excel template can only be displayed once in the menu.
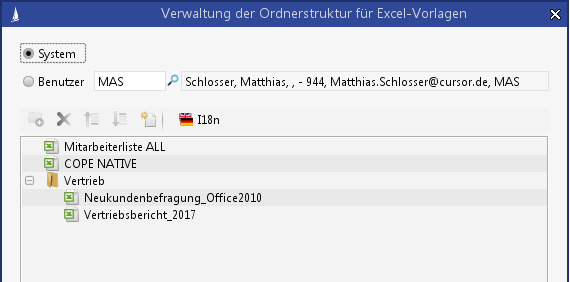
Figure: Administration console - Managing the Excel menu structure for system-wide Excel templates
Select the option "User" and the relevant token to manage user-specific Excel templates. The Excel menu structure for the user-specific Excel templates for the selected user will be displayed. Only user-specific Excel templates of the selected user can be added

Figure: Administration console - Managing the Excel menu structure for user-specific Excel templates
As a result, the system will display a mix of the system-wide and user-specific menu structure in the application.
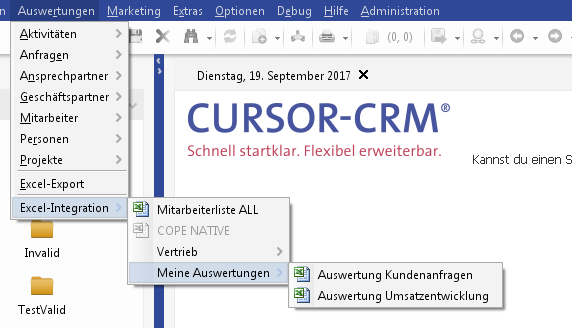
Figure: Excel menu structure result
Special feature of the mixed reporting menu
The menu item Reports allows for a mixed structure of Excel templates and reports. All Excel templates across the entire menu contain the Excel icon. All report entries contain the icon of the file type they create. It will suffice to name a directory 'Report' at the top level of the menu structure. The Excel report can be placed in the relevant submenu if the menu subdirectory name is additionally used. The internal menu names (entity names in English) should always be used here, so that the Excel template assignment in the reporting menu will always work, no matter the language used in the client.
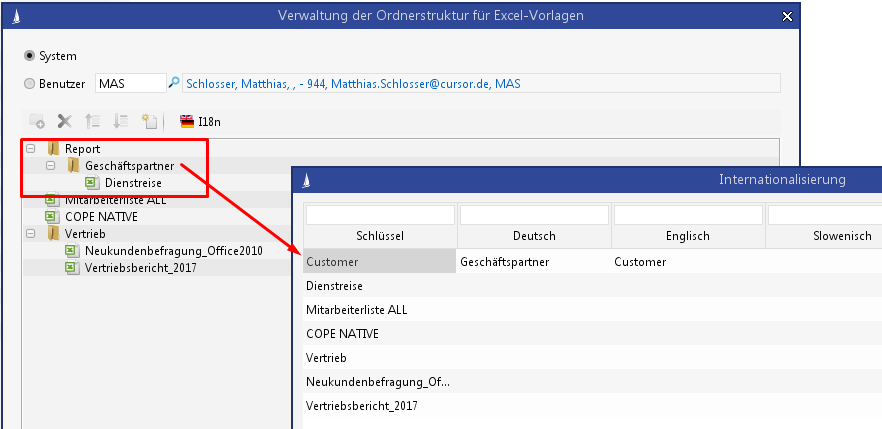
Figure: Administration console - Managing the Excel menu structure in the reporting menu
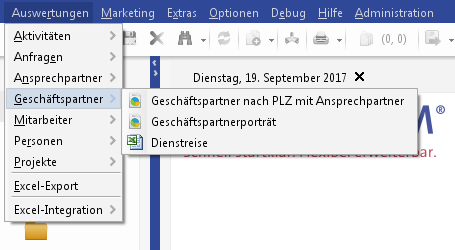
Figure: Result of the Excel menu structure in the reporting menu
Changes to the folder structure will only be effective after a restart of the client!
-
Folders or Excel templates can be moved to other folders via Drag&Drop.
-
Folders and Excel templates are moved with one of the two buttons in the toolbar.
-
The Excel templates will not be mixed with the existing reporting menu in the Web Client. Instead, these Excel templates will be integrated into the existing Excel menu structure.
Internationalization
The internationalization of the folders and templates is done in the menu structure management via the button of the same name.
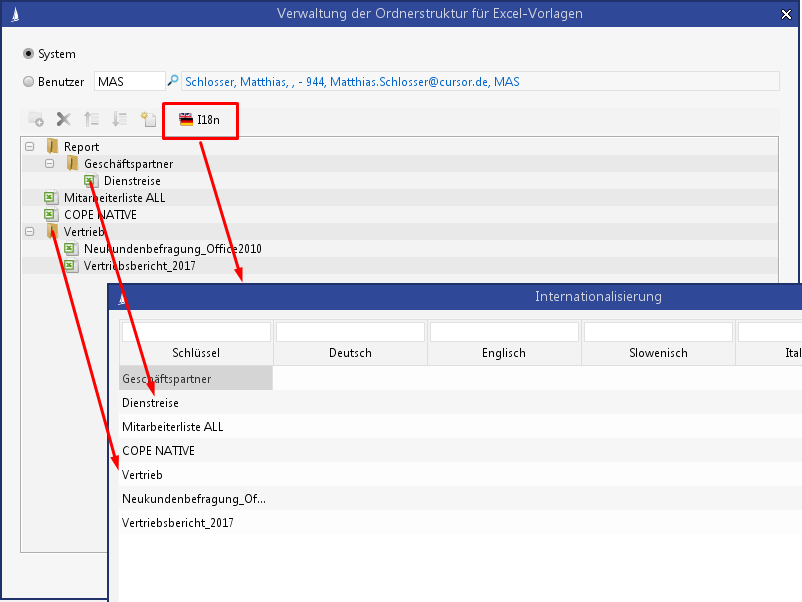
Figure: Internationalization management in the Excel menu structure
Other characteristics
The menu item Business trip (Excel) under Report can now be deactivated via an internal system parameter.
The syntax for Oracle is:
DELETE FROM PropertyMapper WHERE pk = 'PkDefaultMenuBar$ExcelExport';
INSERT INTO PropertyMapper (Pk, id, property, propertyType, principal, Active, CreateUser, UpdateUser, CreateDate, UpdateDate, propertyValue)
VALUES ('PkDefaultMenuBar$ExcelExport','DefaultMenuBar$ExcelExport', '', 'SYSTEM', '', 1, 'TECH_USER', 'TECH_USER', SYSDATE, SYSDATE, 'false');
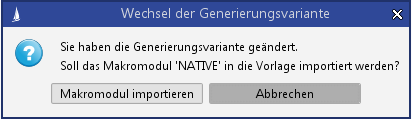
Switch type of document generation
The value NATIVE must be entered in the field 'Type of generation' for a server-side generation of the Excel template. The subsequent prompt regarding the import of the macro module must be answered with 'Yes'. Otherwise any customer macro potentially available in the template would not be run automatically.
The type of document generation can also be switched from within the list view. The switch will be done for all selected entries.
Limitations when using NATIVE
No full support of the CONF_PKLAYOUT = LINK parameter
Primary key fields (not to be mistaken for lookup fields in entities) can be represented by a link with the option to switch to CRM directly. The only text displayed is the primary key.
NATIVE availability
The generation type NATIVE cannot be used for all Excel templates. An Excel template will be exempted from server-side export file generation if one of the following conditions is met:
-
The Excel template uses the transfer of data back to the main screen
-
The data is read directly from the main mask instead of from a search
Parameter CONF_SEARCHNAME is empty -
Limited support for a visualization of the lookup fields based on field attributes
Not supported are-
CONF_LOOKUPKEYLAYOUT = FIELDPROPERTY
-
CONF_LOOKUPENTITYLAYOUT = FIELDPROPERTY or ALL_LOOKUPFIELDS.
-
In such a case, the Excel template can still be used with the generation type COM and will therefore only be available in the Windows client.
Special features of the customizing transport
Changes to system-wide Excel templates or the Excel reporting menu must always be assigned to a package if customizing transport is activated. System-wide changes cannot be applied in the production system and must be done in the development system instead.
Changes to user-specific Excel templates or the user-specific Excel reporting menu can also be done in the production system. A package will not be requested. Switching from a user template to a system template or vice versa will be denied when the customizing transport is activated.
Excel template configuration
Excel integration configuration is done in the template. The behavior of the Excel integration can therefore be individually defined for each template. Every Excel template must contain a spreadsheet named CONFIG. It contains the configuration details for the data transfer.
![Konfiguration-der-Excelvorlage[1].jpg](/__attachments/a_bbd1cca929f1b961954239ec8827553840ba02a44a909347d83949a665393531/Konfiguration-der-Excelvorlage%5B1%5D.jpg?cb=18279c5aebc66b2fb3a7794cfa9a08f2)
The spreadsheet CONFIG is divided into the following three groups:
-
Export configuration
-
Import configuration
-
General configuration
A group can be opened via the 'Plus' button or the level buttons 1-3 in the toolbar on the left.
CRM to Microsoft Excel export configuration
The following details the configurations of the two export types.
![Konfiguration-des-Exports[1].jpg](/__attachments/a_e99a41cdf41a72df85dab9b9afa7f151065b082001eaeb88afdc3d6a0ab48f7c/Konfiguration-des-Exports%5B1%5D.jpg?cb=5e75842148b70bf9477be7b2875e23fe)
Data export using a search
This type allows the forwarding of search results to Excel in the form of a table. That means that virtually any data from the application can be selected.
|
Business partner |
Match Code |
Company / Last Name |
Name Add. 1 / First Name |
Type |
Department Addition |
Starts on |
Description |
|---|---|---|---|---|---|---|---|
|
CURSOR Software AG, (+49)641/40000-0 |
COAL |
Altenhain |
Cornelia |
Ms. |
Production |
29.11.2002 12:00 |
Contract extension |
|
CURSOR Software AG, (+49)641/40000-0 |
COAL |
Altenhain |
Cornelia |
Ms. |
Production |
24.12.2004 12:00 |
Prospect |
Example for visualizing the search result in Excel.
The following parameters are available:
-
Search name in CRM
-
Show search dialog and selection dialog
-
List of cell names for the start position of the individual tables
-
Insert mode
-
Primary key visualization
![Einstellungen-zur-Datenquelle-Suche[1].jpg](/__attachments/a_617e51610adf913486d5dbf6597d86692c592e17ce66e12dd6709226f78a9e53/Einstellungen-zur-Datenquelle-Suche%5B1%5D.jpg?cb=f6814cf7ee935441a9deb76199f45a0e)
Figure: Settings for the data source 'Search'
Search name in CRM
Enter the name to be used for the complex search. All main search and table search fields are returned, for which the checkbox 
The order of the fields in the search is maintained in the Excel output.
(The parameter cell name is 'CONF_SEARCHNAME')
Show search dialog and selection dialog
The search dialog can be optionally displayed before the search is executed. The user can therefore complete the search parameters with own search criteria. Just like for the serial letter, the modified search can be saved under a specific name to be able to use it again at a later time. The selection results will be displayed in a selection dialog after the search is completed. The datasets selected by the user will be transferred to Excel, once the dialog is confirmed.
The search dialog and selection dialog will not be shown by default. The following values are available for this parameter:
-
ALL or Yes:
Display the search mask before the search is executed. The search result is then displayed in a selection dialog box.
You can process the selection set later or restart the search -
SEARCHDIALOG:
Only the search mask will be displayed before the search is executed. The selection dialog will not e displayed later to allow editing the selection. All selected data will be applied without request for confirmation! -
SEARCHRESULT:
Only the selection dialog for editing the selection will be displayed. The search mask will not be displayed before the search is executed! -
NONE or No:
The specified search will be executed and the result will be forwarded directly to Excel. (Default case)
No display of the search mask or the selection dialog!
(The parameter cell name is 'CONF_SEARCHDIALOG')
The primary key of the current dataset from the main mask can be used for the complex search execution. That allows a limiting of the search results to select e.g. only the data associated with the currently displayed contact person.
A parameter template for the field 'Primary key' of the current entity must be used in the main search of the complex search. The value of the primary key of the current entity is provided in the variable 'PK'.
Example:
<ComplexSearch Pk="Excel... >
<ExtendedSearchMetaData PK="Excel... Templates="Pk.ContactPerson,PK;" ReturnType="RETURN_TYPE_MAIN" ...>
<ExtendedSearch PK="Excel... >
<Query>
<SubQuery operator="de.... entityName="ContactPerson"...>
<Condition searchResultField="true" ...defaultSearchValue="false">
<AttributeName>Pk.ContactPerson</AttributeName>
<Function functionClassName="de.cursor.jevi.common.search.function.InFunction" numberOfParameters="32">
<Parameter parameterClassName="de.cursor.jevi.common.search.template.ParameterTemplate" parameterValue="Platzhalter (wird zur Laufzeit gesetzt)" />
</Function>
</Condition>
The search result of the main search and of all table searches is included. A separate table is inserted in Excel for each main and table search. The result of the complex search is mixed. That means that detail searches will be mixed into the superordinate main or table search.
Cell names for the table start
This cell contains a comma-separated list of positions (cell names) for all result tables, e.g.: TABLESTART1,TABLESTART2.
The cell names can be on any spreadsheet of the Excel template. The export spreadsheet for the data export from CRM will not be included.
(The parameter cell name is 'CONF_TABLESTART')
-
The start position is overwritten by the first field of the table header.
-
All cells to the right of the start cell will be overwritten.
-
A start position must be assigned for each result table of a search (main search + all table searches). The table will be inserted at position A1 if no start position is provided.
Insert mode
Insert mode for inserting table rows.
(The parameter cell name is 'CONF_INSERTMODE')
-
INSERT
A new row is added automatically when rows are inserted into a table to prevent overwriting subsequent data. (Standard)
-
OVERWRITE
No new rows are added when rows are inserted into a table. Existing data can be overwritten.
Primary key visualization
Decides how imported primary keys are displayed in Excel.
(The parameter cell name is 'CONF_PKLAYOUT')
-
LINK
Visualization as a link with option to switch over directly to CURSOR-CRM/EVI. Example:
Altenhain, Cornelia, Roma, CURSOR GIESSEN
-
PLAIN
Visualization as plain text. Example: 'ged-personpk1#contactperson1'
-
REMOVE
Primary key will not be output
Lookup field output for key
The output of the individual columns of a key lookup field is controlled via the entry 'Lookup key layout'.
(The parameter cell name is 'CONF_LOOKUPKEYLAYOUT')
-
ALL: Keys and descriptions are output in separate columns.
-
KEY: Key output
-
DESC: Description output
-
FIELDPROPERTY: The field attribute configuration will be considered for the key field output. The output will therefore be similar to the export from list view.
Supplement for the entry FIELDPROPERTY
Lookup fields for key fields can be divided up into individual columns as part of the export to Excel.
The configuration is done via the menu item Field attributes of the context menu for the relevant field in the mask (only visible for administrators). The option ‘Layout for Excel export’ is provided. A window will open when this option is selected, in which the fields 'Key' and 'Description' are offered.
![Feldeigenschaften-Layout-fuer-Export-nach-Excel[1].jpg](/__attachments/a_319242332909d159352bb1a4c20ea9a8d96f2418e72990553e21a2e3c5c24dfc/Feldeigenschaften-Layout-fuer-Export-nach-Excel%5B1%5D.jpg?cb=2a5c6ebb9a58730c9a79fbb632dcd9e6)
Figure: Field attributes 'Layout for Excel export'
The fields for the Excel export are selected via their respective checkboxes (selected fields are included). The order of the fields in this window also specifies the order in which the fields are exported as individual columns to Excel. Use the 'Sort' button on the left to move fields up or down to change the sort order. The changes are applied immediately, once the field attributes are exited.
In its original state, no fields are selected in the list 'Choice of export fields for Excel'. In that case, the field will not be divided up into multiple columns and the full text will be forwarded to Excel just like it is displayed in the list view.
The layout in the list view is impacted by the following field attributes.
-
Show key field in tabular view and navigator view
-
Show description in tabular view and in navigator view
Look at the matrix below to see the effects of the two field attributes in the list view:
Example based on activity status E = Done
|
|
Key field in lists |
Description field in lists |
|---|---|---|
|
Key field in lists |
E |
[E] Done |
|
Description field in lists |
[E] Done |
Done |
Lookup field output for entities
For lookup fields on entities the field attributes are considered for the export. It makes sense to split the long text into individual columns when exporting to Excel to allow editing and filtering the data afterwards. The configuration is done via the menu item Field attributes of the context menu for the relevant field in the mask (only visible for administrators). The option Layout for Excel export is provided. A window will open when this option is selected, in which all available fields are displayed. (All search result fields of the lookup search on which the layout is based)
The fields for the Excel export are selected via their respective checkboxes (selected fields are included). The order of the fields in this window also specifies the order in which the fields are exported as individual columns to Excel. Use the 'Sort' button on the left to move fields up or down to change the sort order. The changes are applied immediately, once the field attributes are exited
In its original state, no fields are selected in the list. In that case, the full text will be written to a cell in Excel just like it is displayed in list view (see Lookup field output to key). The distribution across multiple columns in Excel will occur, once one or more fields are selected
Column title with entity name
It may make sense to display the name of the entity as part of the column title to avoid duplicate field names. The output of the entity name in the column title is controlled via the entry Column title with entity name.
(The parameter cell name is 'CONF_COLUMNTITLE_WITH_ENTITY')
-
Yes
The name of the associated entity is added to the column title.
![Spaltentitel-mit-Entitaetsnamen-ja[1].jpg](/__attachments/a_cff7ab09bdf177c90f3c3da8fb401b925966f78f6006d2fd146390da3bc907ab/Spaltentitel-mit-Entitaetsnamen-ja%5B1%5D.jpg?cb=171b76031e24601e189b940f7ee8f61f)
-
No
Only the field name will be output as before (standard case)
![Spaltentitel-mit-Entitaetsnamen-nein2[1].jpg](/__attachments/a_8544ac6c67e5ca527ee0ea53dd0b25788b7313ec8a573707b25e6cc481c37556/Spaltentitel-mit-Entitaetsnamen-nein2%5B1%5D.jpg?cb=b136b8971791209958ffec30db8d3f80)
Formatting in Excel
The data types and in part also their formatting will be included when exporting data from CRM. That will guarantee a unified format for the entire column, even if it includes values that could be interpreted by Excel with a different format.
-
Numeric fields
Value output as number category, taking into consideration the field attributes 'Display digits' and 'Unit'.
Example
-
Date fields
Value output as date category, taking into consideration the output 'Time' from the CRM application.
Example
![Datum1[1].jpg](/__attachments/a_e8f757ecf842613568ef39978c3e6efe4cf7cda027305a4490d3aa98244bf70b/Datum1%5B1%5D.jpg?cb=20a03a9e96c0fc9000fd5d9a69d92faf)
![Datum2[1].jpg](/__attachments/a_92739bfed9ee839ca204ac3a29500e28f41aca1bbb5659df2f15416f5d92ec8d/Datum2%5B1%5D.jpg?cb=c6e6bc634bd1296143c122f028325c64)
-
Text fields
Value output as text category. In contrast to previous behavior, the cell content will always be displayed as text, even if the text input field could be interpreted differently by Excel, e.g. if it only contains number characters. That means that the 'Street number' or 'Freetext1' will now always be displayed as text in Excel, no matter what value the field contains.
![Textfelder[1].jpg](/__attachments/a_17b6fb3893d287640ba6ecfd77feea730ac47e05cb66a8d4b58f1e62c6f924e7/Textfelder%5B1%5D.jpg?cb=a8d3339315ebe57e8f732b4e0d45dda9)
Column sorting in bidirectional Excel templates
Search results from complex searches can be transferred to Excel via the bidirectional Excel interface. The column sort order assignment was optimized for this transfer. The user has additional options to change the order of the columns.
-
Changing the field order of the search
The field order for the Excel export is determined by the field order in the complex search of the Excel template on which the search is based. When a field in the complex search is moved, then the change will also affect the Excel template.
Already possible:
Column sort order for Excel export = field order of the complex search
Disadvantage
The order of the fields that are handed over as part of a bidirectional Excel calculation cannot always be defined completely, and specifically not if fields from an associated entity are added to the mix. A change in the order of the fields will mean that any references and calculations done previously will no longer fit and will have to be repeated for the new structure, which is not always easy (especially when this entails formulas).
-
Specified column sort order in the spreadsheet
Defining the column titles in the template means that the user can specify the column sort order for each table search.
All fields of a table search will be transferred as usual from the start position in Excel (standard case). Should the inserted row of the start position of a table search already contain internationalized column titles, then their sort order will be used as specification.
How can a sort order specification in the Excel template be created quickly?
-
Prepare the bidirectional Excel template as usual
-
Test the execution of the Excel template complete with a transfer of the table data
-
Copying the transferred column headers into the original Excel template.
The column headers must be inserted at the output position of the table search. -
Adjust the column sort order of the column titles in the Excel template as needed
-
Save the Excel template - that's it
-
The parameter 'CONF_USE_COLUMNSORT_IN_EXCELSHEET' must be added to the CONFIG tab of the Excel file and confirmed with 'Yes' to include the specified column sort order in the spreadsheet. Existing column titles in the spreadsheet will not be included (standard case).
-
Changes to the internationalization
The column titles in the Excel templates with a defined sort order must be checked and updated as needed when changes are made to the internationalization of field names. -
Reading the column specifications
The column titles are read from the Excel template first, before the data is transferred to Excel. Reading begins at the output position of the table. All cells to the right of the output position (including the output position) will be uploaded in order one at a time. The reading ends when an empty cell is encountered. -
Missing values in the column specifications
All fields from the table search that are not listed in the Excel template will be appended after the last defined column of the Excel template. The process considers the field sort order of the complex search as well.
Possible causes:-
New fields were added to the search.
-
The internationalization of some fields has changed.
-
-
Unknown fields in the column specifications
All column headers that are not included in the table search remain empty
Possible causes:-
Fields were removed from the search.
-
The internationalization of some fields has changed.
-
E.g. a space was entered into the column title to generate an empty column
-
Formatting the imported table data
As part of the table data import, column widths, row heights and column titles of the table will be formatted to optimize the layout. This formatting feature for the imported table data can be deactivated.
Advantage: Slight performance increase
The parameter 'CONF_FORMATIMPORTEDDATA' must be added to the CONFIG tab of the Excel file and confirmed with 'No' to deactivate the formatting of imported data. The default setting is 'Yes' (even if the parameter entry is missing). That guarantees identical behavior at all times. For standard use, no changes will be needed.
This function should only be used if formatting in the table and the column titles is of no consequence.
Use of internal field names
The internal field names (e.g. LastName.ContactPerson) can now also be exported to Excel instead of the internationalized field names (e.g. Last name).
Advantage:
-
Once the Excel template is changed over, changes to the language or the internationalization of the fields will have no effect on the Excel template. The internal field names will always be used.
-
There will be no need for later changes to the customer-side VBA logics or PivotTables.
-
There will be no need for later changes to the pre-sorting in the Excel template.
-
Changeover of the templates
The templates must be changed over to the internal field names manually. The templates will remain executable if this changeover is not done, but they will remain sensitive to language changes or changes to field names.
How do I change over the templates?
1. Manually add the new CONFIG parameter CONF_COLUMNTITLE to the CONFIG tab in the Excel template.
This parameter controls the field name output - internationalized or the internal field name with short or long name (more details about the configuration parameter later on). The default is 'Internationalized' to guarantee the previous behavior.
2. The administrator activates the new CONFIG parameter (Value: INTERN_SHORT or INTERN_LONG) and tests the Excel template.
Result: The selection fields in the complex search are output in the Excel file with their internal names.
3. Now follows the manual changeover, e.g. change of the field name in macro code, PivotTable or a pre-sorting of the output columns.
-
Explanation of the configuration parameter
|
Title |
Default |
Explanation |
|---|---|---|
|
Output type is column title during export |
I18N
|
I18N = The internationalized field names are used as column headers (default case)
|
|
Additional row with internationalized column titles |
No
|
Yes = The internationalized field names are additionally displayed in a separate line.
|
The CONFIG parameter 'Column title with entity name' (CONF_COLUMNTITLE_WITH_ENTITY) is not considered if the internal field name is used.
Column title characteristics
|
Type |
CONFIG parameters
|
Column title |
|---|---|---|
|
Default field
|
I18N
|
[I18n Field name] OR
Examples:
Output of the entity name depends on the CONFIG parameter 'Column title with entity name' ( |
|
Default field e.g. StartDate.Activity |
INTERN_SHORT |
[Fieldname.Entityname] Example:
|
|
Default field e.g. StartDate.Activity
|
INTERN_LONG |
[Searchalias][Relationpath].[Fieldname.Entityname] Examples:
|
|
Lookup field 'Key' e.g. ActTypeKey.Activity |
I18N
|
[I18n Field name]
OR
Examples:
Output of the entity name depends on the CONFIG parameter 'Column title with entity name' (CONF_COLUMNTITLE_WITH_ENTITY). |
|
Lookup field 'Key' e.g. ActTypeKey.Activity |
INTERN_SHORT |
[Type=KEY|DESC][Fieldname.Entityname] Examples:
|
|
Lookup field 'Key' e.g. ActTypeKey.Activity |
INTERN_LONG |
[Searchalias][Relationpath]# [Type=KEY|DESC].[Fieldname.Entityname] Examples: MYACT#KEY.ActTypeKey.Activity
|
|
Lookup field 'Entity' e.g. DefaultContactPerson.Activity |
I18N
|
[I18n Field name]
OR
OR
Examples:
Output of the entity name depends on the CONFIG parameter 'Column title with entity name' (CONF_COLUMNTITLE_WITH_ENTITY) Output of individual fields of the entity lookup field depending on 'Lookup entity layout fields' (CONF_LOOKUPENTITYLAYOUT). |
|
Lookup field 'Entity' e.g. DefaultContactPerson.Activity |
INTERN_SHORT |
[Type=KEY|DESC][Fieldname.Entityname]
OR
Output of individual fields of the entity lookup field depending on 'Lookup entity layout fields' (CONF_LOOKUPENTITYLAYOUT). |
|
Lookup field 'Entity' e.g. DefaultContactPerson.Activity
|
INTERN_LONG |
[Searchalias][Relationpath]#[Type=KEY|DESC].[Fieldname.Entityname]
OR
Examples:
Output of individual fields of the entity lookup field depending on 'Lookup entity layout fields' (CONF_LOOKUPENTITYLAYOUT) |
Data export from the current main mask
This variant allows the export of all data from the current main mask to Excel. Data from the submask will not be transferred.
![Export-der-Daten-aus-dem-aktuellen-Fenster[1].jpg](/__attachments/a_4cce02b06191b420ac73ce8c3a5f7230d416eaaa3f1ebd19adfb55a9356ab101/Export-der-Daten-aus-dem-aktuellen-Fenster%5B1%5D.jpg?cb=21c4d0aef920664b7ad7c45039d3b845)
Only the source fields from CRM and the target cells in Excel must be listed in the group Export configuration from the main window. Any number of fields can be imported.
The target cells must currently have a name and must be on the spreadsheet specified for the data export from CRM (the spreadsheet entitled INCOMING in the standard case).
For more details, see Other configuration parameters spreadsheet for data from CRM (export).
-
The export via search must be deactivated (no search entered) to allow the data export from the main mask.
-
The field names used in the main mask can be determined easily using the mouse and holding the Ctrl key; the field name is displayed in the lower status bar.
-
This variant cannot be used for generally available templates.
Configuration of the import from Microsoft Excel to CRM
Excel data can be imported into the current CRM main mask.
![Konfigurations-des-Imports-von-MSExcel[1].jpg](/__attachments/a_dade2153581b491ce69d46ee524cd05f497d9a75e7c39c4258ab26ff907f29ec/Konfigurations-des-Imports-von-MSExcel%5B1%5D.jpg?cb=f9312cfe609374ed7f4323950ee61bf5)
All target fields in CRM and the source cells in Excel must be listed in the group 'Import configuration'. Any number of fields can be imported.
The target cells must be currently named and must be on the spreadsheet to be used for importing the data into CRM (the spreadsheet entitled OUTGOING in the standard) – see Configuration parameter spreadsheet for data into CRM (import).
The data import to CRM can be set up with a time delay; see also 'Other configuration parameters'.
-
The field names used in the main mask can be determined easily using the mouse and holding the Ctrl key; the field name is displayed in the lower status bar.
-
The back transfer to CRM cannot be used for generally available templates.
Other configuration parameters
General configuration
|
CRM |
Default |
Explanation |
|---|---|---|
|
Auto save of changes in CRM |
No (Name of the cell: CONF_APPL_AUTOSAVE) |
Auto save the dataset in CRM after the data transfer to CRM |
|
Save as application file |
No (Name of the cell: CONF_APPL_CREATEDOCUMENT) |
Yes: The generated Excel document will be saved as an application file in CRM. The document subject is entered via the wizard. |
|
Prevent direct opening from the task list |
No (Name of the cell: CONF_APPL_AVOID_INSTANT_OPEN) |
Yes: The generated Excel document cannot be opened directly from the task list
|
|
Version
|
- (Name of the cell: CONF_APPL_VERSION) |
The current version name, e.g. EVIJET, CARMEN, etc.
|
|
System name
|
-
|
Name of the system from the CT system settings
|
|
System type
|
- (Name of the cell: CONF_APPL_SYSTEMTYPE) |
Type of the system from the CT system settings, DEV, TEST, PROD, UNKNOWN
|
|
EXCEL |
Default |
Explanation |
|
Spreadsheet for data from CRM (export) |
INCOMING (Name of the cell: CONF_SHEETDATA) |
The data from CRM is displayed in this spreadsheet. All Excel fields that were defined for the Excel export must be saved here. |
|
Spreadsheet for data to CRM (import) |
OUTGOING (Name of the cell: CONF_SHEETRESULT) |
This spreadsheet must contain the Excel cells that were configured for the import to CRM. |
|
Immediate transfer back to CRM |
No (Name of the cell: CONF_IMMEDIATE_TRANSFER) |
Yes: The transfer back to CRM starts immediately after the data transfer to Excel is complete.
|
|
Auto close the Excel document |
No (Name of the cell: CONF_AUTOCLOSE) |
Yes: The document closes automatically after the transfer. The document is not displayed ("Calculator").
|
|
Start Macro |
No (Name of the cell: CONF_MACRO_RUN) |
Start the macro listed below after the data transfer to Excel |
|
Macro name |
- (Name of the cell: CONF_MACRO_NAME) |
Name of the macro to be started |
|
Name of the start cell after the data transfer |
START (Name of the cell: CONF_CELL_START) |
The focus is on this cell after the data transfer. |
|
Column width for all imported columns with graphics |
3 (Name of the cell: CONF_COLUMNWIDTH_GRAPHIC) |
It defines the width (unit = cm) for all columns that will be filled with graphics from CRM. The default value for this configuration parameter is 3 cm. The graphics in it are scaled so that the full column width is used. The original aspect ratio of the graphic remains intact. The individual rows may therefore have varying row heights. |
|
Always scale graphics to column width |
No (Name of the cell: CONF_PICTURE_ALWAYS_SCALE) |
Should the graphics always be scaled to the stated column width or only if the graphics are wider. Graphics will be default only be scaled if they are wider than the set width. |
|
Minimize picture before inserting |
Yes (Name of the cell: CONF_PICTURE_MINIMIZE) |
Minimizing the pictures will increase the performance for Excel creation, but will result in a lesser image quality. This change has no effect on the stated column width. |
Tips and Tricks
Opening an Excel file in parallel
Please note the following when using an Excel template with an extended runtime and you open another Excel file, while communication between the CRM application and the Excel template is still running:
-
The current instance of Excel will be used to display the spreadsheet if the file is opened directly via the Explorer. That will interfere with the running communication between your CRM application and the Excel template, because both are open in the same instance. The Excel template generation will therefore be canceled.
-
Solution: start Excel without a document and then open the document from within Excel (or via Drag&Drop into Excel). This method will open a new Excel instance, which will not affect the running communication in the other instance. The Excel template generation will be completed without errors.
Sample templates
-
Template with all configuration parameters
-
Bidirectional Excel interface and template management
-
-
Template with transfer back