Single documents using the example of a single letter
This chapter describes the essential steps that are taken when creating a single document. As an example, a single letter template is used.
A new document should be created based on an existing template in the application. The document should display information from the application. Finally, the document is saved in the application. The process passes the following stations:
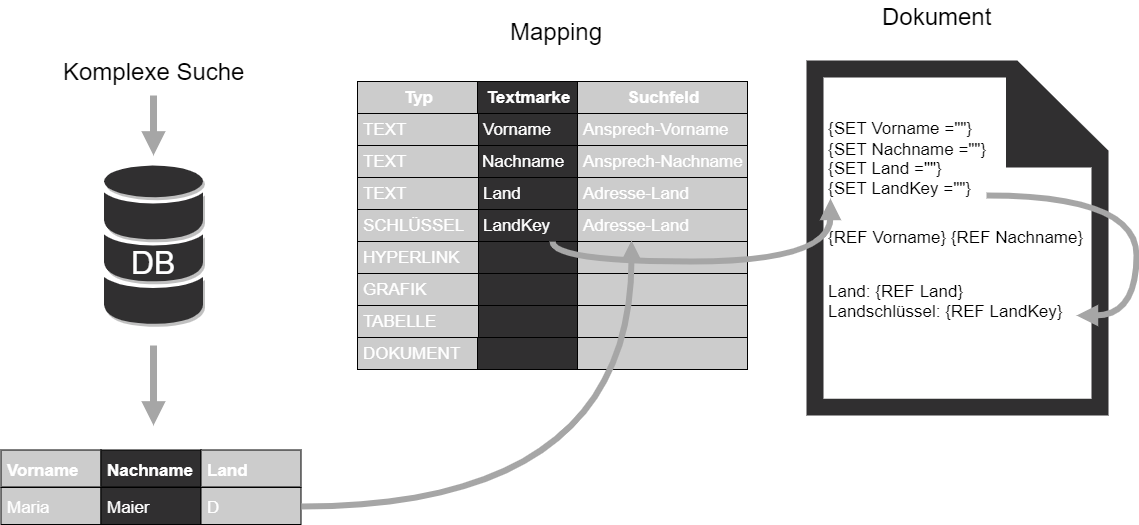
Figure: Functioning of the data transfer for single letters
Step 1
The user checks the necessary criteria for the single letter creation in the activity.
Step 2
It starts the single letter generation via the multifunction button documents in the menu bar DropDown button - New - Start Document. In addition, there may be other ways to start the document, such as a button on the surface. Then the following step 3 is usually omitted here.
Step 3
The user selects the right template from the available templates.
Step 4
If several contacts are assigned to the activity, a selection dialog opens in which the user can select one of the assigned contact persons of the activity as addressee. By default, the contact person is taken from the activity field of the right area. If the user selects several contacts, a mini-serial letter is created: a separate document is generated for each selected contact person.
Step 5
Depending on the design of the call for the creation of the document, a dialog is displayed in which the user can assign a subject for the document. This subject is added to the document dataset and can become part of the name (if configured accordingly). However, the subject given here is not available in the document itself as a bookmark.
Step 6
The complex search is now executed in the background. It may happen that no dataset is selected because the main search does not find any data that matches the search criteria. Then the document creation is aborted with a message.
If the complex search finds more than one dataset, another selection dialog appears. Here, the user is prompted to select the correct dataset. This selection dialog should therefore show the user the required information. Its columns are defined in the complex search: there the checkbox in the field attribute “Display in selection window” determines that the field appears in this selection list.
Use the arrow buttons to move the desired address to the lower selection area of the assignment dialog. By confirming the OK button, the dataset is transferred to the lower selection area. If multiple sentences are selected, a mini-serial letter is created.
Step 7
In the background, a document based on the selected template is copied to the user’s local document directory (typically [Windows User Directory]\tmp\document\[version name]).
Step 8
Using the complex search, which is linked to the template, the data from the application is selected. In the mapping table (”mapping table”), the association between the search field and the field is recorded in the template.
Step 9
This data is transferred to the local document. The field values are inserted in the SET fields. The REF fields are updated to receive the transferred data. After this update, the SET fields are removed. In addition, the link of the REF fields is resolved, so that after this action in the generated single letter neither SET nor REF fields are present.
Step 10
The document is saved locally and then transferred to the application server. This stores the transferred document in a separate document directory, which is usually located on the server. The directory for saving the document files can be configured via a system entry. In general, a user cannot access this directory. This prevents access to the documents while bypassing the application. Access by the application takes place exclusively via the application server and can be restricted by granting rights.
Step 11
A new document dataset is created in the system. This contains a reference to the document in the server document directory.
Step 12
The single letter is linked and displayed with the activity and other entities.
Step 13
If the document is to be edited again, the document is copied from the server’s document directory to the user’s local document directory and then opened (more details found in check out and return procedures).
Serial letters
Internationalization of serial letter templates
In older versions, the internationalized name of a field was saved as MERGEFIELD (field name from the control file) in the serial letter document. This has a significant disadvantage: It is problematic to map the serial letter fields for multiple languages or configuration groups cleanly. Each time you change the internationalization of a field, you need to adjust the field name in the serial letter template.
To solve this problem, a new process has been developed, such as the templates and the letters can be used without problems despite intervening changing fields of mask names.
Objectives of the procedure are:
-
Nothing should change for the user: he will continue to see the internationalized fields in the template and the control file.
-
The template is stable against changes to internationalization (field renaming)
-
The template also works in multilingual or in versions where multiple configuration groups are used.
The procedure is to save the serial letter template with the internal field names - not the internationalized field names anymore. In order to be able to use existing serial letter templates with the new functionality in the application, you must load, open and save each serial letter template once. Further working steps are not necessary.
To preserve the readability of the fields in the template, proceed as follows:
Management of the serial letter template in the administration console
In the course of opening the serial letter template in the admin console, all fields are internationalized. The readability of the serial letter template thus remains for the administrator. Before the serial letter template is uploaded, the internationalized fields are automatically reset to their original internal field names. The saved template on the server again contains the internal field names. (Note: Changes to the internationalization of the fields during the processing of the serial letter template are not taken into account. So you should only edit a serial letter template if fields are not renamed at the same time on the masks.)
Creating the serial letter
The control file is filled with the internationalized field names. The serial letter document still contains the internal field names before merging with the control file. These fields are now converted. In this way, all fields in the serial letter template are internationalized prior to merging. This ensures that the fields in the serial letter template match the column titles from the control file and that the readability of the serial letter template is preserved. (When opening the serial letter, the user may get the indication that field X can no longer be found in the control file. However, there is still the possibility to map the MERGEFIELD to another field in the control file. The serial letter template should be adjusted by the administrator in such a way that the modified internationalized field name appears in the affected MERGEFIELD.)
Switch off security requests
Security request 'SQL query'
When opening a serial letter, the SQL query must be confirmed. This security feature of Microsoft Word can be disabled via a registry entry, see also
Example for Office 2007:
[HKEY_CURRENT_USER\Software\Microsoft\Office\12.0\Word\Options] "SQLSecurityCheck"=dword:00000000
Convert dialog for CSV control file
When opening a serial letter with a CSV file, the conversion must be confirmed, see also http://support.microsoft.com/kb/834948/en-us?fr=1
Example for Office 2007
[HKEY_CURRENT_USER\Software\Microsoft\Office\12.0\Word\Options] "DefaultCPG"=dword:000004e4
The work steps for document creation
Step 1
Use of the complex search for the serial letter
The start window can be found in the application as menu item Marketing / Mail merge. First, the user selects the desired serial letter template here. This also loads the associated complex search at the same time. Before executing the selection, it is possible to adjust the search to limit the search result. The user can select any number of addressees from the amount of datasets found.
There are two options for selecting recipients:
Option 1: Search for addressees via the search mask
The search addressees button displays the main search of the associated complex search in the search mask. After a successful selection, the assignment dialog for selecting the serial letter addresses is displayed. All selected addresses are already in the lower area and are thus selected. All contact persons who should not be contacted can be moved to the upper area.
Option 2: Loading saved addressees
Alternatively, the list of addressees can be loaded from a file.
Both selection variants can be repeated as often as required. The result of each selection is added to the total result set each time. When adding the data, it is also checked whether the structures of both quantities match each other. If they do not match, a corresponding message appears and the add operation is canceled.
Step 2
Working with the selection result
Unwanted duplicates can be cleared using the ‘Check duplicate addressees’ button.
Viewing and sorting: Here, the total result quantity can be displayed and reworked manually. Sets in the upper area are removed, sets in the lower area remain in the total result set. The current number of datasets is output in the button. The total results set can also be sorted here (e.g. by ZIP code).
Save the total result quantity:
The current total result can be saved as an * .ser file via Explorer. This means that the same results set can be reloaded at a later point in time to carry out specific follow-up actions.
Step 3
More options in the start window
The further steps depend on which output the user chooses: Form letter (including tax file), tax file (without serial letter document) or the possibility of a test run for both cases. If the checkbox is set with “Test run”, no changes are made in the database, i.e. no activities, documents and links to the selected data are generated. So you can easily develop and test searches and templates.
If no test run is performed, the assistant is enhanced by steps for storing activities, documents, and links. Thus, the user is first asked to enter a subject for the document for the new activities to be created. Then he can add more application files as an attachment. If serial letter activities are generated, they are automatically linked to the application files that have been added. In this way flyer attached to the serial letter can be saved as a PDF file.
In the next step, the user determines whether a log activity and a reminder activity should be created for each selected dataset. These activities can be created as a collective activity:
Collective activity is: Overall, only one log and one reminder activity is generated. All datasets are linked to these two activities, so they are “collected”.
Collective activity is not active: One completed and one open activity per dataset are created.
As a rule of thumb, you can say that the collection activity should always be activated, otherwise very many activities could be generated. However, in this case it is not possible to link the activities created to your own employees, so the entries in the mapping table are then ineffective.
If activities are to be created, an entry mask opens to record the most important fields for a completed and/or open activity.
The start of serial letter generation takes place via the Done button. The control file and - if specified - the serial letter document are created and saved as documents in the system. The serial letter is automatically loaded as the main mask in a new level and then displayed for further processing.
At the same time - if entered - the activities and links are generated in the background. This process can take several minutes to complete.
Step 4
Transfer the field values to a CSV control file.
The control file is linked to the serial letter document and serves as a database. In the serial letter document, all fields from the control file can be displayed in fields of type MERGEFIELD. In the case of key fields, both the key and the long name are transferred as a separate field.
In the control file, the internationalized field names are used as column titles to facilitate the readability of the available fields from the application. This column title is therefore also used in the serial letter template as ‘MERGEFIELD’. If the internationalization of a field in the application changes, which is also used in the serial letter, this has an effect on the control file and the serial letter template.
The "Excel" 2003 export format can only contain approx. 65,000 entries. Otherwise, the Excel export format is always preferred for the control file because it is processed faster in Word.
Step 5
Saving the document
The document is saved and can then be edited. The serial letter preview button in Word Processor displays the data from the control file in the document.
Letter salutation with full name extensions
Additional title fields have already been created in version 2016.1 to enable a correct letter salutation. These are now used for the generation of salutations (country-specific) in version 2018.1.
New title fields
-
SUBSTITUTES (substitute = official title that replaces the name and academic title in the salutation, e.g. "Government President", "State Secretary")
-
JOBTITLE (title replacing the academic title in the letter salutation, e.g. "Director", "Pastor")
-
PROFESSION (functional designation that appears in the address but not in the letter salutation, e.g. "Attorney", "Managing Director", "Notary", "Authorized Signatory")
-
PREDICATES (name predicates = predicates, title of nobility or similar, which are introduced to the last name, e.g. "Baron of ..."); belongs to the PERSON in terms of content
-
SUFFIX (name suffix = suffix after the name, e.g. "(MdB)", "(MdL)")
-
GRADES (other titles, academic degrees or similar that are not used in the title, e.g. "Dipl.-Ing."); belongs to the PERSON in terms of content
These new fields must first be placed on the mask.
Description of the logic
-
The salutation and letter salutation are generated according to the country code of the person addressed or written to.
-
The logic described below refers to the generation of the German salutation.
-
This logic should take effect automatically if at least one of the new fields is filled. If all 6 title fields are empty, the existing logic is executed.
-
The generation of salutations and letter salutations is to be overridden (if necessary) in the C1 or C2 layer, analogous to the address
-
The generation is stored as Groovy script in the extended settings for each entity and country key:
-
All necessary data fields are available to the script: FirstName, LastName, isLetterAddress, AcademicTitle, NameTitle, Substitutes, JobTitle, Profession, Predicates, Suffix, Grades
-
This data is provided to the script as a variable from the fields of the entities for contact persons and employees.
-
The result of the script is the composite salutation
-
The country code for which the generation is requested is also assigned as the input parameter
-
-
The generation must be called on two places:
-
In the mask script of the entities contact person, business partner and person, to make the changed salutation visible there.
-
On the server side, when you save/create new dataset for the entities contact person, business partner and person, to save the changed salutation.
-
-
In the first step, the logic is only implemented for "Germany". Later, the generation can be successively extended to other countries.
-
Example data:
Name
First name
Substitute
Job title
Profession
Academic title
Predicates
Suffix
Nussbaum
Marie-Luise
-
-
Attorney
Prof. Dr.
-
-
Kröger
Hans-Hartmut
-
-
Board
-
-
-
Eckstein
Liane
-
Director
-
Dr.
of
(MdL)
Starken
Karl Ferdinand
-
-
-
Prof.
Baron of
-
Krollmann
Günther
State Secretary
-
-
Dr.
-
(MdB)
Vollrath
Peter August
Regional bishop
-
-
Prof. Dr.
of
-
Proff zu Irnich
Franz
-
-
-
Dr.
Baron of
-
-
The generation of the salutation takes place according to the following sample:
Structure:
[Mr.|Mrs.] [<SUBSTITUTE>|<JOBTITLE>|<PROFESSION>]
<NAMETITLE> First name<PREDICATES> Last name <SUFFIX>Examples:
-
Mrs. Attorney
Prof. Dr. Marie-Luise Nussbaum -
Mr. Chairman
Hans-Hartmut Kröger -
Mrs. Director
Dr. Liane von Eckstein (MdL) -
Mr.
Prof. Karl Ferdinand Baron of Starken -
Mr. State Secretary
Dr. Günther Krollmann (MdB) -
Mr. Regional bishop
Prof. Dr. Peter August von Vollrath -
Mr.
Dr. Franz Freiherr von Proff zu Irnich
-
-
The generation of the letter salutation takes place according to the following sample:
Structure if a substitute exists:
Dear [Mr.| Mrs.] <SUBSTITUTE>,
Examples:
-
Dear Mr. State Secretary,
-
Dear Mr. Regional Bishop,
Construction, without substitute:
Dear [Mr.| Mrs.] [<JOBTITLE>|<ACADEMICTITLE>] <PREDICATES> Surname,
Examples:-
Dear Mrs. Prof. Dr. Nussbaum,
-
Dear Mrs. Director von Eckstein,
-
Dear Mr. Prof. Baron of Starken,
-
Dear Mr. Dr. Baron of Proff zu Irnich,
-