Introduction
A report is a printout in A4 format whose content is generated from data of a software system (in this case from CURSOR-CRM/EVI). A so-called draft report serves as a template. This is an intended A4 sheet with placeholders for fields, totals, graphics and further elements. A search from CURSOR-CRM/EVI provides the data. A special software module (here: Jasper) then enters the data into the placeholders and generates the finished report.
The generation of mass data reports under Jasper is equivalent to the generation of mass data for serial letters.
Administration console
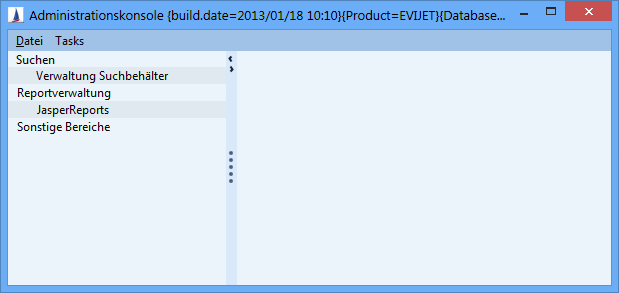
Reports are edited via the Administration Console. It is accessed from CURSOR-CRM/EVI via the menu item Administration / Administration Console.
From this console you only need the Manage Complex Searches and JasperReports nodes.
![Jasper-AdminKonsole[1].jpg](/__attachments/a_5b224229da82ac66ed6b230b9bdeeb054bf2b6f11389d3959bad32f98f2547f7/Jasper-AdminKonsole%5B1%5D.jpg?cb=ec5a5b5d33521e4669bd9b1351447201)
Figure: Relevant options in the administration console
Restrict the administrator console to reporting tasks
The aim of this section is to provide some users with an administrator console reduced to the items 'Reports' and 'Complex searches'.
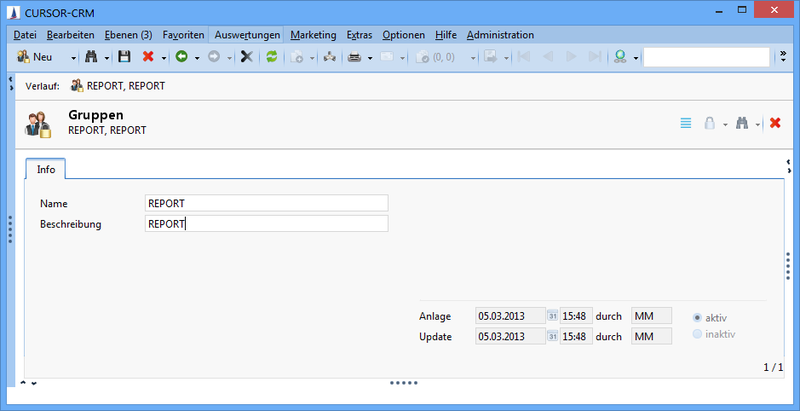
Using the menu item Administration / Groups a new user group is added with the name REPORT. Users who are to edit reports are added to this as employees (in the tree or in the sub-data area). Conversely, you can also add the 'REPORT' user group to the individual user as an additional user group (also in the tree/sub-data area).
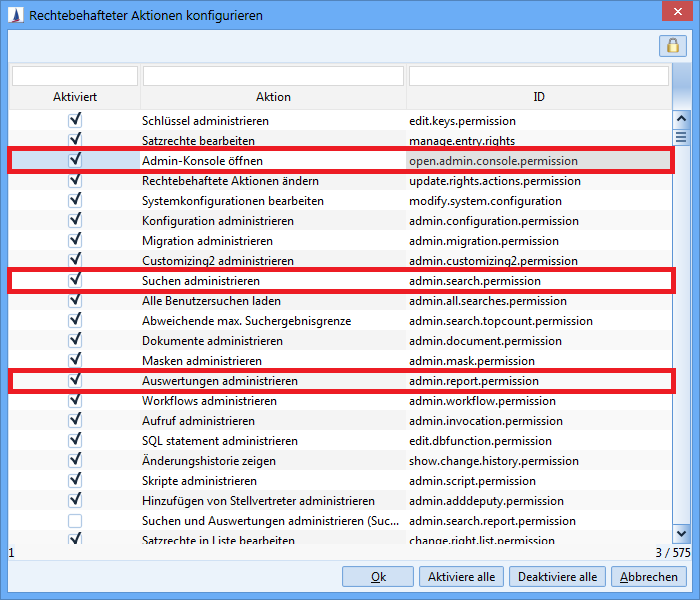
Now the following three actions are processed:
-
Open the administrator console
-
Administrate searches
-
Manage report
To do this you need the following menu items one after the other:
-
Administration / Permission submitted actions. Activate the checkbox here, if deactivated
-
Administration / Permission submitted actions (see figure) double-click on the action here
When configuring the three actions requiring rights, the REPORT user group is added and its write permission is granted.

Naming conventions
The following naming conventions have proven to be useful:
-
Font properties:
Report names and search names should only use the characters listed below to avoid database access errors:
|
The 26 standard Latin letters |
ABCDEFGHIJKLMNOPQRSTUVWXYZ
|
|---|---|
|
Digits |
0123456789 |
|
Underscore |
_ |
-
Report name:
any, not starting with JR_.
Example: First_Report
But not: JR_ 14.12. üöä. -
Complex search:
JR_ plus report name.
Example: JR_First_Report -
Main Search:
Like the complex search itself.
Example: JR_First_Report -
Table searches:
like the complex search itself plus name addition:
Example: JR_First_Report_Contracts
To protect your search from unwanted changes, it is recommended that you assign permissions to the JR_ searches.
'Search container management' node (Complex Search)
The basis of every report software is a database query. In the case of CURSOR-CRM/EVI, the query is defined by a complex search, so that you can find everything you need in the search documentation. The main points for reporting are summarized here.
A complex search is a container for advanced searches. You must enter 'REPORT' as the search type.
The new complex search is empty at first and cannot be saved. You must first create an advanced search. The other new button in the middle of the mask is used for this purpose. This first advanced search is the main search. Other searches are only required in a special case (see: Sub-reports).
It is important that you start your main search with the entity that is the focus of your report. If you describe your report as an inquiry report, start with the Inquiry entity. Additional information, such as the customer's name, can be obtained from a Has-a query.
-
New
-
Enter a unique name (naming convention JR_...)
-
Description of the search for the report
-
Type = Report
-
Add to assign the advanced search
-
If necessary, set input/output parameters
-
Save
The 'CURSOR Standard' checkbox identifies all reports delivered by CURSOR Software AG in the standard version. These are protected and cannot be changed.
Search configuration: Select data
-
Fixed search criteria
As in all advanced searches, you can define fixed and parameterized criteria.
-
Input of search criteria by an input mask format
The search mask that precedes the report is also defined by the search.
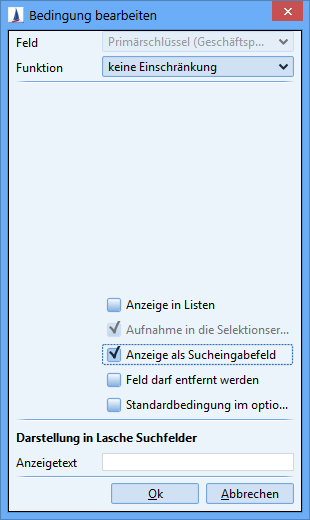
Only the main search, but not any table searches, is displayed on the search screen. The following setting causes a field of the main search to appear on the search mask.
-
Show search input field - checkbox active
-
Field can be deleted - checkbox inactive
Search configuration: Output data
In order for a field to be included in the Jasper report and able to be printed, for example, you must set the CURSOR-CRM/EVI search so that the field is transferred. Set the checkboxes as follows (see figure above):
-
Export in search result - checkbox active
-
Field can be deleted - checkbox inactive
'Jasper Reports' node
This mask offers you functionalities for the following topics
-
Administration of the individual reports
-
Provision of reports for users
-
Layout editing using the 'iReport' Jasper component
A dataset displayed in the screen contains both the report layout and releases and other CURSOR-CRM/EVI specific settings.
This chapter presents the individual functions of this mask.
Import and export
The Export button creates an XML file that contains both the complex search and the Jasper draft report. Note that you can only export one report at a time.
The import is the inverse of the export: You transfer the search and report from such a file to your system.
Advantage:
Backup copies of intermediate statuses during the editing of your report; exchange of reports with CURSOR Software AG.
Preview
The Preview button of the JasperReports mask provides a simplified preview of the draft report.
Start a new report
You always start a new report in the Administration Console in the JasperReports node.
A complex search is required (see Complex Search).
Key steps:
-
Press New button
-
Select complex search
-
Assign names (here without the name addition JR_ of the complex search)
-
Format: always select .jprint
-
Save
When saving, CURSOR-CRM/EVI generates an initial draft report that already contains fields from your search, a company logo and other elements.
You can then edit this draft report as described in the following section.
Open and edit an existing report
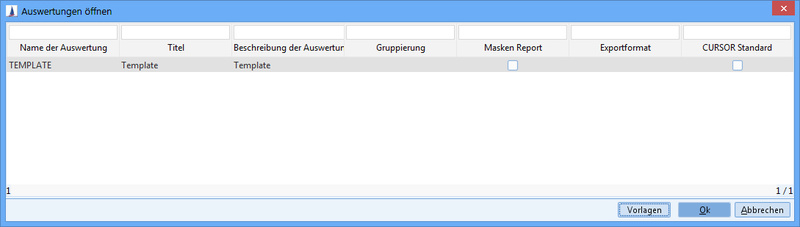
To edit an existing report with Jasper or change its shares, first click Open. Select a report and confirm with OK. An existing report is opened.
To edit the draft report, click on the Templates button and confirm with OK. The Edit button becomes active.
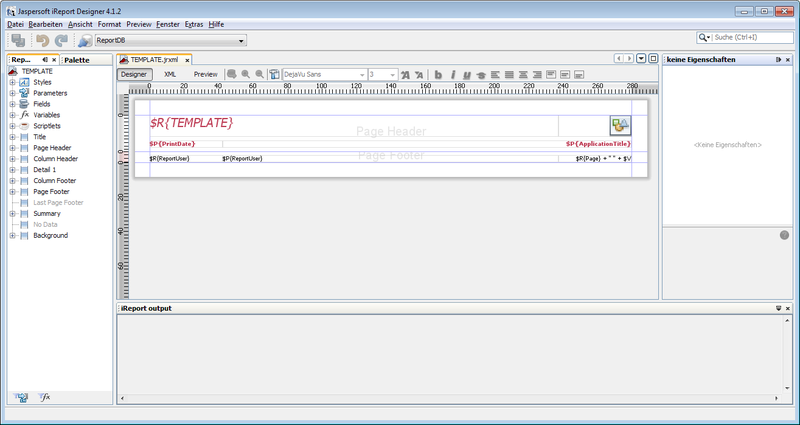
After clicking on the button, the draft report is transferred to the 'iReport' program, where you can design the appearance of the report.
The selection mask of your complex search appears. Select some datasets. These are copied and are available in 'iReport' without you needing access to the CURSOR-CRM database.
-
Save again after returning to the Administration Console!
-
For CURSOR-CRM/EVI standard reports (such as Business Partner Portrait), see: Customize standard reports.
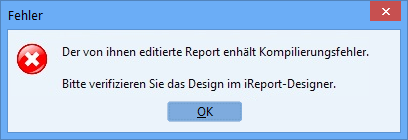
Compile errors and verification
Compile errors
If changes in the design have been incorrectly adjusted and not verified, an error message appears, after which the report is reloaded for editing. The iReport Designer opens the last incorrectly customized report.
Check report
Before a report can be saved, its configuration and design must be checked. If, for example, the search for the report was adjusted, it may be that fields still used in the report were removed from the search.
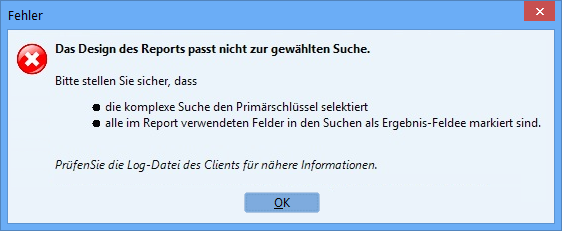
In addition, the main search must always select the primary key of the master dataset.
Including the report in the CURSOR-CRM reporting menu
The following settings in the Administration Console affect the inclusion of the report in the Reporting menu:
-
Reporting menu: determines whether the report appears in the menu at all.
-
Group: the submenu in which the report is to appear. You can select an existing group name or enter a new one here.
-
Internationalization: the name under which the report should appear in the menu.
-
Position: the group is sorted by number, then by name.
Inclusion of the report in the desktop configuration
-
Desktop Report activates the report for the desktop configuration.
Inclusion of the report in the report button
The Report button in the toolbar has a pull-down menu.
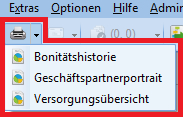
Figure: Multiple reports in the report button.
-
Print button - if activated, the report is included in the pull-down menu
-
Print button pos. - determines the position in the menu.
The default mask report of the entity is used as the top menu item ( printer icon). There is one for the list view and one for the detail view. Depending on the view in which the menu is opened, the corresponding report is used.
-
The menu items are then sorted according to their position.
-
If the position is the same, the name of the report is used.
The icons matching the output format of the report are used. For PDF files, for example, the icon of Acrobat Reader is used. The printer icon is used for the report.
Using a report to print from a CURSOR-CRM mask
For more information, read the chapter on Printing functions in CURSOR-CRM.
Including the report in myCRM
A report can also be included in myCRM. However, this is not done in the admin console, but by the user in the search mask of the report (or by the administrator using a system-wide default). The procedure was described in detail in the user help. The user enters his criteria in the search mask of the report and clicks on the myCRM icon in the search mask. This creates an icon link in the myCRM area. This opens the search mask with preassigned input fields when you click on it again.
Billing data
One special feature is the 'Billing Data' field. It only applies for contract reports in EVI. The 'Contract' mask has a separate print button, to which reports can be linked. Different reports can be stored depending on the product and rate type.
The 'Billing Data' label refers to the fact that such reports are usually used to display billing data.
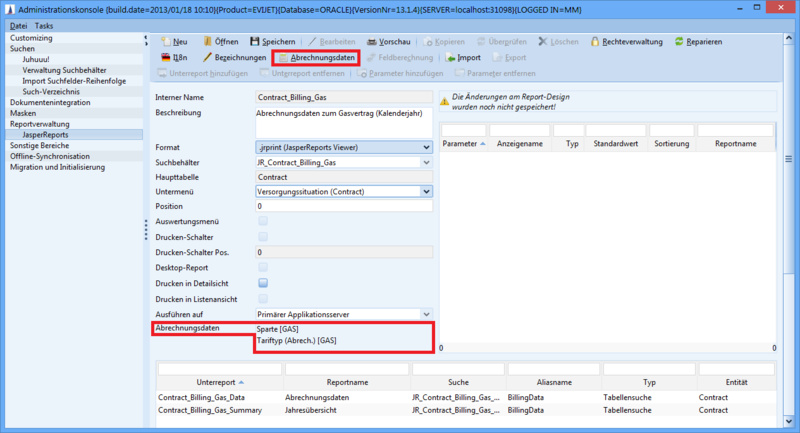
You can use the Billing Data button to open a window (below: Billing Data) where you edit the settings. These settings (product type and/or rate type) determine for which contracts the report is available for printing via the special button in the contract mask.
Translate display names
The display name of a report or its subreports can be changed for the default language directly from the administration console mask.
For other languages, the internationalization dialog can be opened via the I18n button.
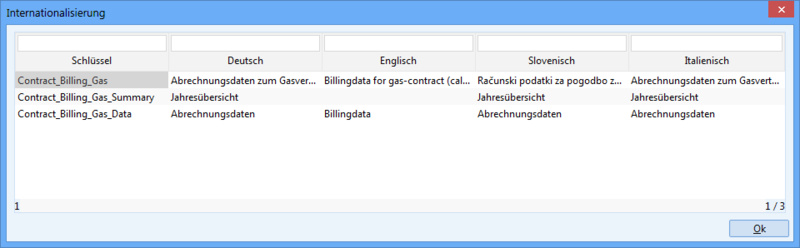
The dialog displays the report and its subreports. The languages currently supported are: German, English, Italian and Slovenian.
Edit descriptions
In the report, field names and the report title are referenced as resources ($R{}). In addition, there are many additional texts, e.g. for page numbering or an overview. These texts are stored in the ReportLabels resource.
# ReportLables_de_DE.properties

Page = Seite
PageSep = von
ReportUser = Auswertung ausgef. von:
SelectionCriteria = Selektionskriterien:

Count = Anzahl
TotalCount = Gesamtzahl
Total = Summe
GrandTotal = Gesamtsumme
If the customer wants to store his own reusable and translatable texts for his reports, he can edit the descriptions using the corresponding button.
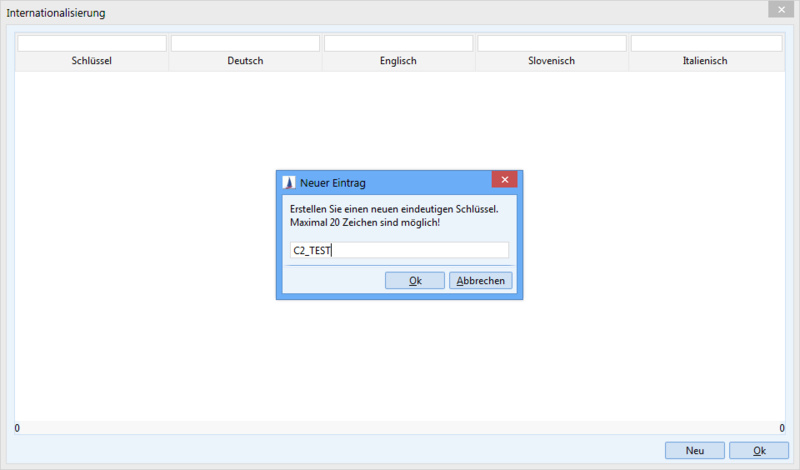
The dialog only shows the entries created by the customer. As a default, the prefix 'C2_' must be used for each entry to avoid conflicts between existing and new keys on the part of CURSOR-CRM/EVI.
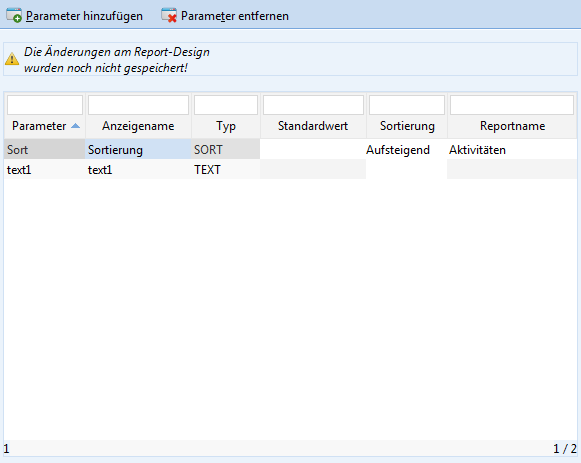
Report parameters
For each report, the report creator defines criteria that can be set by the user when the report is executed. The definition is done in the admin console in a table view, which contains the following columns:
|
Parameter name |
Text field in which the unique internal name of the parameter is entered, as it is used in the report. |
|---|---|
|
Display name |
Name of the parameter as it is presented to the user in the Report Properties dialog. This display name can be translated in the table. If a parameter has been selected in the table, further languages can be edited via the I18n button. |
|
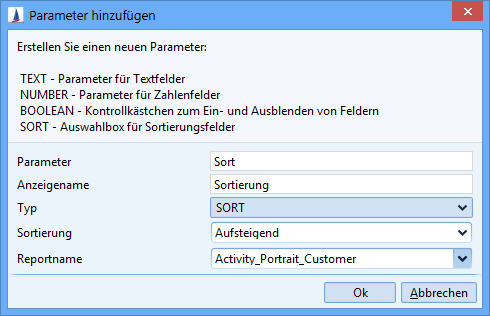
Type |
Combo box with the following options: Text, number, checkbox, sorting field. |
|
Default Value |
Enables the setting of a default value. This is proposed in the Report Properties dialog. However, you can still change it there. |
|
Sorting |
The sorting type Ascending or Descending must be selected for sorting parameters. |
|
Report name |
|
You can choose the main report (empty selection) or a subreport for sort parameters.
The toolbar buttons can be used to add or remove parameters from the report.
The Sort Field type has a special function and is used to define sorting by the user. In the Report Properties dialog, a dropdown box is generated at report execution time for each parameter of this type, in which all result fields of the report are displayed. The user can select a field from this field list and determine whether it is to be sorted in ascending or descending order.
A new parameter can only be added if its name is not yet in use. The name of the parameter is also checked in the report design to avoid conflicts. The new parameter (with the exception of the sort parameters) is inserted in the design of the report and can be used there. It can also be used in the subreport.
A parameter that is no longer required can be removed by the administrator. The report design is examined for points of use. Only if the parameter is not used is the definition removed from the design of the main report and all subreports.
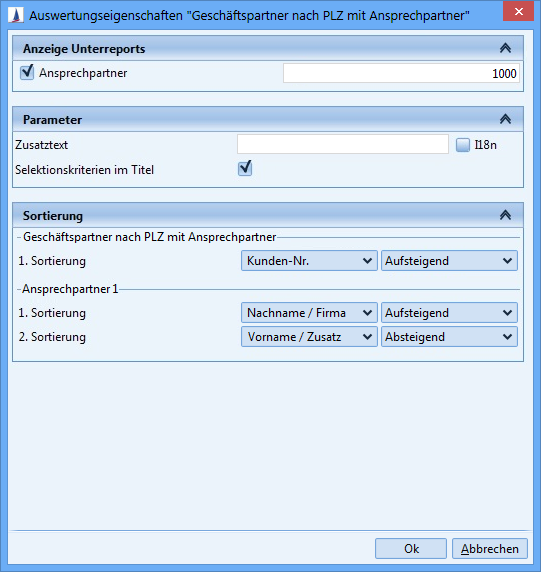
Report Properties
In the Report Properties, the user can influence the display in the report. They are automatically displayed at the Print button and can be viewed in the Reporting menu in the search mask.
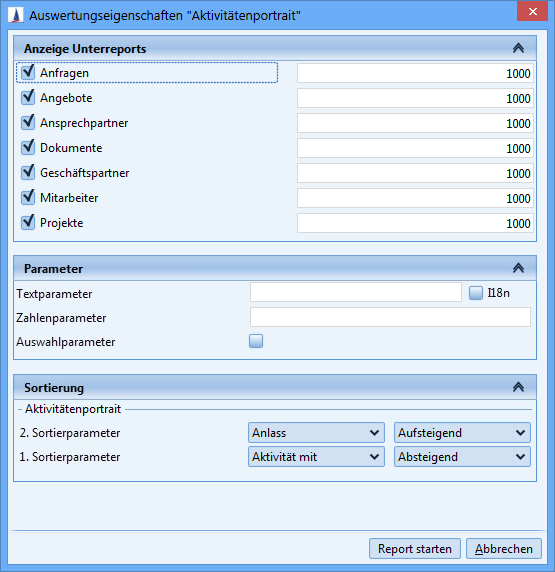
The dialog shows all parameters of the report, top count setting for the subreports and sort options.
|
Display subreports |
The amount of data in the subreport can be set using the first parameters. This functionality was already available before and has only been revised in the layout. A subreport can be completely hidden via the selection box. The amount usually describes all data in the report, that is, not that you can display one inquiry per activity, for example, but that one inquiry is displayed overall. This depends on the function in the search. See: Activities in the business partner portrait.
|
|---|---|
|
Parameter |
Parameters can be set as text, number or in checkboxes. These parameters are transferred to the report. There it is up to the report creator which parameters he uses and how. Each parameter is also available in the subreports. |
|
Translating text parameters |
Instead of writing a text, the user can also choose from a list of values. The values can be stored as a label in the Administration Console (see Editing Labels). 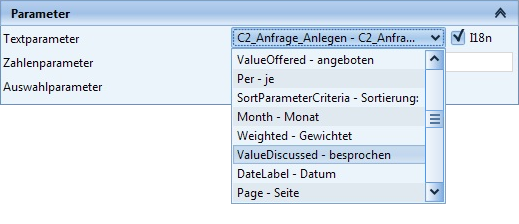
|
|
Sort parameters |
You can manipulate the sort order in the report or subreport. You can choose from all fields that have not yet been used for sorting. If the report uses implicit sorting, these cannot be changed, but are only listed for the user. The implicit sort parameter, for example, for a grouping in the report, appears before those that the user can change. 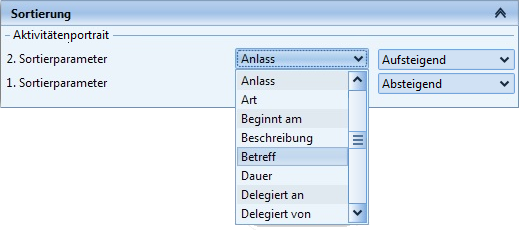
|
When sorting to lookup fields, note that the key is used as a sort criterion here, even if the report outputs the description, for example.
If the report properties have not been changed, the default values set by the administrator are transferred to the report. Sort options that are not maintained are not taken into account during execution.
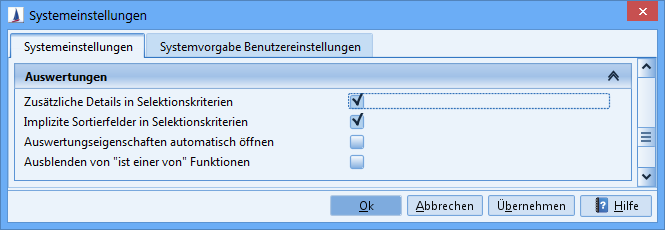
As with the Print button, it can also be displayed automatically in the Report menu of the Report Properties dialog. The option must be activated via the system setting 'Show report parameters automatically'. If this option is active, the report contains parameters and the report properties have not yet been opened and confirmed manually, then the dialog box appears in the search dialog after you press the search button.
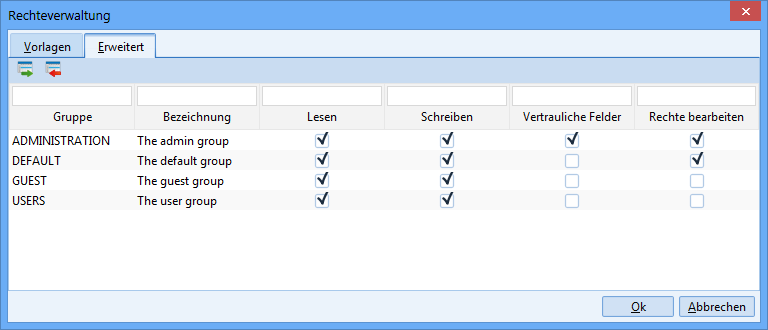
Rights manager
Reports can be assigned to one or more rights groups. Each user is only shown the reports for which he is authorized on the basis of the group assignments. The read permission of the rights group is decisive in this regard.
Reports that do not yet have a group assignment are not offered for execution. The reason for this requirement is the objective of the report creator to actively request a configuration to prevent the inadvertent publication of reports.
Transfer of selection criteria to the report
The selection criteria entered by the user are passed as a character string to the parameter $P{SelectionCriteria}. When you start a new report, this parameter is already built into the draft report by default.
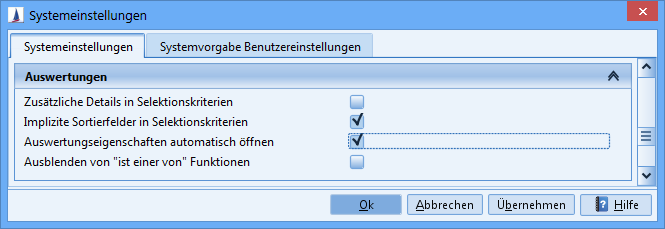
From version 8.4 and later, additional details can be displayed in the selection criteria. These can be set via system parameters. These parameters are preset for HelVIS.
In addition to the selection criteria, the changed TopCount settings of the sub-report searches are displayed in the same parameter. The field parameters and sort parameters are available as separate Jasper parameters in the report design.

In the report, all fields have been moved from the page footer to the title. The summary at the end of the report can also be used for this purpose. The page footer is not suitable for this, since the texts cannot be enlarged arbitrarily.
The dialog shows all report parameters in the report properties dialog. The internal function of the field parameters depends on the use by the report creator.
A separate option has been introduced for the output of implicit sorting.
The output shows how all parameters, selection criteria and sorts are transferred to the report.
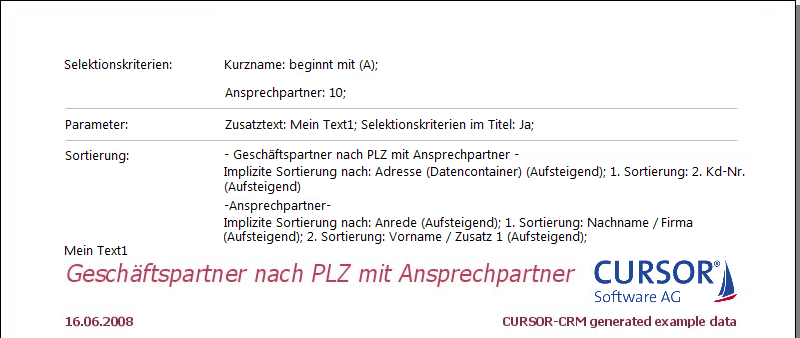
It is important to note that this is text composed in the program that cannot be formatted in the report. Some separators are loaded via i18n properties.
Report template
The report template only applies to reports that are generated when executed. This means that if no print report is stored in the detail view or list view of a CRM mask, the CRM temporarily generates a draft report based on the report discussed here called 'TEMPLATE'. There is no such template for reports you have created yourself; the default settings are hard coded.
In the TEMPLATE report, you can adjust the layout of the page header and footer. This special TEMPLATE report can be loaded and edited using the Administration Console. In the open dialog you can switch between normal reports and the templates (of which there is currently only one).
The company logo is loaded from the database as a document object and can be exchanged there. However, you can adjust the position and size of the logo in the template.
Note that the key value for the logo field must be 'Logo' and for the title field must be 'Title'. The image cache must be used for the logo.
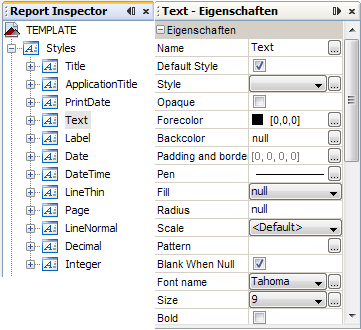
The styles in the report and thus the fonts and colors can also be adapted to the layout. All styles are included in the generated reports.
Report-related operations in other parts of the Administration Console
Replacing the company logo
-
In the Administration Console, go to the Manage Document area, under Import/Export Document Objects.
-
Export the document objects - they are saved as files in a directory.
-
One of these files is called
ReportLogo.gif; replace it with your logo (again in GIF format and again under the file nameReportLogo.gif) -
Import the document objects.