Preconditions
You must import incoming emails, tasks and appointments from Outlook to CURSOR-CRM.
In Outlook, create a directory named Import Folder, and then move the emails to import. If the entire mail inbox was configured for the import, the process can take a while.
You can adjust the necessary configuration in your user preferences.
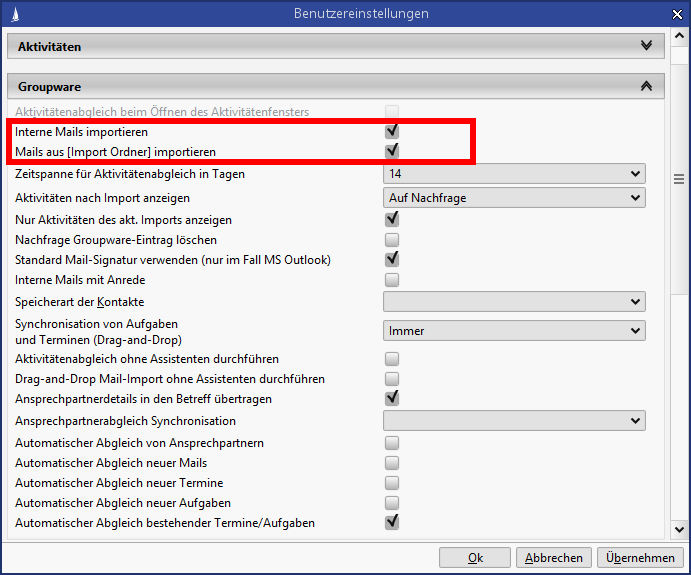
Figure: Configuration for the mail import under User preferences / Groupware
Start Groupware synchronization
How the Groupware synchronization works:
-
In the quick start bar, click on the icon

-
If required, enter your login data and confirm with OK. A Groupware synchronization tab is opened.
-
Unknown Attachment
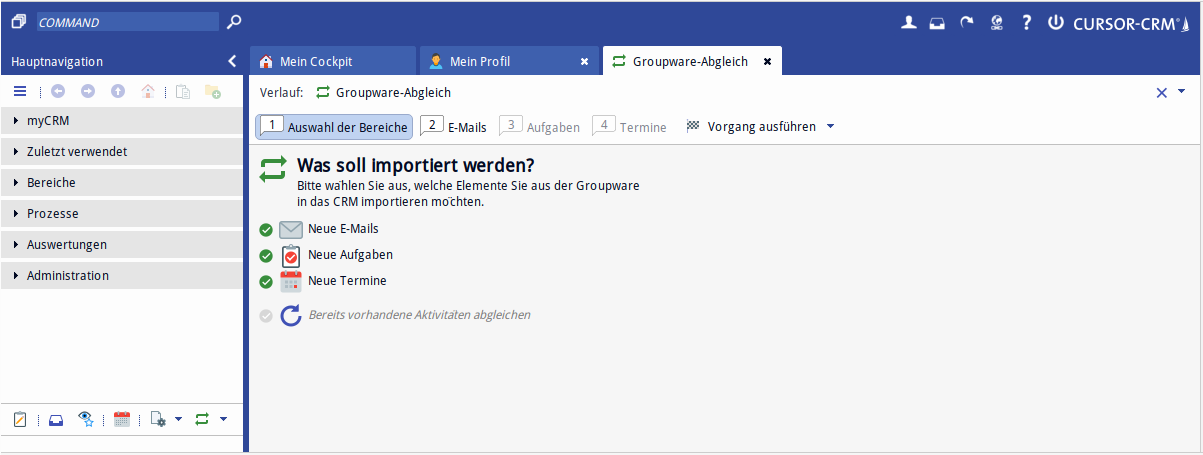
Select areas that you want to import with one click.
-
Unknown Attachment

-
Unknown Attachment

-
Unknown Attachment

-

Manual synchronization is not possible because this option is hidden when the following options are enabled:
automatic matching of existing appointments / tasks (via user Groupware settings)
Automatic groupware matching (via employee mask)
-
-
Assign the datasets that should be imported. By default, all datasets are selected. Select the datasets you want to import with Unknown Attachment + click and click on the record you want to import.
How to get to the areas:-
Click on Unknown Attachment, if you want to assign emails
-
Click on Unknown Attachment, if you want to assign tasks
-
Click on Unknown Attachment, if you want to assign appointments
Only one step is possible at a time. If you want to go to step 4 (appointments), you must first select steps 2 and 3. The same applies to the reverse order.
-
-
Click

Status of appointments and meetings
Appointments exported from CRM to Outlook or imported from Outlook to CRM are unlinked from Outlook. The mapping is resolved.
The main features of the adjustment:
-
Follow-up, appointment and meeting are always synchronized from Inhouse to Outlook with the default value of Outlook.
-
Appointments from Outlook Tentative, Busy (without participants), Busy and Available are synchronized from Outlook to Inhouse as appointments
-
Appointments from Outlook that have participants (meetings, are synchronized from Outlook to Inhouse as a meeting).
-
Follow-ups that are in the system are treated accordingly as appointments.
-
The key is marked "as no longer selectable" in the default.
-
New follow-ups are no longer created.