Basics
If activities are entered in two systems it is also necessary to synchronize them automatically in order to prevent double operating expense. The automatic activity synchronization takes care to synchronize the activities in MS Outlook and in CRM in pre-defined time periods. The following activities are automatically synchronized with the groupware system:
-
appointed time
-
meeting
-
follow-up
-
task
Above that you can import e-mails from MS Outlook to the CRM-system. Imported e-mails can be recognised by the status I ('imported') and by the type MAILIN. Creations and changes in CURSOR-CRM are directly transferred to the groupware system. For all other activity types you can transfer an activity as appointed time or task in the groupware system. New creations and changes in the groupware system as well as mails that have come in can be imported either manually or automatically into CURSOR-CRM. Existing appointed times are permanently synchronized, as far as the automatic import has been activated. A change to one of the systems initiates an adaptation in the other system. For example, if a new appointment, task, or meeting was created in Outlook, an HTML link to the CRM activity is generated in the text on the Outlook page after the corresponding CRM activity has been created. For newly imported appointments/tasks, the link is not written to the appointment/task in Outlook until the next activity synchronization.
Advantages:
-
Smooth connection of a standard groupware (MS Outlook) and CRM
-
Easy configuration and handling
-
Better and faster activity management
-
Advanced automation and less work by rules in Outlook
-
Use and update at runtime on mobile equipment (condition: MS Exchange connection)
-
Creating an appointed time activity in CRM this entry is automatically synchronized with the Outlook calendar and other mobile equipment.
Preconditions
Before fully using the functionality you need to perform some configuration steps.
Import folder
If you have several e-mail addresses or if you receive many e-mails every day, it becomes more difficult to follow. E-mails can be imported from several specified folders. Through the folder name you can set the status of the imported activity. All e-mails in this directory you have either moved there manually or via Outlook rules, are imported.
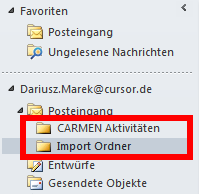
Figure: Created 'Import folder' in MS Outlook
-
Precondition
The activity import is activated through the import directory in user preferences. All mails from the "import directory" and all set directories are imported.
In case of several folders for activity import these need to be created underneath Import folder.
-
Configuration
The directory (or directories) need(s) to be positioned underneath the mail in. The directory is to be designed according to the following scheme: CRM <Description> [<Status>]
CRM <Beschreibung> [<Status>]
The order must begin with "CRM ". After that, a short description follows. Status is placed to the end. Important: The status needs to be written in square brackets and receive the desired key from the field "Status".
Example:
CRM Erledigt [E]
All e-mails imported from this directory automatically get the status E (in German: erledigt; in English: done).
To import e-mails from this folder you need to activate the option under User preferences / Groupware / Mails from [Import folder].
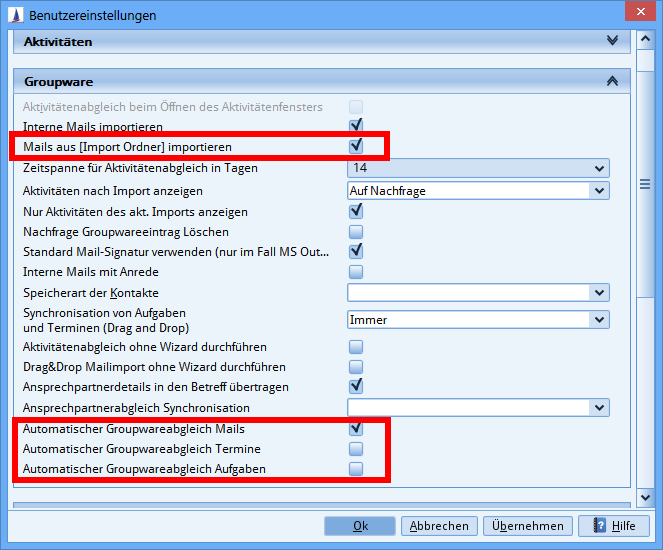
Figure: Relevant groupware settings
Mails are synchronized by default. In case of tasks and appointed times this option can also be activated.
If the automatic synchronization has been activated in the employee configuration, the option Activity synchronization when activity window is opened becomes inactive.
Besides the Import folder the folder CARMEN/EVI/TINA activities is automatically created. All imported e-mails are moved there and stored.
Log-in and activation of automatic groupware synchronization
In the employee configuration passwords are stored. Depending on the IT landscape and the safety concept in your company the passwords for CURSOR-CRM and the groupware link can be differing.
Ask your administrator for the access data for the groupware system.
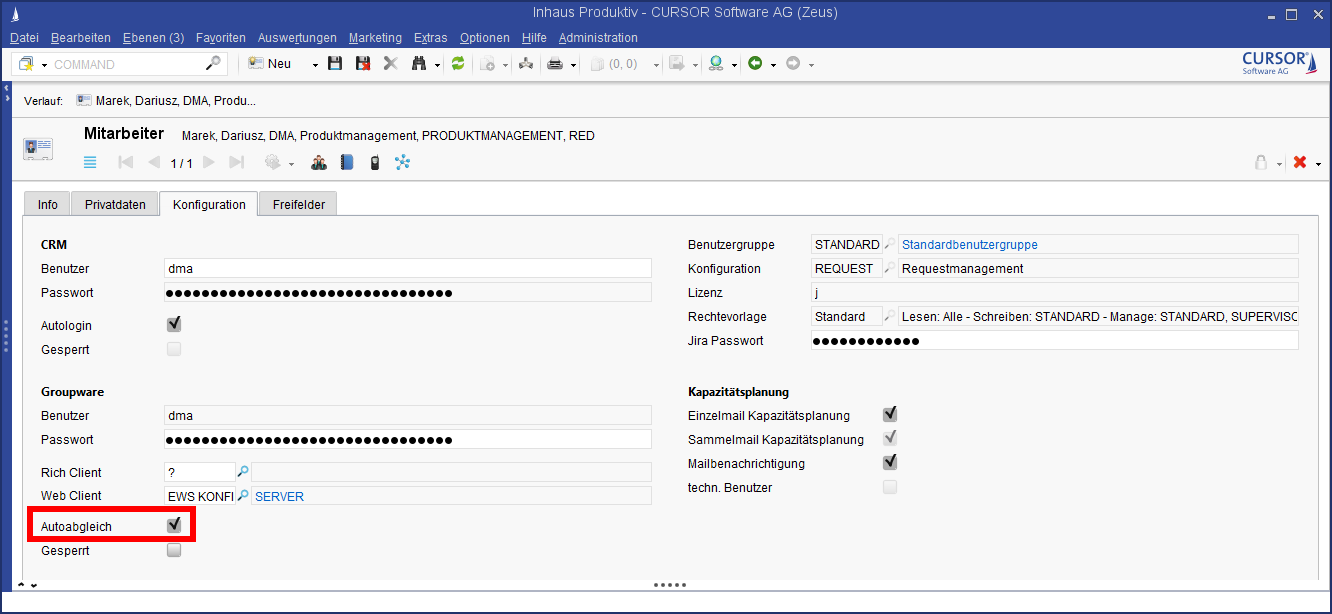
Figure: Employee account configuration
When the identification of the user is made separate in CRM and in the groupware system, the corresponding access data (user name, password) are to be entered and saved separately. In order to automatically start the groupware synchronization the option Auto synchronization needs to be activated. The configuration Web Client is also required to link the web client to the groupware system.
The option Groupware password blocked becomes automatically active when the log-in in the groupware system fails one time due to wrong access data. With that it is prevented that the client permanently starts log-in attempts and the gets blocked for good by the groupware system when for example wrong access data are entered three times.
Proceeding
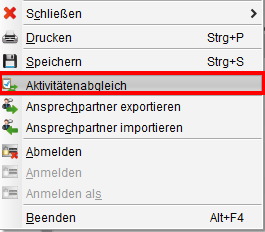
How the manual groupware synchronization works:
-
Click Activity synchronization in the menu File. If this menu item is inactive, a check should be carried out using the menu item "Tools / Check for Office installation" so that the version can be entered in the local settings files.
-
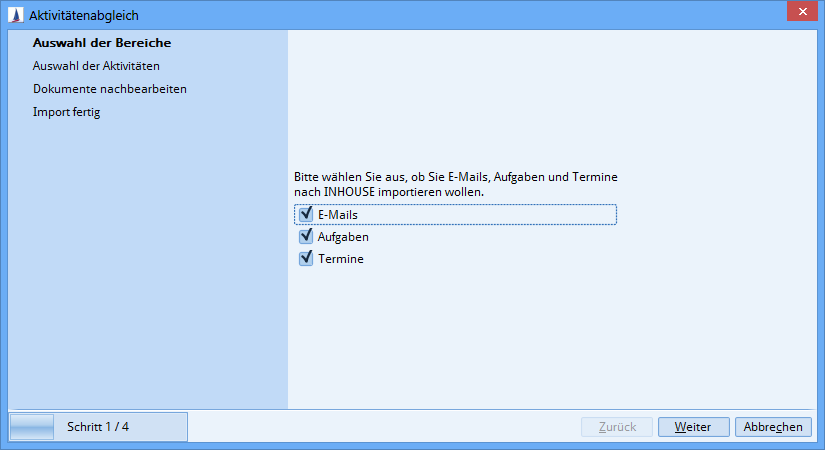
Area selection. On the first page of the wizard you select what you want to import (emails, tasks, appointed times).
You can define a permanent default under User Preferences / Groupware . By default, only emails are imported.
-
Activity selection. On the following pages you are informed about new datasets in the groupware system. Deselect the datasets you do not want to import in the column 'Import'. Empty mandatory fields are marked red and need to be filled to proceed.
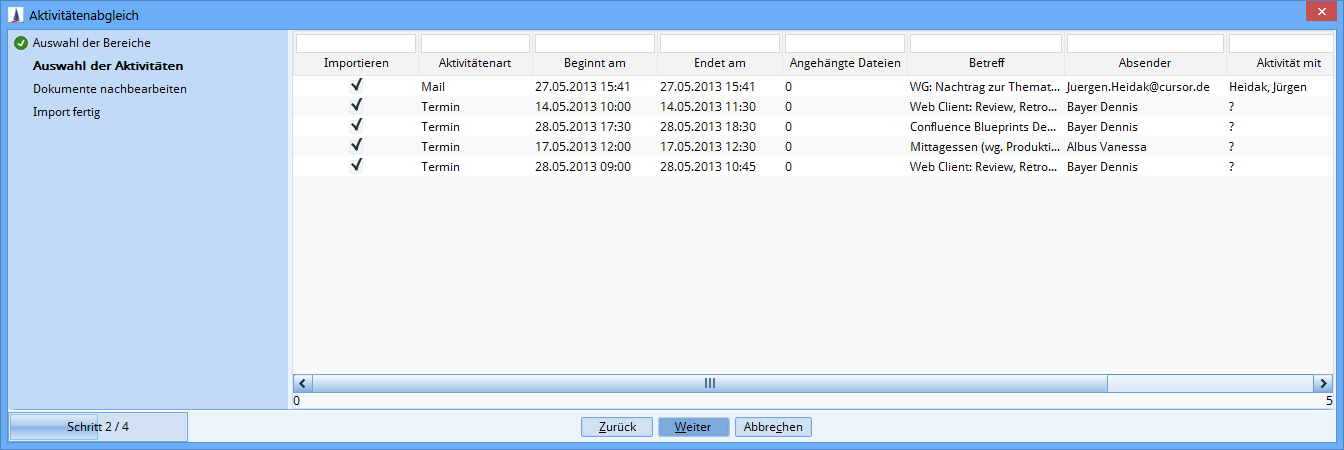
Proceed with Next. -
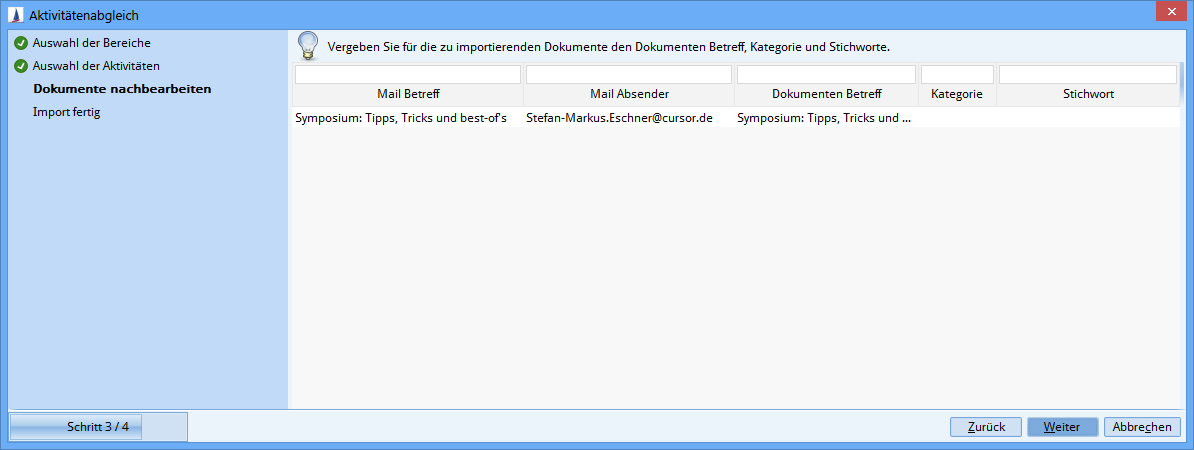
Edit document. In this step you can equip the attached documents with category and keyword. This behaviour can be activated resp. deactivated through an administrative setting. If deactivated, this step is skipped. In that case you can not allocate any category or keyword.
-
Import completed. After the synchronization you can have the imported activities or the result of the import displayed in the main window Activity.
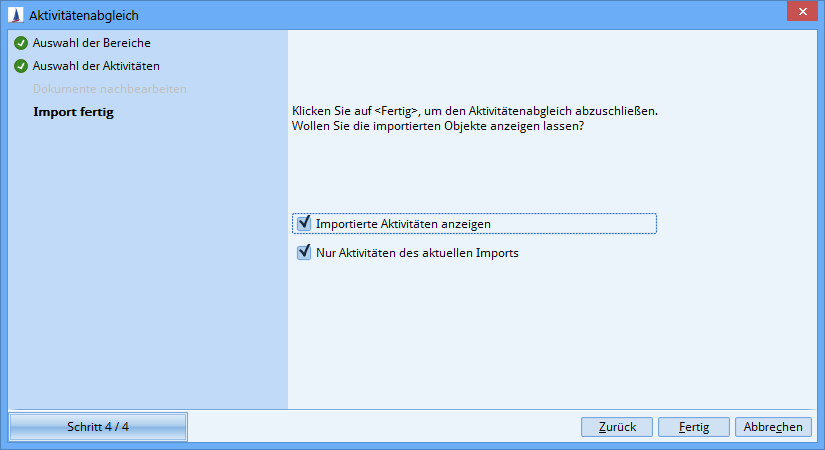
You can define a permanent default under User Preferences / Groupware . By default, only activities of the current import are displayed.
-
Complete the data to the activities. Change the activity type corresponding to the activity content.
-
Save your changes.
-
If needed, assign other datasets to the activity. Through the fields Delegated to, Activity with, Main inquiry and Main project you make the main allocations.
-
Imported activities are marked by the activity type 'I' (imported) and can be directly displayed through the quicksearches Not assigned imported mails, Imported mails and All imported mails.
In case of the automatical activity synchronization all steps are conducted in the background with the default settings. After successful import a popup message is displayed.

Figure: Popup message after activity import
Clicking the link lists the imported activities.
Unknown e-mail addresses
If an e-mail is imported by a sender not stored as contact person in the system, the e-mail is "unknown". "Unknown" means a missing allocation to the contact person. You can create the mission allocation ba assigning the new a-mail address to an existing contact person (new dataset Communication) or if you create a new contact person and assign this e-mail address to him/her as standard.
In activities that have been created through unknown e-mail addresses you can open the joined e-mail with the button ![]()
![]()
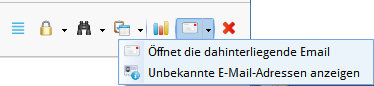
Figure: Action menu for unknown e-mail addresses
Unknown contact person
If a sender address has no contact person, the following actions are implemented:
-
The domain information are cut off the mail address so that for example @cursor.de is left.
-
The search BPwithEmail is implemented on the business partner with this domain (e.g. @cursor.de).
-
If a dataset is found, it will be linked with the activity.
Activity as appointed time or task in groupware system
You can transfer an activity which from its activity type is neither appointment, follow-up nor task, into the groupware system as appointed time or task. The activity synchronization includes these appointed times and tasks.
-
In the activity click

-
In the menu select Synchronization as date or Synchronization as task. Both main entries are deactivated after the process.
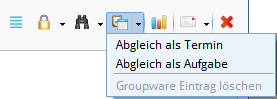
If an activity is an appointed time, a meeting, a follow-up or a task, the button ![]()
With Delete groupware entry you remove the entry in the groupware system.
Examples from practice
Mobile equipments
You can use the functionality Automatical synchronization very effective in mobile use. If your unit (Smartphone or tablet) has a linking option to the MS Exchange-Server, you can have all emails moved to the Import folder transmitted automatically to the CRM-system.
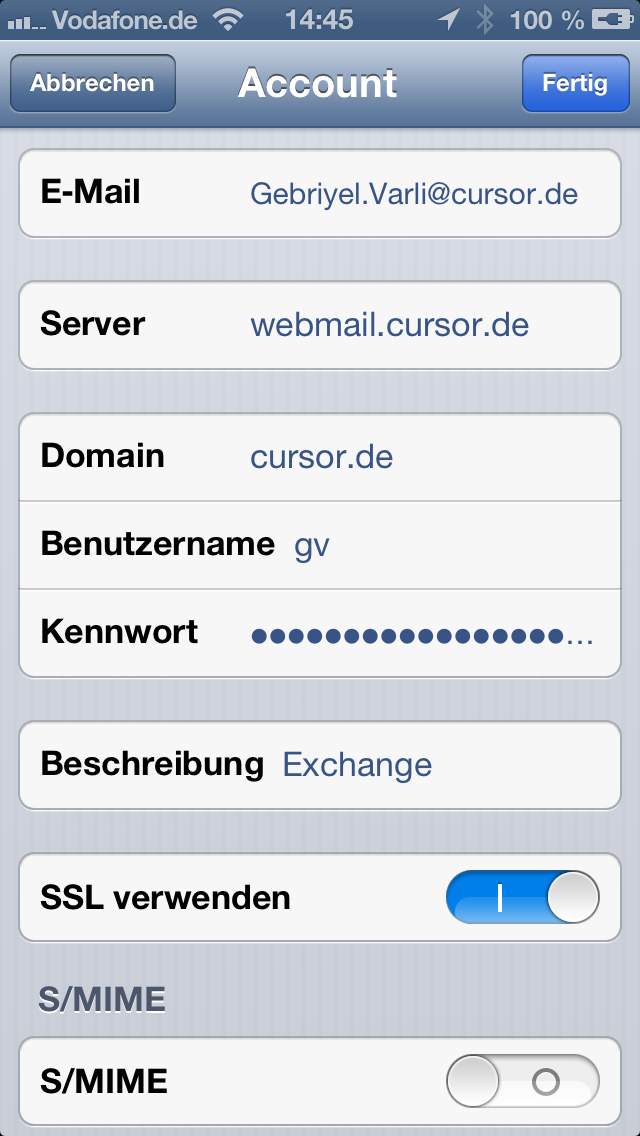
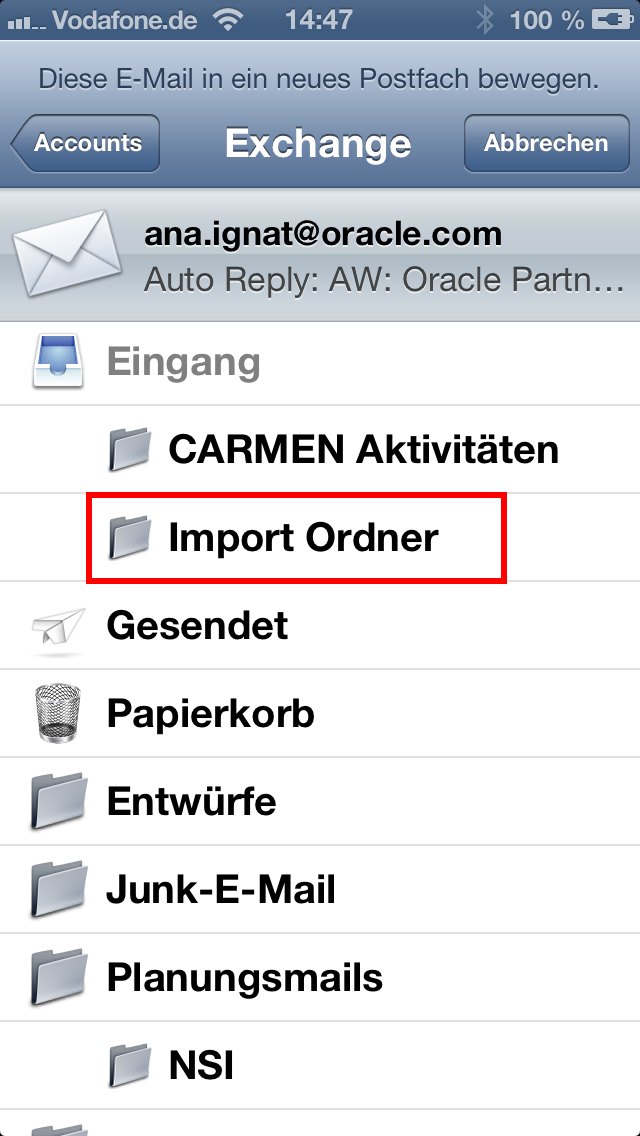
Figure: Configuration and linking of an iPhone
As sales employee you save precious time by not having to enter received information in form of e-mails into the CRM-system again. When appointed times and tasks have changed in your CRM-calendar, you can receive these changes also away on business and react promptly.
Rules in MS Outlook
In order to even more reduce handling time of incoming e-mails, you can determine in MS Outlook which specific e-mails are to be moved directly to the import folder.
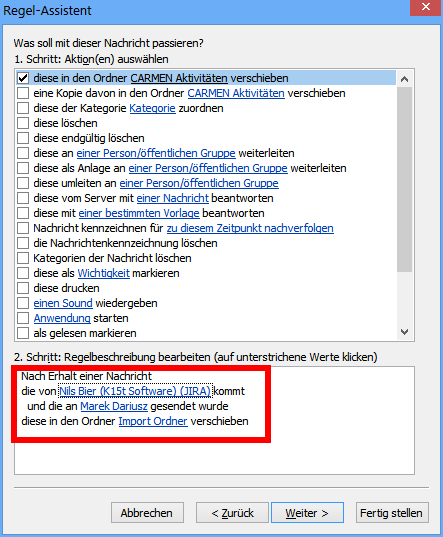
Figure: Exemplary rule description
In that case, manually moving of the e-mails to be imported is omitted.