Creating email
An email is sent via an activity. CURSOR-CRM distinguishes between external and internal emails. In any case, an email has an appropriate signature.
-
Create an activity.
-
Assign the contact persons to the activity, who are the recipients of the email.
-
If required, attach a single letter or any other documents from CURSOR-CRM you want to send, or attach it later on to the e-mail right in the window E-mail dispatch.
-
Save the activity.
-
Click the External message OR Internal message OR Answer button
-
The mail dispatch dialog opens. You can edit the email as needed and attach documents.
The information from the "Relation type" sub area is taken over when the mail is sent, so that the persons are set accordingly in CC or as recipients.
Add recipients /Cc recipients /Bcc recipients
Enter the email address manually in the To: field. Automatically opens a lookup list where you can select your recipients.
OR
1. Click the button Add recipients and enter the search criteria (name, first name).
2. Click Execute search or press Enter. Recipient selection is displayed.
3. Move the mouse pointer over the recipient's dataset.
4. The email address will be accepted with a further click on the Add recipients / CC recipients / BCC recipients button
5. Then click on Return to mail.
6. If necessary, activate the read receipt.
To remove a recipient from the list, click the cross icon.
Add CRM attachments
1. Click the button Add Attachment and enter the search criteria
2. Click Execute search. Document selection is displayed.
3. Move the mouse pointer over the document's dataset.
4. The document will be accepted as an attachment with a further click
Add file system attachments
1. Click on Please choose a file to upload
2. Select the file in the local file system.
3. Click Open. The document is uploaded and appears in the attachment box.
To remove a document from the attachment, click the cross icon OR drag the desired document from the local system and drop it in the import area (Drag & Drop).
-
To send the email, click Send mail.
By sending the e-mail the entries of the following fields of the activity are automatically updated:-
Description: Title, signature and information about the email transmission (internal / external, date, time) are inserted.
-
Starts on: The date or time is updated (15 minutes before Ends on).
-
Ends on: Date and time you sent the email.
-
Type: MAILAUS.
-
Status: E (Completed).
-
Priority: Only after changing the Groupware system and only if 'A' (= 'importance: high'), 'B' (= normal) or 'C' (= 'importance: low') was entered.
-
Sending Date: Date and time you sent the email.
-
The external mails are locked in the CRM system after they have been sent. This is technically correct because external mails have the character of documents that may not be changed unilaterally after the exchange between business partners.
The functions Send external mail and Reply are therefore not selectable for read-only mails in the menu.
Forward e-mail
To forward a mail, click Forward mail. Alternatively, use the shortcuts CTRL + ↑ + L .
Attachments to an e-mail
When generating an e-mail in the Groupware system, all documents linked to the activity (single letters and application files) are added to the e-mail as attachments. If you add further attachments or remove attachments in the Groupware system, these changes are automatically carried out during the activity. Attached documents from the file system are imported into the CRM and linked to the activity.
If an email with attachment is sent, the attached files in the format doc, docx, odt and txt can be converted to pdf format. Alternatively, you can also attach the documents in the original format. PDF-files generated that way are automatically linked with the mail activity.
Before sending, the documents can be viewed directly in the mail dialog.
If an attempt is made to send documents that have been borrowed, locked or archived, a context-sensitive notification message with actions is displayed. This is to prevent activities to which documents are attached and which have been borrowed, locked or archived from being resent as mail by mistake. This is to ensure that documents are always sent with the most current status.
The attachments can be converted for both internal and external mails. It is also possible to switch off the conversion. For this you configure the desired option in the user preferences Convert email attachments to PDF.
Documents that are assigned to the activity are not automatically added as attachments in a mail reply.
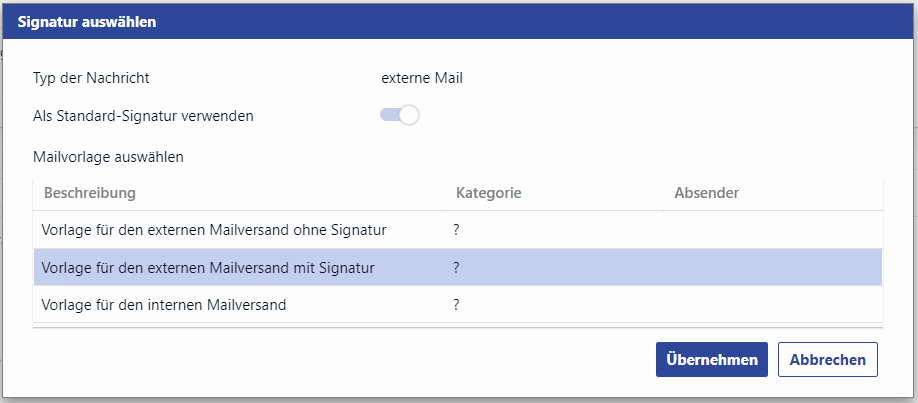
Selecting a signature
On the one hand, you can adapt the signature to the current event and, on the other hand, use a fixed default design. With a click on the menu item Individual e-mail signature you can open the dialog to select a signature.
As standard you are provided the type external mail you can change through the selection menu. In case of a long list you use - as usually - the filter function through the column header. Mark the selected signature and click Send mail. Additionally you can freely define your standard signature for each message type. To do so, activate the checkbox Use as standard signature on the marked signature.
Mail dispatch under an individual signature
-
When sending an e-mail under an alternative e-mail configuration via the individual signature, the user name from the e-mail configuration used for sending is preassigned
-
The flag "Save password" is visible and active if the logged-in user has the permission to change the password in the e-mail configuration
-
The dialog text is:
“Please enter the username and password (usually corresponds to the network login).”
Editing an email on a touch device
On touch devices, an additional button is shown when sending an email, if the HTML editor is enabled. It is not possible to edit an email in HTML mode. For editing, the content must be converted from the HTML format to the PLAIN text format (pure text).
If the button is clicked, you are informed that all HTML formatting (font color, size, numbering, enumeration, etc.) will be lost. Only unformatted text remains.
If the HTML text contains other formatting than line breaks and paragraphs, you are asked again if you really want to perform the formatting.