![]()
Basics
With the Groupware-Integration, you can create, import and answer e-mails in CURSOR-CRM. The e-mail is created as an activity.
There are two methods for integrating the Groupware system:
-
The client-sided Groupware integration (Microsoft Outlook only) and
-
the server-sided Groupware integration (all Groupware systems).
The client-sided connection synchronizes Outlook data with your local computer. The server-sided connection synchronizes directly with the Groupware server. Depending on the method, there are differences in the handling in CURSOR-CRM. These are marked with the following notes:
-
ClientMail (client-sided integration)
-
ServerMail (server-sided integration)
Creating an external e-mail
The external mails are locked in the CRM system after they have been sent. This is technically correct because external mails have the character of documents that may not be changed unilaterally after the exchange between business partners.
The functions Send external mail and Reply are therefore not selectable for read-only mails in the menu.
This is how you create an external e-mail (ClientMail)
-
Create an activity.
-
Assign the contact persons to the activity, who are the recipients of the email.
-
If required, assign those employees to the activity who also are supposed to be recipient of the e-mail.
-
Attach a single letter or any other documents to the activity you want to have attached.
-
Save the activity.
-
Click

-
The e-mail is created in the groupware system. You can edit the e-mail, if required. Send the e-mail in the groupware system.
By sending the e-mail the entries of the following fields of the activity are automatically updated:
-
-
Description: Title, signature and information about the email transmission (internal / external, date, time) are inserted.
-
Starts on: The date or time is updated (15 minutes before Ends on).
-
Ends on: Date and time you sent the email.
-
Type: MAILAUS.
-
Status: E (Completed).
-
Priority: Only after changing the Groupware system and only if A (= 'importance: high'), 'B' (= normal) or C (= 'importance: low') was entered.
-
Sending Date: Date and time you sent the email.
-
If one of the addressees has no e-mail address, you will be getting an information correspondingly.
This is how you create an external e-mail (ServerMail)
-
Create an activity.
-
Assign the contact persons to the activity, who are the recipients of the email.
-
If required, assign those employees to the activity who also are supposed to be recipient of the e-mail.
-
You can now attach a single letter or any other documents from CURSOR-CRM to the activity you want to have attached, or attach it later on to the e-mail right in the window E-mail dispatch.
-
Save the activity.
-
Click
-
The e-mail is displayed in E-mail dispatch. You can edit the e-mail, if required. For sending the email click
By sending the e-mail the entries of the following fields of the activity are automatically updated:
-
-
Description: Title, signature and information about the email transmission (internal / external, date, time) are inserted.
-
Starts on: The date or time is updated (15 minutes before Ends on).
-
Ends on: Date and time you sent the email.
-
Type: MAILAUS.
-
Status: E (Completed).
-
Priority: Only after changing the Groupware system and only if 'A' (= 'importance: high'), 'B' (= normal) or 'C' (= 'importance: low') was entered.
-
Sending Date: Date and time you sent the email.
-
Selecting the sender address for server-side mail delivery
The administrator can store several mail configurations for one user. When sending an email via the CRM system, the user can select from several sender addresses if several mail configurations have been stored for him.
The selection of the email dispatch address was linked to the signature. The user can already select these individually today before sending the mail. An additional field Sender address is offered there. If this is filled, then the transmission is carried out with this send address.
A mail configuration can be assigned in the document template. The selection is controlled by the authorizations in the document template.

Figure: Sending a mail with a selectable sender address
Creating an internal e-mail
This is how you create an internal e-mail (ClientMail)
-
Create an activity.
-
Assign those contact persons to the activity who also are supposed to be recipient of the e-mail.
-
Attach a single letter or any other documents to the activity you want to have attached.
-
Save the activity.
-
Select

-
The e-mail is created in the groupware system. You can edit the e-mail, if required. Send the e-mail in the groupware system.
This is how you create an internal e-mail (ServerMail)
-
Create an activity.
-
Assign those contact persons to the activity who also are supposed to be recipient of the e-mail.
-
If required, attach a single letter or any other documents from CURSOR-CRM you want to send, or attach it later on to the e-mail right in the window E-mail dispatch.
-
Save the activity.
-
Select
-
The e-mail is displayed in E-mail dispatch. You can edit the e-mail, if required. For sending the email click
Attachments to an e-mail
Reply mail
When the email is generated in the Groupware system, the documents (single letters and application files) that are linked to the activity are attached to the email as attachments. If you add further attachments or remove attachments in the Groupware system, these changes are automatically carried out during the activity.
With the server-side Groupware connection, it is also possible to attach a document from CRM in the email editing window (button Add document ... / Add document from CRM ).
If an e-mail is sent with attachment, the attached files in format doc, docx, odt and txt can be converted to pdf-format. Alternatively, you can also attach the documents in the original format. PDF-files generated that way are automatically linked with the mail activity.
The attachments can be converted for both internal and external mails. It is also possible to switch off the conversion. For this you configure the desired option in the user preferences Convert email attachments to PDF.
Hints for the conversion of Excel documents
Only the print area of each visible page is generated. If no individual print area is defined, the default print area of a page is used. You now have two options for editing Excel documents before PDF conversion:
-
Define a print area for all worksheets of an Excel document (or even just an empty cell). In the generated PDF document, however, one page per print area is added, which may then also be empty.
-
You hide all worksheets that are not to be included in the PDF document.
Send reply with documents
Alternatively, the option Send reply with documents can be selected via the Split button Email to be able to select any documents from the CRM.
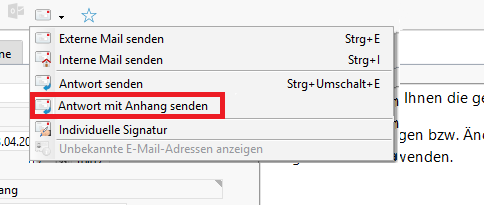
Figure: Menu entry "Send reply with documents”
By clicking on this entry, the Merger dialog opens, in which the user can start a document search and select any number of entries. After confirming the selection with OK, Outlook opens with the prepared email.
Documents assigned to the activity are not automatically added as attachments,
The sent email is created as an activity linked to the outgoing email. The attachments are linked to the new activity. If additional documents have been added via Outlook or attachments already added by the CRM have been removed, only those documents are linked to the activity that were sent with Outlook.
Contents of the e-mail in Microsoft Outlook (ClientMail)
Subject and text are adopted from the activity. In an internal e-mail, the Main contact person, the Main opportunity and the Main project are also added to the text / subject. The first two information from the previously mentioned fields are put in first position to the subject. Additional information are put in first position to the text. The information are displayed in square brackets.
Salutations are automatically generated and adopted from the Salutations of the respective contact person. The addressees (not CC or BCC) are greeted personally, one after another (women first to men).
A signature is automatically added to the end of the e-mail text.
Editing an e-mail in Microsoft Outlook (ClientMail)
Changes to subject and text which are done in the Groupware system are adapted to the activity. This also goes for attachments you add / remove to / from the e-mail.
Importing an e-mail
You import an email by running an Activity synchronization with the Groupware system.
When opening the main window Activities, you are informed whether there are new e-mails, tasks or calendar entries in the Groupware system (user preferences Automatic activity import). You can import those directly via Activity synchronization.
You can also manually import an e-mail from Outlook via drag&drop. If an email from Outlook is dropped on a business partner using drag and drop, the default contact person of the business partner and the business partner dataset itself are linked to the mail activity created. If further, unique contact persons can be identified on the basis of the email address, these are additionally linked to the MAIL activity.
In case of a manual import, grouped e-mails cannot be imported in one process. The e-mails need to be imported individually.
Answering an e-mail
This is how you reply to an e-mail (ClientMail)
-
Invoke the activity to the e-mail you want to reply to in form view of the main window activities.
-
In the menu of the button

-
An e-mail is created in Outlook. The sender of the original e-mail is entered as recipient.
CURSOR-CRM recognizes the original sender by the relational type SENDER who is entered to the corresponding activity.
If you as writer of the reply e-mail are not entered in Delegated to and Delegated by, this employee or those employees entered there are additionally enclosed as Recipient (Delegated to) respectively in "CC" (Delegated by) into the reply e-mail. -
Edit the e-mail and send it.
-
In CURSOR-CRM a new activity is created to the reply a-mail. It is a copy of the original activity and differs in the following:
-
-
Subject: RE:" is added to the subject text (= reply).
-
Description: The text as reply e-mail.
-
Starts on: Current date and time.
-
Ends on: Current date and time.
-
Type: Is set to MAILOUT.
-
Status: Is set O (open).
-
Delegated to: You will be entered here.
Complete or change the entries to the activity (e.g. result) and save them.
-
How to reply to an e-mail (ServerMail)
-
Invoke the activity to the e-mail you want to reply to in form view of the main window activities.
-
In the menu of the button
-
The e-mail is displayed in E-mail dispatch. The sender of the original e-mail is entered as recipient.
CURSOR-CRM recognizes the original sender by the relational type SENDER who is entered to the corresponding activity.
If you as writer of the reply e-mail are not entered in Delegated to and Delegated by, this employee or those employees entered there are additionally enclosed as Recipient (Delegated to) respectively in "CC" (Delegated by) into the reply e-mail. -
Edit the e-mail and send it.
-
In CURSOR-CRM a new activity is created to the reply a-mail. It is a copy of the original activity and differs in the following:
-
Subject: RE:" is added to the subject text (= reply).
-
Description: The text as reply e-mail.
-
Starts on: Current date and time.
-
Ends on: Current date and time.
-
Type: Is set to MAILOUT.
-
Status: Is set O (open).
-
Delegated to: You will be entered here.
Complete or change the entries to the activity (e.g. result) and save them.
Original e-mail as attachment to the activity (ClientMail)
Original e-mail as attachment to the activity (ClientMail) The original e-mail (msg-file) from Outlook is saved to an activity, thus giving you access directly from the activity to the original e-mail. The original e-mail may contain formats and screenshots, which are not adapted to the activity.
To open the original email just invoke the activity and click ![]()
Saving the original e-mail (e.g. msg file from Outlook) must be set in the system.
Forward e-mail
To forward a mail, click on ![]()


If an email is forwarded to an employee, contact person or business partner in CRM, the activity generated is blocked.
Send meeting inquiry
The meeting inquiry can be sent from an activity with the type BESPRECHUNG (CONFERENCE). Clicking the menu item ![]()
The activity gets write-protected after saving and cannot be changed any more. Changes can only be made through the meeting inquiry in Outlook. If a change has been made on the appointment/meeting request in Outlook, it is transferred with the following activity synchronization into CURSOR-CRM. If the automatic (server-sided) synchronization activated, the activity is also updated here.
Selecting signatures
You have the option to adapt the signature to the current occasion and use a pre-set design. Clicking the menu item ![]()
As standard you are provided the type external mail you can change through the selection menu. In case of a long list you use - as usually - the filter function through the column header. Mark the selected signature and click Send mail. Additionally you can freely define your standard signature for each message type. To do so, activate the checkbox Use as standard signature on the marked signature.
Unknown Attachment
Figure: Signature selection in the mail dialog
Configurable e-mail import
When importing e-mails (via import folder) it is possible to automatically implement specific allocations. With that, you do not need to manually edit imported mails later.
To import e-mails you need to do two configuration steps:
-
Create several import folders in Outlook with the following structure: Import Folder | <Ordner aus Vorlage>
-
Create a new activity. Mark this one now as template and enter the name of the import folder.
After importing a mail, (by definition) an activity with Delegated to = <User, der den Import durchgeführt hat> and Subject = <Name des Importordners> is searched for. If the search finds exactly 1 activity, all fields not empty and links to imported e-mails are transferred from the template.
You can create as many activities for import Outlook and templates as you wish.
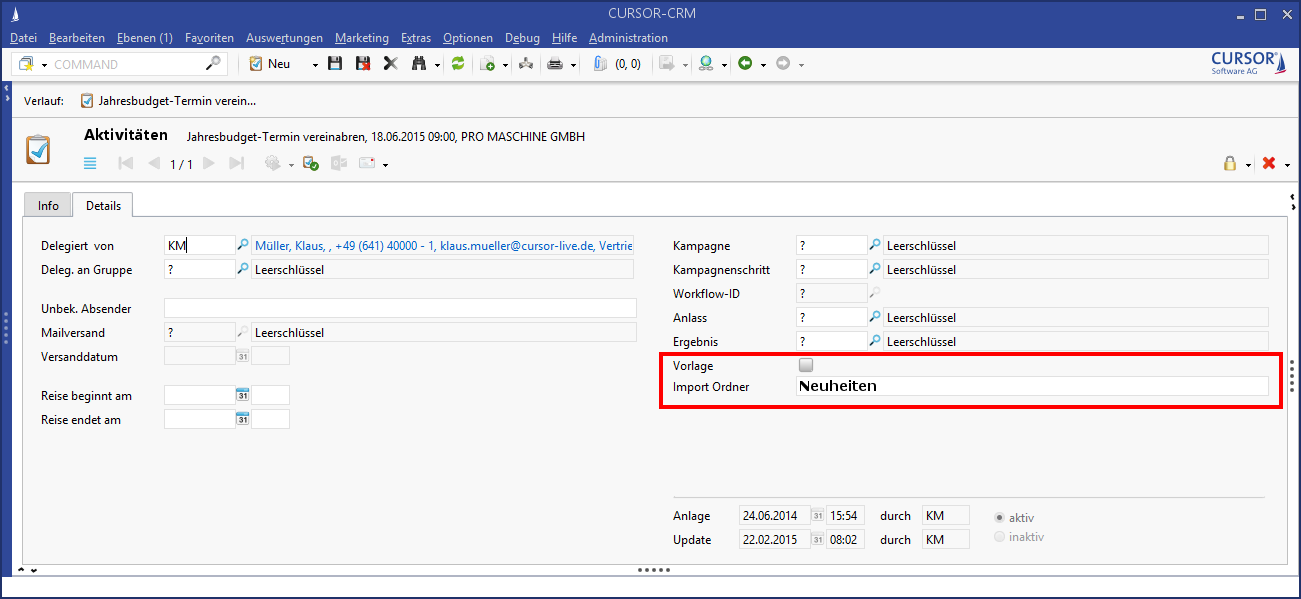
Figure: New fields on activity mask and Outlook configuration